
CodeIgniter Controllers, Views Routing: Learn with Example
 Editorial Team
⚡ Smart Summary
This CodeIgniter example builds a small application to show how routing, controllers, and views work together. A new project is created with Composer, routes map URLs to controller methods, and each method loads a view that returns HTML to the browser.
In this tutorial, you are going to learn the following topics:
- Routing – routing is responsible for responding to URL requests. Routing matches the URL to the pre-defined routes. If no route match is found, CodeIgniter throws a page-not-found exception.
- Controllers – routes are linked to controllers. Controllers glue the models and views together. They request data and business logic from the model and return the results in the presentation of the view. Once a URL has been matched to a route, it is forwarded to a controller’s public function. This function interacts with the data source and business logic and returns the view that displays the results.
- Views – views are responsible for presentation. A view is usually a combination of HTML, CSS, and JavaScript. This part is responsible for displaying the web page to the user. Typically, the data displayed is retrieved from the database or another available data source.
How to Create a New CodeIgniter Project
We will use Composer to create a new project. We will use the PHP built-in server, so it is not necessary to have extra software such as Apache. In this tutorial, we use the Windows operating system, so we have created a Sites folder on drive C. You can use any directory suitable for you.
Open the command line or terminal and run the following command:
cd C:\Sites
We will now create a CodeIgniter project using Composer. Run the following command:
composer create-project CodeIgniter/framework ci-app
Here:
- The command above creates a new CodeIgniter project version 3, using the latest stable release (3.1.9 at the time of writing), into a directory called ci-app.
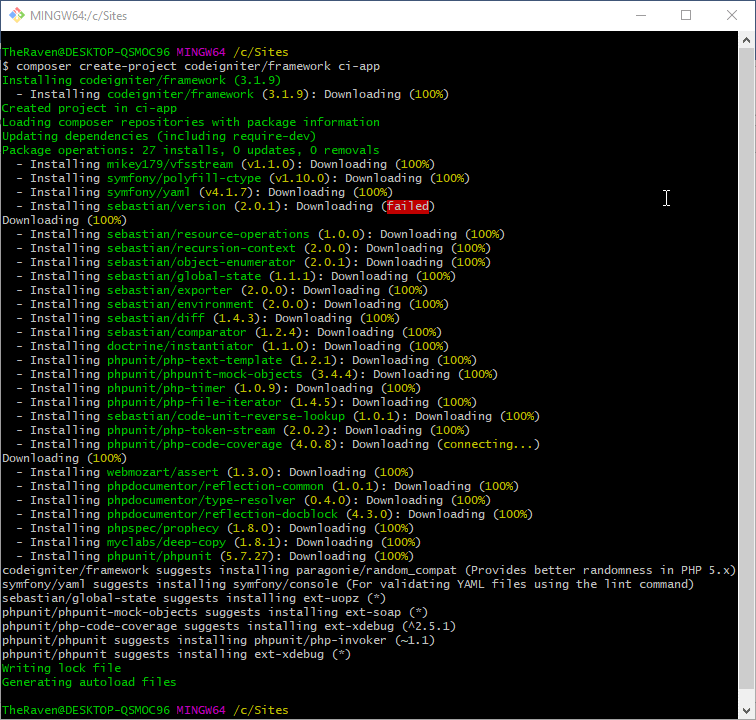
When the command has finished running, you should see results similar to the following in the terminal:
Run the following command to browse to the newly created project directory ci-app:
cd ci-app
Now start the PHP built-in web server:
php -S localhost:3000
Here:
- The command above starts the built-in PHP server running on port 3000.
Open the web browser and browse to the following URL: http://localhost:3000/. You will get the following page:
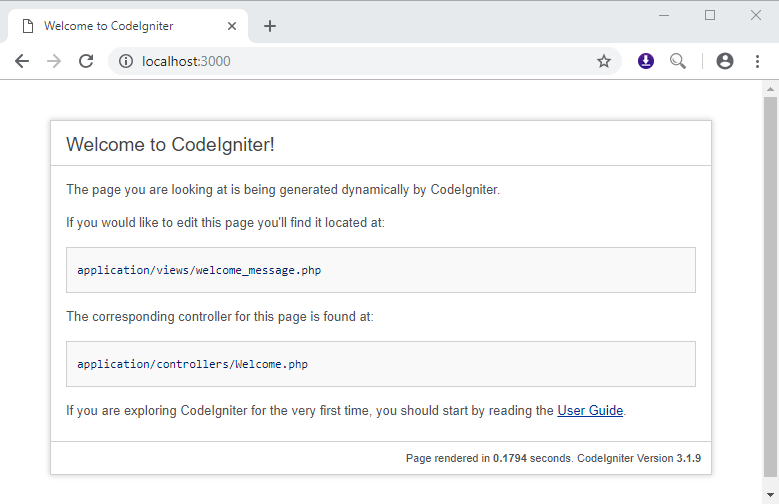
If you can see the page above, congratulations, you have successfully installed CodeIgniter. The page is rendered by the view located in application/views/welcome_message.php, and the responsible controller is located in application/controllers/Welcome.php.
CodeIgniter Routing
For now, our application has only a single URL, which is the home page. In this section, we will customize the home section and create some new URLs that respond to different requests.
Let us start with the home page route. Open the routes file at the path below:
application/config/routes.php
You should see the following content:
$route['default_controller'] = 'welcome';
$route['404_override'] = '';
$route['translate_uri_dashes'] = FALSE;
Here:
- $route[‘default_controller’] = ‘welcome’; defines the default controller that responds to URI requests.
- $route[‘404_override’] = ”; allows you to define a custom route for 404 errors. A 404 error occurs when a page is not found. CodeIgniter has a default handler for the error, but you can define your own if you wish.
- $route[‘translate_uri_dashes’] = FALSE; allows you to translate dashes to underscores. We will discuss this option when we look at how routes work in CodeIgniter.
Let us now look at the controller method responsible for displaying the home page we saw when we opened http://localhost:3000/. Open the following file:
application/controllers/Welcome.php
You should see the following code:
<?php
defined('BASEPATH') OR exit('No direct script access allowed');

class Welcome extends CI_Controller {

public function index()
{
$this->load->view('welcome_message');
}
}
Here:
- defined(‘BASEPATH’) OR exit(‘No direct script access allowed’); protects against directly accessing the controller class without passing through the index.php file. In the MVC paradigm, all requests have a single entry point, which for CodeIgniter is index.php. This code blocks all requests that do not come through index.php.
- class Welcome extends CI_Controller {…} defines a class Welcome that extends the parent class CI_Controller.
- public function index() defines a public function that is called by default when you open the home page.
- $this->load->view(‘welcome_message’); loads the view welcome_message, located in application/views/welcome_message.php.
So far we have only explored what comes out of the box with CodeIgniter. Let us now make some changes. We will create our own home page and replace the default page. Create a new file at application/views/home.php and add the following code:
<!DOCTYPE html>
<html>
<head>
<meta charset="utf-8">
<meta name="viewport" content="width=device-width, initial-scale=1">
<title>Hello CodeIgniter!</title>
<link rel="stylesheet" href="https://cdnjs.cloudflare.com/ajax/libs/bulma/0.7.2/css/bulma.min.css">
<script defer src="https://use.fontawesome.com/releases/v5.3.1/js/all.js"></script>
</head>
<body>
<section class="section">
<div class="container">
<h1 class="title">
CodeIgniter Hello World
</h1>
</div>
</section>
</body>
</html>
Here: the HTML code above loads the Bulma CSS framework and Font Awesome from a CDN and creates a very basic HTML document. It applies a simple CSS rule from the Bulma CSS framework.
Open the following URL in your browser: http://localhost:3000/. You should see the following:

Great, we have successfully modified the home page. Moving on, let us define our route. Assume our application also needs to show an about-us page.
Create a Route
Open the routes file application/config/routes.php and add the following route:
$route['about-us'] = 'welcome/about_us';
Here:
- When a visitor visits the URL /about-us, we instruct CodeIgniter to look for a controller Welcome and execute the method about_us.
Create a Controller
Let us now define the controller method about_us. Open application/controllers/Welcome.php and add the following method:
public function about_us(){
$this->load->view('about_us');
}
Here:
- The code above defines a function about_us and loads a view about_us.
Create a View
Let us now create the view we just referenced. Create a new file about_us.php in application/views/about_us.php and add the following code:
<!DOCTYPE html>
<html>
<head>
<meta charset="utf-8">
<meta name="viewport" content="width=device-width, initial-scale=1">
<title>About CodeIgniter!</title>
<link rel="stylesheet" href="https://cdnjs.cloudflare.com/ajax/libs/bulma/0.7.2/css/bulma.min.css">
<script defer src="https://use.fontawesome.com/releases/v5.3.1/js/all.js"></script>
</head>
<body>
<section class="section">
<div class="container">
<h1 class="title">
About us yap...
</h1>
</div>
</section>
</body>
</html>
We are good to go. Open the following URL in your web browser: http://localhost:3000/index.php/about-us. You will see the following page:
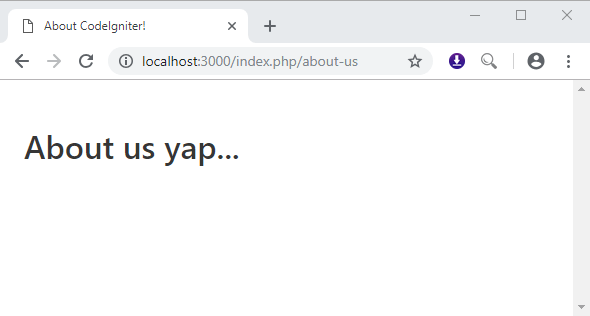
If you can see the page above, congratulations, you have successfully created a simple application in CodeIgniter.
