
C# Hello World: First Console Application Program
 Editorial Team
⚡ Smart Summary
C# Hello World is the classic first console application that introduces the language’s core building blocks, including using directives, a namespace, a class, and the Main method, while printing a simple message to the Windows command prompt.
C# is one of the languages provided by Microsoft to work with .NET. This language encompasses a rich set of features, which allows developing different types of applications.
C# is an object-oriented programming language and resembles several aspects of C++. In this tutorial, we see how to develop our first application.
This will be a basic console application. We will then explore the different data types available in the C# language, as well as the control flow statements.
Building the First Console Application
A console application is an application that can be run in the command prompt in Windows. For any beginner on .NET, building a console application is ideally the first step to begin with.
In our example, we are going to use Visual Studio to create a console type project. Next, we are going to use the console application to display a message “Hello World”. We will then see how to build and run the console application.
Let us follow the below-mentioned steps to get this example in place.
Step 1) The first step involves the creation of a new project in Visual Studio. For that, once Visual Studio is launched, you need to choose the menu option New->Project.

Step 2) The next step is to choose the project type as a Console application. Here, we also need to mention the name and location of our project.

- In the project dialog box, we can see various options for creating different types of projects in Visual Studio. Click the Windows option on the left-hand side.
- When we click the Windows options in the previous step, we will be able to see an option for Console Application. Click this option.
- We then give a name for the application, which in our case is DemoApplication. We also need to provide a location to store our application.
- Finally, we click the ‘OK’ button to let Visual Studio create our project.
If the above steps are followed, you will get the below output in Visual Studio.
Output:-

- A project called ‘DemoApplication’ will be created in Visual Studio. This project will contain all the necessary artifacts required to run the Console application.
- The Main program called Program.cs is the default code file which is created when a new application is created in Visual Studio. This code will contain the necessary code for our console application.
Step 3) Now let us write our code which will be used to display the string “Hello World” in the console application.
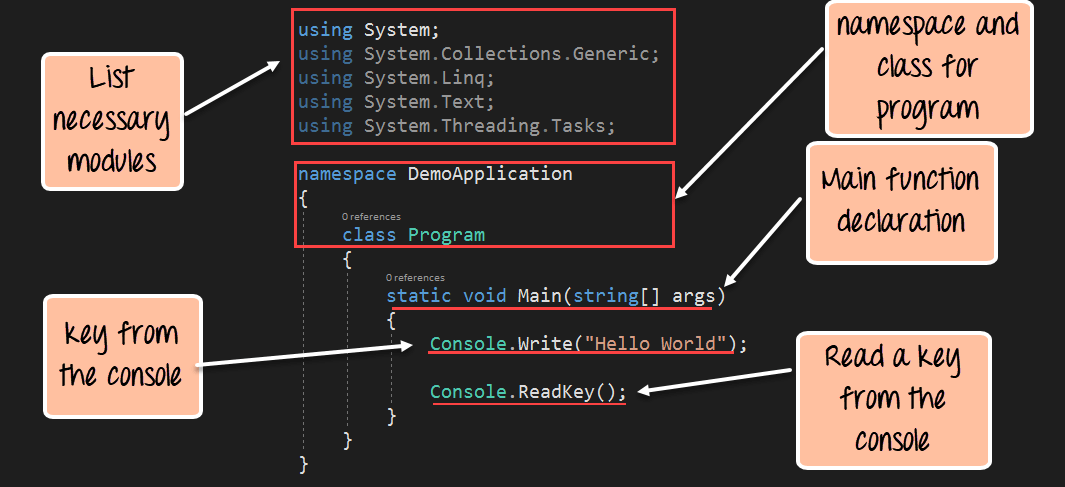
All the below code needs to be entered into the Program.cs file. The code will be used to write “Hello World” when the console application runs.
C# Hello World Program
using System;
using System.Collections.Generic;
using System.Linq;
using System.Text;
using System.Threading.Tasks;
namespace DemoApplication
{
 class Program
 {
  static void Main(string[] args)
  {
   Console.Write("Hello World");

   Console.ReadKey();
  }
 }
}
Code Explanation:-
- The first lines of code are default lines entered by Visual Studio. The ‘using’ statement is used to import existing .NET modules in our console application. These modules are required for any .NET application to run properly. They contain the bare minimum code to make a code work on a Windows machine.
- Every application belongs to a class. C# is an object-oriented language, and hence, all code needs to be defined in a self-sustaining module called a ‘Class.’ In turn, every class belongs to a namespace. A namespace is just a logical grouping of classes.
- The Main function is a special function which is automatically called when a console application runs. Here you need to ensure to enter the code required to display the required string in the console application.
- The Console class is available in .NET which allows one to work with console applications. Here we are using an inbuilt method called ‘Write’ to write the string “Hello World” in the console.
- We then use the Console.ReadKey() method to read any key from the console. By entering this line of code, the program will wait and not exit immediately. The program will wait for the user to enter any key before finally exiting. If you do not include this statement in code, the program will exit as soon as it is run.
Step 4) Run your .NET program. To run any program, you need to click the Start button in Visual Studio.

If the above code is entered properly and the program is executed successfully, the following output will be displayed.
Output:

From the output, you can clearly see that the string “Hello World” is displayed properly. This is because the Console.Write statement causes this string to be sent to the console.
Anatomy of the C# Hello World Program
Every C# console program is built from a small set of predictable parts. Recognizing them makes the Hello World example easy to read and to extend.
- using directives: Lines such as using System; import ready-made .NET namespaces so their classes can be used without writing the full path. Without using System, the code would need System.Console instead of Console.
- namespace: A namespace is a logical container that groups related classes and prevents naming clashes. In the example, DemoApplication is the namespace.
- class: Every line of executable C# lives inside a class. The template creates a class named Program to hold the program logic.
- Main method: Main is the entry point of the application. Execution starts here automatically, and a program may define only one entry point.
- static and void: The static keyword lets Main run without creating an object of the class, and void means the method returns no value.
Together, these parts turn a few lines of text into a runnable Windows application.
Console.Write vs Console.WriteLine in C#
The Hello World example uses Console.Write, but most C# programs also use Console.WriteLine. Both methods send text to the console, and the difference is what happens after the text is printed.
- Console.Write: Prints the supplied value exactly and leaves the cursor on the same line, so two consecutive Write calls place their output side by side.
- Console.WriteLine: Prints the value and then appends a line break, so the next output starts on a fresh line.
For example, Console.Write(“Hello “) followed by Console.Write(“World”) prints Hello World on one line, whereas two WriteLine calls would print each word on its own line. WriteLine is the more common choice for readable, line-by-line output, while Write is useful when building a single line piece by piece, such as printing a prompt before reading user input. Both methods live in the Console class inside the System namespace.
How to Run a C# Console Application Using the .NET CLI
Visual Studio is not the only way to build and run a C# program. The cross-platform .NET CLI (command-line interface), included with the .NET SDK, compiles and runs console applications on Windows, Linux, and macOS without an IDE. This is handy for quick experiments, automation, and lightweight setups such as Visual Studio Code.
Follow these steps to create and run a Hello World program from the terminal:
- Install the .NET SDK: Download and install the SDK from the official .NET website, then confirm it works by running dotnet –version.
- Create a project: Run dotnet new console -o DemoApplication. This creates a folder with a project file and a Program.cs that already prints a message.
- Move into the folder: Run cd DemoApplication so the CLI commands act on the new project.
- Run the program: Run dotnet run. The CLI restores dependencies, compiles the code, and executes it, printing the output to the terminal.
- Build without running: Run dotnet build when you only want to compile and produce the executable in the bin folder.
Modern project templates use top-level statements, so a new Program.cs may contain a single line, Console.WriteLine(“Hello, World!”), without an explicit class or Main method. The compiler generates them behind the scenes, which keeps small programs short. As a project grows, you can still add classes, namespaces, and an explicit Main method exactly as shown earlier. Because the same commands work on every supported operating system, the .NET CLI is the most portable way to run C# code.
