
Android Debug Bridge (ADB) Connect to Device over USB, WiFi
 Editorial Team
⚡ Smart Summary
Android Debug Bridge connects a workstation to an emulator or a physical handset, opening a shell, installing builds and exposing the device to automation tools over either a USB cable or a wireless link.
What is Android Debug Bridge (ADB)?
Android Debug Bridge (ADB) is a command-line tool that lets you communicate with a device. It bridges an emulator instance (Android device) and the background daemon process (server), so you can install builds, debug a device and run commands through a Unix shell.
Using a real device for mobile automation testing has always been a challenge. Android offers solutions to connect one over USB (Universal Serial Bus) — namely Android Debug Bridge.
USB debugging and ADB Configuration
Appium can execute tests on real devices, but the following pre-requisites must be set up first.
- USB debugging should be enabled
- ADB configuration
- Desired capability setup as per the hardware changes.
We will cover both an emulator and a real device. The emulator steps come first.
How to Connect to an Emulator
Pre-requisite: the SDK (Software Development Kit) should be installed on the machine. ADB in Android is packaged with Google’s Android SDK.
Steps to enable ADB from SDK Manager.
Step 1) Open Android SDK folder
Step 2) Double click on SDK Manager
Step 3) From the list of all packages select Tools and mark the checkbox for
- Android SDK Tools and
- Android SDK Platform-tools.
The SDK Manager package list with both entries ticked is shown below.

⚠️ Version note: the standalone SDK Manager above was deprecated in SDK Tools 25.2.3 and its launcher removed in 25.3.0. Open the same package list from Android Studio (Tools > SDK Manager) or the sdkmanager CLI. The package is still Android SDK Platform-tools, which contains adb.
How to Connect Android Device with ADB (Android Debug Bridge)
Step 1) Enable USB Debugging on your device
Enable the USB debugging option from ‘Developer Option’ on the Android phone, then connect the device to the computer with a USB cable, as shown here.

Step 2) Go to the Android SDK folder
Open the folder where the Android SDK files were saved, ‘Android SDK >> Platform-tools’ — for example C:\android-sdk\platform-tools, shown below.

Step 3) Open the Command window
Inside the folder, hold Shift and use the right-click menu >> select ‘Open command window here’, shown below. You can also reach the folder path from the Run command.

The command prompt then opens already pointed at the platform-tools folder.

Step 4) Connect an external Android device
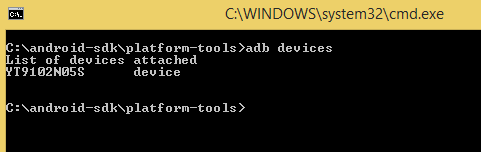
Connect an external Android device (mobile phone) with its USB cable. Then, in the command prompt above, type:
'adb devices' & press Enter
It will display a list of all the connected devices, as shown below.
First check whether the ADB server is running as a background process: type ‘adb’ in the same command prompt and press enter. It should list the adb processes running.
When the server starts it binds local TCP port 5037. All ADB clients use port 5037 to reach the server, which then scans ports to find every connected emulator or device instance.
The ADB daemon runs on an odd-numbered port and the matching emulator console takes the even-numbered port beside it. Android’s ADB documentation puts the scanned range at odd ports 5555 to 5585, covering the first 16 emulators.
If a single device is connected, the server finds and connects to it automatically. With several devices or emulators running, you must name the target on the command line. The instance on odd port 5557 has its console on even port 5556 — one odd and one even port each.
emulator 1: console 5556
emulator 1: adb 5557
emulator 2: console 5554
emulator 2: adb 5555
Command to detect all connected devices:
<$ adb devices>
emulator-5554 device
emulator-5556 device
emulator-5558 device
Command detecting a single device from multiple connected devices:
<$ adb -s emulator-5554 install Guru99.apk>
It targets the adb connection for device 5554 and installs the application — this is how you address a single ADB instance from the command line.
Syntax used to access ADB instances from the command line:
adb -d — An adb command when a single USB device is connected
adb -e — An adb command when only a single emulator is running
adb devices — This will print the list of emulators / devices attached.
adb version — List the adb version number.
adb help — Print the list of supported commands.
How to Configure ADB for Wi-Fi Support
ADB can also be configured over Wi-Fi, which frees the handset from the cable during a long Appium run.
Pre-requisite
- Both the Android device and the host computer should be connected to the same wireless network, and
- the device Bluetooth option should be disabled.
Steps to connect:
- Connect the device using a USB cable to the host computer. Confirm USB debugging is enabled on the device.
- Set the target device to listen for a TCP/IP connection on port 5555.
$ adb tcpip 5555
The command prompt confirms the switch to TCP/IP mode, as shown below.

- Now disconnect the USB cable from the device.
- On the device, find the IP address under Settings >> Wi-Fi Setting >> Advanced >> IP Address. Connect to it, then confirm the session.
$ adb connect 148.100.1.17:5555
$ adb devices
List of devices attached
148.100.1.17:5555 device
The configuration is now complete and ‘adb’ is working over the wireless network.
⚠️ Version note: the cable-first sequence above remains the only route on Android 10 and lower. Android 11 (API 30) and higher add Wireless debugging: enable it in Developer Options, choose Pair using pairing code, then run adb pair ipaddr:port and enter the code. No cable needed.
NOTE: if a connection error occurs, kill the adb host connection below, then reconnect from step one.
$ adb kill-server
If you are looking for an emulator, see this list of the best Android emulators for Windows.
