
Android App Testing Tutorial with Automation Framework
 Thomas Hamilton
⚡ Smart Summary
Android app testing verifies a build across a fragmented device landscape, combining unit, integration, operational and system checks with automation frameworks that run either on a device or directly on the JVM.

Why Android Testing?
Android is the largest operating system in the world. At the same time, Android is fragmented: there are tons of devices and Android versions that your app must be compatible with.
It does not matter how much time you invest in design and implementation, mistakes are inevitable, and bugs will appear.
Android Testing Strategy
A correct Android testing strategy should include the following
- Unit Test
- Integration Test
- Operational Test
- System Test
Unit tests
Unit Tests are sets of programs designed to verify an atomic unit of source code, such as a method or a class.
The Android platform comes pre-integrated with the JUnit 3.0 framework. It is an open source framework for automating Unit Testing, and it lets developers write effective unit test programs.
An addition to Unit Testing is User Interface (UI) tests. They cover the UI components of your target application and ensure it returns the correct output for a sequence of user actions on the device.

The common way to perform UI tests on a device is Android Instrumentation. But this has performance issues. One of the best tools to conduct UI testing on Android is Robotium.
⚠️ Version note: JUnit 3 classes such as InstrumentationTestCase were deprecated at API 24; current projects use AndroidX Test, Espresso and UI Automator. Robotium has had no release since 2016.
Integration tests
In Integration Testing, all unit tested modules are combined and verified. In Android this often means checking integration with components such as Service, Activity and Content Provider testing.
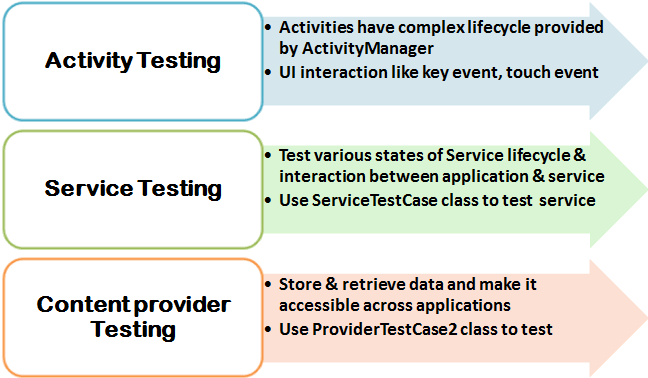
Many testing frameworks are used to conduct integration tests for Android, such as Troyd, Robolectric and Robotium.
Operational tests
Operational tests, also called Functional or Acceptance Tests, are high level tests that check the completeness and correctness of the application.
In Android, FitNesse is an open-source framework that makes operational tests easy to run against the target application.
System tests
In System Testing the system is tested as a whole and the interaction between the components, software and hardware is checked.
In Android, System Testing normally includes
- GUI tests
- Usability tests
- Performance tests
- Stress tests
In the above list, Performance Testing is given more focus. You can use tools like Traceview to conduct performance tests on Android. This tool can help you debug your application and profile its performance. Traceview is now deprecated in favour of the CPU Profiler.
Automated Android Testing
As Android is fragmented, testing on many devices is necessary, and that costs money. Automated Android Testing helps reduce those costs.
Benefits of automated Android testing
- Reduce time for executing test cases
- Increase productivity of your development process
- Early bug detection, save cost on software maintenance
- Quickly found and fix the bugs on implementation
- Ensure the quality of software
We will study the following 2 frameworks
- Android Testing framework
- Robolectric Testing framework
Android testing framework
One of the standard testing frameworks for Android applications is the Android testing framework. It is well integrated with the Android SDK tools, and its architecture has three parts.
- Application package is your target application which needs to be tested.
- InstrumentationTestRunner is the Test Case runner that executes test cases on the target application. It includes:
- Test tools: SDK tools for building tests. They are integrated in the IDE or run from the command line.
- MonkeyRunner: A tool that provides APIs for writing programs which control an Android device or emulator outside of Android code.
- Test package is organized into test projects and follows a naming convention. If the application under test has a package name of “com.mydomain.myapp” then the Test package should be “com.mydomain.myapp.test”. The Test package includes 2 objects:
- Test case classes: include test methods to be executed on the target application.
- Mock objects: include mock data that will be used as sample input for test cases.
Android Test Case Classes

- TestCase includes JUnit methods to run JUnit test
- TestSuite is used to run set of test cases
- InstrumentationTestSuite is a TestSuite that injects Instrumentation into InstrumentationTestCase before running them.
- InstrumentationTestRunner runs test cases on the target application.
- AndroidTestCase extends JUnit TestCase with methods for accessing resources like Activity Context.
- ApplicationTestCase verifies the Application classes in a controlled environment.
- InstrumentationTestCase verifies a particular feature or behavior, for example the UI output of the application.
- ActivityTestCase is base class that supports testing the Application Activities.
- ProviderTestCase is class for testing single ContentProvider.
- ServiceTestCase tests Service classes in a testing environment and supports the Service life cycle.
- SingleLaunchActivityTestCase is used to test single Activity with an InstrumentationTestCase.
- ActivityUnitTestCase <Activity> is used to test single isolated activity.
- ActivityInstrumentationTestCase2<Activity> extends the JUnit TestCase class and connects you to the target application with instrumentation, so you can access GUI components and send UI events such as keystrokes or touches.
Below is an example of ActivityInstrumentationTestCase. It verifies the UI operation of a Calculator application and checks the correctness of the UI outputs.

Robolectric testing framework
Testing using the Android testing framework with a device or emulator is difficult. Building and running tests is slow and takes much development effort. To fix this problem, there is another choice: the Robolectric testing framework.
Robolectric allows you to run Android tests directly on the JVM without the need for a device or an emulator.
Robolectric Test Case Classes
Robolectric can perform the following actions:
- Register and create a Shadow class
- Intercept the loading of Android class
- Uses Javassist to override the method bodies of Android class
- Bind Shadow object to Android class
This allows the code under test to execute without an Android environment.
Other testing frameworks
Besides the testing frameworks mentioned above, there are many others, such as:
- Android Junit Report, a custom instrumentation test runner for Android that generates XML reports for integration with other tools.
- Espresso
- Appium
Myths of Android Testing
Many enterprises develop Android Testing strategies that are based on common misconceptions. This section examines a few popular myths and realities of Android testing.
Myth #1: All Android devices are the same, so testing on emulators is enough
An application can work perfectly on emulators, yet crash during execution on some real devices.

Emulators are not sufficient for your mobile testing. You must test your app on real devices.
Myth #2: Testing on some common devices is enough
Your application looks different across devices because hardware, screen sizes and memory differ. Test on a range of devices, OS versions, carrier networks and locations.
Myth #3: Exploratory testing just before launch is enough
- In most testing we design test cases then execute them; in Exploratory testing design and execution happen together.
- There is no plan or preparation, so the tester runs whatever tests he chooses. Some functions get tested repeatedly, while others are never tested.
Myth #4: If there are some bugs in the application, users will understand
- If the application does not work and has bugs, users uninstall your app.
- Quality issues are the first reason for bad reviews in Google Play, damaging your reputation and losing customers’ trust.
Therefore it is essential to have a proper Android testing strategy in place.
Best practices in Android Testing
- Application developers should create the test cases at the same time when they are writing the code
- All test cases should be stored in version control, together with source code
- Use continuous integration and run tests every time the code is changed
- Avoid relying on emulators and rooted devices alone; confirm results on real hardware with an inspector such as uiautomatorviewer
