How to integrate UFT(QTP) with ALM (Quality Center)
⚡ Smart Summary
Integrating UFT (QTP) with ALM (Quality Center) lets you drive functional automation scripts from a central test management platform. This resource explains the full roadmap: installing the connectivity add-in, connecting UFT to ALM, saving scripts and resources, configuring UFT settings, executing, and analyzing results.

- ALM allows integration with other HP products such as HP UFT and HP LoadRunner.
- HP UFT is a functional automation tool that supports automation of both Windows-based and web-based applications. It also supports multiple technologies such as .NET, Java, Siebel, SAP, etc.
- In this section, we will understand how to drive UFT scripts from ALM. It consists of various configurations and steps.
- The prerequisite for this module is that both ALM and UFT must have been installed.
Following is the roadmap one needs to follow in order to run UFT tests using ALM:

Part A – Add-in Installation
Step 1) Navigate to the ALM landing page (http://localhost:8181/qcbin/) and select ‘Tools’ as shown below.

Step 2) The Add-in page opens, and the ‘HP ALM Connectivity’ link should be clicked.

Step 3) Click the ‘Download HP ALM Connectivity’ link, and the exe file will be downloaded to the specified location.

Step 4) Right-click the downloaded file and select ‘Run as Administrator’.

Step 5) There will not be any installation wizard that the user has to go through if UFT is preinstalled. The user only receives the installation status as shown below.

Part B – Connecting UFT and ALM
Step 1) Open UFT and you will notice the presence of ALM as one of the menus as shown below.

Step 2) Navigate the ALM menu and select ALM Connection.

Step 3) The ALM connection dialog opens.
- Enter the ALM server URL.
- Enter the UserName.
- Enter the Password and click ‘Connect’.

Step 4) Upon successful authentication, the ALM files will be downloaded, as we are establishing a connection between ALM and UFT for the very first time.

Step 5) The ALM connection dialog waits for the user to select the domain and project.
- Select Domain.
- Select the project.
- Click ‘Login’.

Step 6) The ALM connection dialog displays the status.
- Connected to the Server, and lists the details about the server address and user name.
- Connected to the project, and lists the details about the project.
- Click ‘Close’.

Part C – Saving Script into ALM
- Let us understand the various components that are required for executing a UFT script.
- Main Driver Script – The entry point for any UFT script, which has a .mts extension.
- Library – The relevant script/function files, which can be of extension (.vbs) or (.qfl).
- Object Repository – It is usually a Shared Object Repository by nature and has a .tsr extension.
- DataTable – Used for parameterizing the tests. Usually an Excel file.
Note: The idea behind this chapter is to understand ALM and UFT integration and NOT to learn how to write UFT scripts.

Step 1) The first step is to save the Main Driver Script into ALM from UFT. Navigate to the ‘File’ menu and choose ‘New Test’ as shown below.

Step 2) The New Test dialog opens.
- Select the type of test.
- Enter the Name of Test.
- We need to choose the location as ALM (by default it would display the UFT installed location). Click on the ‘Browse’ button.

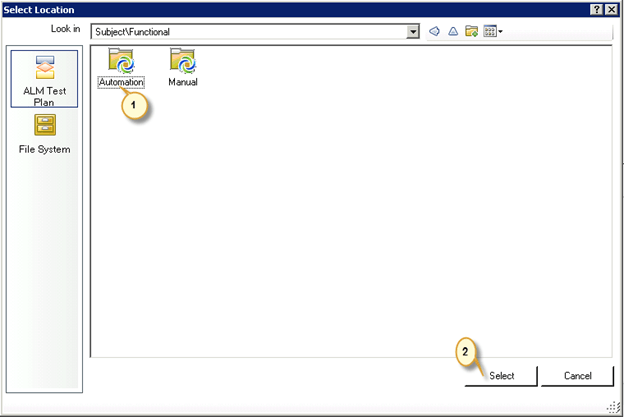
Step 3) The ‘Select Location’ dialog opens up.
- Choose the ‘ALM Test Plan’ tab.
- Double-click the ‘Functional‘ folder to open its subfolders.

Step 4) The ‘Select Location’ dialog opens up with the subfolders of the ‘Functional‘ folder.
- Double-click the ‘Automation‘ folder.
- Click ‘Select’.
Step 5) The ‘New Test’ dialog is displayed back to the user.
- With the selected test location pointing to ALM.
- Click ‘Create’.

Step 6) Now let us verify if the test has been created successfully by logging into ALM. Navigate to the ‘Test Plan’ module.
- You will notice that the test script ‘Guru99_Bank_Auto’ is created under the ‘Automation’ folder.
- Under the details tab, we can also find that the test type is locked down as ‘QUICKTEST_TEST’, which means it is a UFT script.

Step 7) Now start developing the script in UFT and save the script, which can be accessed in ALM by selecting the ‘Test Script’ tab of the created test.

Step 8) The next step is to save the associated function library files under the ‘test resources’ module of ALM, which would be picked up automatically during execution.
For this script, we have two function libraries associated with the created test script, one of which contains all functions related to the application and one which contains functions that will help the users to generate the output text result file.

Step 9) We need to save the associated library files in ALM under ‘test Resources’.
- Click the ‘New Resource’ button.
- The ‘New Resource’ dialog opens up.
- Enter the Name of the Function Library.
- Select the type as ‘Function Library’.
- Click ‘OK’.

Step 10) The created test resource will be displayed to the user as shown below.

Step 11) Now we need to upload the .vbs onto the created test resource.
- Click ‘Resource Viewer’.
- Click ‘Upload File’.

Step 12) The upload file dialog opens up.
- Select the path where the .vbs file is located.
- Select the file that has to be uploaded.
- Click ‘Open’.

Step 13) Upon uploading successfully, ALM displays the status to the user. Click ‘OK’.

Step 14) The uploaded test resource can be viewed using ‘Resource Viewer’.

Step 15) Repeat steps 8 to 14 to upload the other function file associated with the test. After uploading the ‘generateresult.vbs’, the resource viewer would be displayed as shown below.

Step 16) Now we need to upload the relevant ‘Object Repository’ files under the ‘test resources’ module, similar to how we uploaded function libraries.
- Click the ‘New Resource’ module.
- The ‘New Resource’ window opens up.
- Enter the Name of the test resource.
- Select the type of the file as ‘Object Repository’.
- Click ‘OK’.

Step 17) The test resource is created as shown below. Now the user needs to upload the repository file.
- Click the ‘Resource Viewer’ tab.
- Click the ‘Upload File’ button.

Step 18) Now upload the shared object repository file.
- Select the file where it has been stored.
- Click the ‘Open’ button.

Step 19) Upon uploading successfully, ALM displays the status to the user. Click ‘OK’.

Step 20) The test resource can be viewed right from ALM as shown below.

Step 21) The last test resource that we need to upload is the ‘Test Data’ sheet, which contains the parameterized test.
For demo purposes, we have automated 4 test cases. The designed test data is shown below. Now we need to upload the same in ALM.

Step 22) Create a new resource with the name ‘TestData’, select the type as ‘test Resource’, and select ‘OK’.

Step 23) As explained from steps 17 to 19, upload the test data Excel file, and upon successful upload, the created ‘test data’ would be displayed as shown below.

Part D – Settings in UFT
Step 1) We have all the associated files loaded into ALM; we have to ensure that the automation script picks up the library file, object repository, and data file from ALM. Let us understand how to associate function libraries to the test script dynamically from ALM.
![]()
Step 2) The Object Repository also has to be picked up from the ‘Test Resources’ tab of ALM. Let us see how to load the object repository dynamically during runtime.
![]()
Step 3) The Test Data has to be imported into the ‘Global’ sheet of UFT. To perform this, we should ensure that we have the following piece of code before making an attempt to access the parameters mentioned in the data table.

Step 4) We should ensure that we allow other HP products to interact with UFT. To perform this, go to ‘Tools’ -> ‘Options’ as shown below.

Step 5) The Options dialog opens up.
- Select the ‘GUI Testing‘ tab.
- Select ‘Test Runs’.
- Enable ‘Allow other HP products to run tests and components’.
- Click ‘OK’.

Part E – Executing Scripts in ALM
Step 1) Create a test suite in the ‘Test Lab’ module for execution. Let us create a ‘New Folder’ for the automated test suite.
- Select the ‘Test Lab’ module.
- Select the folder under which we would like to create the new folder.
- Click on the New Folder icon.
- Enter the name of the folder.
- Click OK.

Step 2) The New Folder would be created as shown below:

Step 3) Now we need to create a test set under the created folder.
- Select the folder.
- Click the ‘New Test Set’ button.
- Enter the Name of the Test Set.
- Click ‘OK’.

Step 4) Like manual tests, after creating the test set, the test instances need to be added from the Test Plan tree.
- Select the created test set.
- Click the ‘Select Tests’ button. The Test Plan tree opens up.
- Select the test.
- Click the ‘<=’ button.

Step 5) The added test would be displayed as shown below.
- The added test displays the type of test as ‘QUICKTEST_TEST’ automatically.
- Click the ‘Run’ button to trigger the execution.

Step 6) The Automatic Test Runner dialog opens up. Let us understand all the available features within this window.
- Run all – Allows us to execute the test set completely.
- Run – Allows us to execute only the selected test instance.
- Run all tests Locally – The test would be kicked off on the local host. If unchecked, the user has the capability to enter the host name on which the tests have to be executed.
- Enable Log – Creates an execution log file during the test run. To view the execution log after test execution, select ‘View Execution‘ from the ‘Run‘ menu of the same dialog.
Click ‘Run’ to trigger the test.

Step 7) UFT will be launched in the background while the script is being executed. The run status will be displayed once the test execution is completed as shown below. Close the window.

Part F – Analyzing the Results
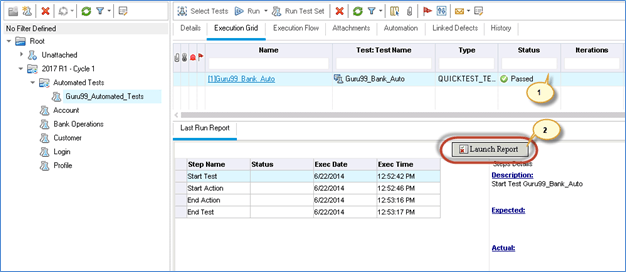
Step 1) The execution grid is displayed back to the user upon closing the ‘Automatic Runner’ dialog.
- With the test execution status updated.
- The inbuilt UFT test report can be accessed by clicking the ‘Launch Report’ button.
Step 2) The inbuilt UFT test report will be shown to the user.

Step 3) The detailed results can be accessed using the ‘Test Runs’ module. Like manual tests, the detailed result displays all the information.

Step 4) The test also generates a text result file, which can be accessed from the attachments section. The text file is generated by the script (test framework), which is NOT the inbuilt report of UFT. To access it, perform the following:
- Select the ‘Run ID’.
- The ‘Run details’ dialog opens up.
- Go to the ‘Attachments’ section.
- A result file will be available for the users to download. Double-click on the text file.

Step 5) The text result file is opened in Notepad. The result file will be displayed as shown below.

Download the UFT automation script used in this tutorial
Video on QTP integration with Quality Center:
Click here if the video is not accessible.
Notes:
- Quality Center provides many features like copying test steps, emailing scripts for review, adding attachments, etc., to facilitate faster development of test cases.
- You can create a script in automation tools like QTP and LoadRunner, and then upload and store them in Quality Center.
- You can also directly convert a Manual Test Script in Quality Center into an Automated Script.
Click here if the video is not accessible