
Apache Flume Tutorial: What is, Architecture & Hadoop Example
 Prafulla Ranadive
⚡ Smart Summary
Apache Flume is a distributed service for collecting, aggregating and moving large volumes of log data into HDFS, built around agents that chain a source, a channel and a sink together.

What is Apache Flume in Hadoop?
Apache Flume is a reliable and distributed system for collecting, aggregating and moving massive quantities of log data. It has a simple yet flexible architecture based on streaming data flows. Apache Flume is used to collect log data present in log files from web servers and aggregate it into HDFS for analysis.
Flume in Hadoop supports multiple sources, including:
- ‘tail’ (which pipes data from a local file and writes it into HDFS via Flume, similar to the Unix command ‘tail’)
- System logs
- Apache log4j (which enables Java applications to write events to files in HDFS via Flume).
The current release is Flume 1.11.0, published on 25 October 2022 and available from the Apache Flume download page. This walkthrough was written against 1.4.0, so several steps below carry a note where a current release behaves differently.
Flume Architecture
A Flume agent is a JVM process with three components – Flume source, Flume channel and Flume sink – through which events propagate after being initiated at an external source. The diagram below shows how they connect.
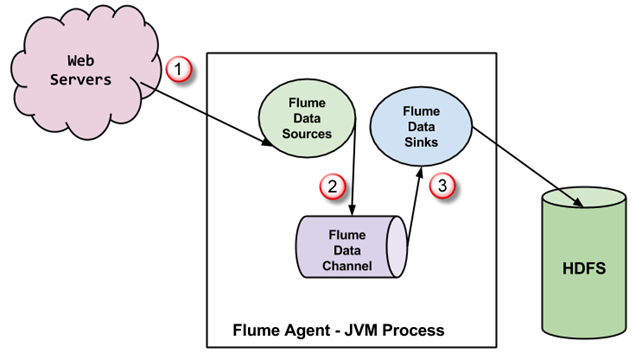
- The events generated by the external source (a web server) are consumed by the Flume source. The external source sends events to the Flume source in a format that the target source recognises.
- The Flume source receives an event and stores it into one or more channels. The channel acts as a store which keeps the event until it is consumed by the Flume sink. This channel may use a local file system to store these events.
- The Flume sink removes the event from a channel and stores it into an external repository such as HDFS. There could be multiple Flume agents, in which case the Flume sink forwards the event to the Flume source of the next agent in the flow.
Some Important Features of Flume
- Flume has a flexible design based upon streaming data flows. It is fault tolerant and robust, with multiple failover and recovery mechanisms. Flume offers different levels of reliability, including ‘best-effort delivery’ and ‘end-to-end delivery’. Best-effort delivery does not tolerate any Flume node failure, whereas end-to-end delivery guarantees delivery even in the event of multiple node failures.
- Flume carries data between sources and sinks. This gathering of data can be either scheduled or event-driven. Flume has its own query processing engine, which makes it easy to transform each new batch of data before it is moved to the intended sink.
- Possible Flume sinks include HDFS and HBase. Flume can also transport event data such as network traffic data, data generated by social media websites and email messages.
Flume, library and source code setup
Before we start with the actual process, ensure you have Hadoop installed; if not, work through how to install Hadoop first. Change user to ‘hduser’ (the id used while configuring Hadoop; you can switch to the userid used during your own Hadoop config).

Step 1) Create a new directory with the name ‘FlumeTutorial’.
sudo mkdir FlumeTutorial
- Give read, write and execute permissions.
sudo chmod -R 777 FlumeTutorial
- Copy the files MyTwitterSource.java and MyTwitterSourceForFlume.java into this directory.
Download Input Files From Here
Check the file permissions of all these files, as below, and grant ‘read’ permission if it is missing.

Step 2) Download ‘Apache Flume’ from https://flume.apache.org/download.html.
Apache Flume 1.4.0 has been used in this Flume tutorial.

Next, click through to a mirror.

Step 3) Copy the downloaded tarball into the directory of your choice and extract the contents using the following command.
sudo tar -xvf apache-flume-1.4.0-bin.tar.gz

This creates a new directory named apache-flume-1.4.0-bin and extracts the files into it. That directory is referred to as <Installation Directory of Flume> in the rest of the article.
Step 4) Flume library setup. Copy twitter4j-core-4.0.1.jar, flume-ng-configuration-1.4.0.jar, flume-ng-core-1.4.0.jar and flume-ng-sdk-1.4.0.jar to
<Installation Directory of Flume>/lib/
Either or all of the copied JARs may have the execute permission set, which can cause an issue with the compilation of code, so revoke it. In my case, twitter4j-core-4.0.1.jar had the execute permission. I revoked it as below.
sudo chmod -x twitter4j-core-4.0.1.jar

After this, the command below gives ‘read’ permission on twitter4j-core-4.0.1.jar to all.
sudo chmod +rrr /usr/local/apache-flume-1.4.0-bin/lib/twitter4j-core-4.0.1.jar
Please note that I downloaded twitter4j-core-4.0.1.jar from Maven Repository, and all Flume JARs, i.e., flume-ng-*-1.4.0.jar, from the org.apache.flume artifacts.
Load data from Twitter using Flume
Step 1) Go to the directory containing the source code files.
Step 2) Set CLASSPATH to contain <Flume Installation Dir>/lib/* and ~/FlumeTutorial/flume/mytwittersource/*.
export CLASSPATH="/usr/local/apache-flume-1.4.0-bin/lib/*:~/FlumeTutorial/flume/mytwittersource/*"

Step 3) Compile the source code using the command below.
javac -d . MyTwitterSourceForFlume.java MyTwitterSource.java

Step 4) Create a JAR. First, create a Manifest.txt file using a text editor of your choice and add the line below to it.
Main-Class: flume.mytwittersource.MyTwitterSourceForFlume
Here flume.mytwittersource.MyTwitterSourceForFlume is the name of the main class. Please note that you have to hit the enter key at the end of this line, as shown below.

Now, create the JAR ‘MyTwitterSourceForFlume.jar’ as follows.
jar cfm MyTwitterSourceForFlume.jar Manifest.txt flume/mytwittersource/*.class

Step 5) Copy this JAR to <Flume Installation Directory>/lib/.
sudo cp MyTwitterSourceForFlume.jar <Flume Installation Directory>/lib/

Step 6) Go to the configuration directory of Flume, <Flume Installation Directory>/conf.
If flume.conf does not exist, copy flume-conf.properties.template and rename it to flume.conf.
sudo cp flume-conf.properties.template flume.conf

If flume-env.sh does not exist, copy flume-env.sh.template and rename it to flume-env.sh.
sudo cp flume-env.sh.template flume-env.sh

Creating a Twitter Application
Read this first. The v1.1 streaming statuses/filter endpoint that twitter4j 4.0.1 needs was retired on 9 March 2023, and the API v2 filtered stream that replaced it, now at developer.x.com, sits behind a paid tier. Treat the screens below as a custom-source pattern, then point the same agent at a file, exec or Kafka source.
Step 1) Create a Twitter application by signing in to the developer portal.


Step 2) Go to ‘My applications’ (this option drops down when the ‘Egg’ button in the top right corner is clicked).

Step 3) Create a new application by clicking ‘Create New App’.
Step 4) Fill in the application details by specifying the name of the application, a description and a website. You may refer to the notes given underneath each input box.
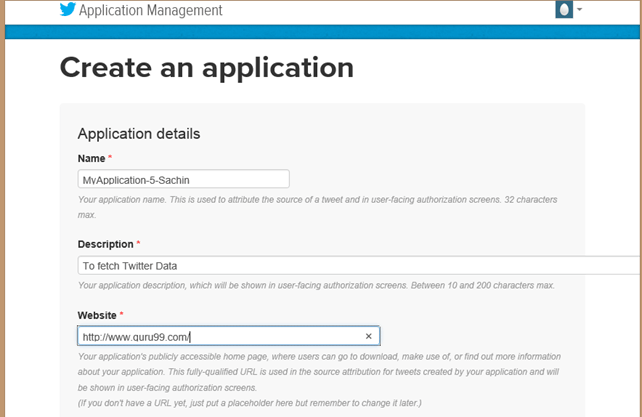
Step 5) Scroll down the page, accept the terms by marking ‘Yes, I agree’ and click the button ‘Create your Twitter application’.

Step 6) On the window of the newly created application, go to the ‘API Keys’ tab, scroll down the page and click the button ‘Create my access token’.


Step 7) Refresh the page.
Step 8) Click on ‘Test OAuth’. This displays the ‘OAuth’ settings of the application.

Step 9) Modify ‘flume.conf’ using these OAuth settings. The steps to modify ‘flume.conf’ are given below.

We need to copy the consumer key, consumer secret, access token and access token secret in order to update ‘flume.conf’.
Note: These values belong to the user and hence are confidential, so they should not be shared.
Modify ‘flume.conf’ File
Step 1) Open ‘flume.conf’ in write mode and set values for the parameters below.
sudo gedit flume.conf
Copy the contents below.
MyTwitAgent.sources = Twitter
MyTwitAgent.channels = MemChannel
MyTwitAgent.sinks = HDFS
MyTwitAgent.sources.Twitter.type = flume.mytwittersource.MyTwitterSourceForFlume
MyTwitAgent.sources.Twitter.channels = MemChannel
MyTwitAgent.sources.Twitter.consumerKey = <Copy consumer key value from Twitter App>
MyTwitAgent.sources.Twitter.consumerSecret = <Copy consumer secret value from Twitter App>
MyTwitAgent.sources.Twitter.accessToken = <Copy access token value from Twitter App>
MyTwitAgent.sources.Twitter.accessTokenSecret = <Copy access token secret value from Twitter App>
MyTwitAgent.sources.Twitter.keywords = guru99
MyTwitAgent.sinks.HDFS.channel = MemChannel
MyTwitAgent.sinks.HDFS.type = hdfs
MyTwitAgent.sinks.HDFS.hdfs.path = hdfs://localhost:54310/user/hduser/flume/tweets/
MyTwitAgent.sinks.HDFS.hdfs.fileType = DataStream
MyTwitAgent.sinks.HDFS.hdfs.writeFormat = Text
MyTwitAgent.sinks.HDFS.hdfs.batchSize = 1000
MyTwitAgent.sinks.HDFS.hdfs.rollSize = 0
MyTwitAgent.sinks.HDFS.hdfs.rollCount = 10000
MyTwitAgent.channels.MemChannel.type = memory
MyTwitAgent.channels.MemChannel.capacity = 10000
MyTwitAgent.channels.MemChannel.transactionCapacity = 1000

Step 2) Also, set TwitterAgent.sinks.HDFS.hdfs.path as below.
TwitterAgent.sinks.HDFS.hdfs.path = hdfs://<Host Name>:<Port Number>/<HDFS Home Directory>/flume/tweets/

To find <Host Name>, <Port Number> and <HDFS Home Directory>, see the value of the parameter ‘fs.defaultFS’ set in $HADOOP_HOME/etc/hadoop/core-site.xml, shown below.

Step 3) In order to flush the data to HDFS as and when it comes, delete the entry below if it exists.
TwitterAgent.sinks.HDFS.hdfs.rollInterval = 600
Example: Streaming Twitter Data using Flume
Step 1) Open ‘flume-env.sh’ in write mode and set values for the parameters below.
JAVA_HOME=<Installation directory of Java>
FLUME_CLASSPATH="<Flume Installation Directory>/lib/MyTwitterSourceForFlume.jar"

Step 2) Start Hadoop.
$HADOOP_HOME/sbin/start-dfs.sh
$HADOOP_HOME/sbin/start-yarn.sh
Step 3) Two of the JAR files from the Flume tarball are not compatible with Hadoop 2.2.0, so in this Apache Flume example we follow the steps below to make Flume compatible with Hadoop 2.2.0. This JAR swap is a 1.4.0-era fix; Flume 1.11.0 already ships current protobuf and Guava builds, so a modern tarball normally needs none of it.
a. Move protobuf-java-2.4.1.jar out of ‘<Flume Installation Directory>/lib’. Go to that directory first.
cd <Flume Installation Directory>/lib
sudo mv protobuf-java-2.4.1.jar ~/

b. Find the JAR file ‘guava’ as below.
find . -name "guava*"

Move guava-10.0.1.jar out of ‘<Flume Installation Directory>/lib’.
sudo mv guava-10.0.1.jar ~/

c. Download guava-17.0.jar from Maven Repository, shown below.

Now, copy this downloaded JAR file to ‘<Flume Installation Directory>/lib’.
Step 4) Go to ‘<Flume Installation Directory>/bin’ and start Flume as follows.
./flume-ng agent -n MyTwitAgent -c conf -f <Flume Installation Directory>/conf/flume.conf

The command prompt window where Flume is fetching tweets looks like this.

From the command window message we can see that the output is written to the /user/hduser/flume/tweets/ directory. Now, open this directory using a web browser.
Step 5) To see the result of the data load, open http://localhost:50070/ in a browser, browse the file system, then go to the directory where data has been loaded, that is
<HDFS Home Directory>/flume/tweets/
Port 50070 is the NameNode web UI on Hadoop 2; Hadoop 3 moved the same page to port 9870.

Flume is one half of ingestion: Sqoop imports tables in batches, Flume streams events, then Pig or Hive shape the files and Oozie schedules the chain. See also big data analytics tools, MapReduce joins and counters and Talend.
