
How to Install Hadoop on Ubuntu: Download & Setup Steps
 Prafulla Ranadive
⚡ Smart Summary
Installing Apache Hadoop on Ubuntu takes two passes: unpack the release under a dedicated system account with passwordless SSH, then edit four XML files before formatting HDFS and starting the single-node cluster.

In this tutorial, we will take you through the step by step process to install Apache Hadoop on a Linux box (Ubuntu). This is a two-part process: first download and install the release, then configure it.
There are two prerequisites:
- You must have Ubuntu installed and running.
- You must have Java installed.
Hadoop 3.x Version Notes for This Setup
The screenshots in this walkthrough were captured on Hadoop 2.2.0. The sequence of steps is unchanged on current releases, but a handful of names and defaults have moved. Check the table below before copying any command verbatim.
| Setting or step | In this tutorial (Hadoop 2.x) | Current Hadoop 3.x |
|---|---|---|
| Release archive | hadoop-2.2.0.tar.gz |
hadoop-3.5.0.tar.gz, the first stable 3.5 release, published 2 April 2026 |
| Default file system property | fs.default.name in the prose, fs.defaultFS in the XML |
fs.defaultFS only; fs.default.name is deprecated |
| MapReduce property | mapreduce.jobtracker.address |
mapreduce.framework.name set to yarn; the JobTracker no longer exists once YARN schedules the work |
| mapred-site.xml | Copied from mapred-site.xml.template |
Ships in etc/hadoop already, so the copy step is unnecessary |
| NameNode web UI port | 50070 | 9870 |
| Java | Java 6 or Java 7 | Java 8 or Java 11 |
Everything else in this guide behaves the same way on Hadoop 3: the dedicated account, the SSH key, the four configuration files, and the start and stop scripts.
Part 1) Download and Install Hadoop
Step 1) Add a Hadoop system user
Add a Hadoop system user using the command below.
sudo addgroup hadoop_

sudo adduser --ingroup hadoop_ hduser_
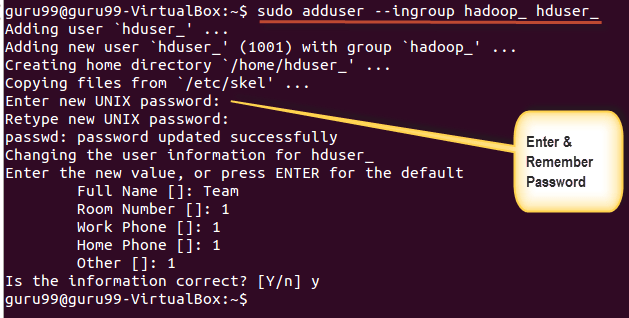
Enter your password, name and other details.
NOTE: There is a possibility of the below-mentioned error in this setup and installation process.
“hduser is not in the sudoers file. This incident will be reported.”

This error can be resolved by logging in as the root user.

Execute the command
sudo adduser hduser_ sudo

Re-login as hduser_

Step 2) Configure SSH
In order to manage nodes in a cluster, Hadoop requires SSH access.
First, switch user, enter the following command
su - hduser_

This command will create a new key.
ssh-keygen -t rsa -P ""

Enable SSH access to the local machine using this key.
cat $HOME/.ssh/id_rsa.pub >> $HOME/.ssh/authorized_keys

Now test the SSH setup by connecting to localhost as the ‘hduser_’ user.
ssh localhost

Note: If you see the error below in response to ‘ssh localhost’, then there is a possibility that SSH is not available on this system.

To resolve this –
Purge SSH using,
sudo apt-get purge openssh-server
It is good practice to purge before starting the installation.

Install SSH using the command-
sudo apt-get install openssh-server

Step 3) Download Hadoop
The next step is to download Hadoop from the Apache Hadoop releases page.

Select Stable

Select the tar.gz file (not the file ending in src).

Once the download is complete, navigate to the directory containing the tar file.

Enter,
sudo tar xzf hadoop-2.2.0.tar.gz

Now, rename hadoop-2.2.0 as hadoop.
sudo mv hadoop-2.2.0 hadoop

Finally, hand the folder to the new account.
sudo chown -R hduser_:hadoop_ hadoop

Substitute the version you actually downloaded for hadoop-2.2.0 in the three commands above.
Part 2) Configure Hadoop
Step 1) Modify the ~/.bashrc file
Add the following lines to the end of the file ~/.bashrc.
#Set HADOOP_HOME
export HADOOP_HOME=<Installation Directory of Hadoop>
#Set JAVA_HOME
export JAVA_HOME=<Installation Directory of Java>
# Add bin/ directory of Hadoop to PATH
export PATH=$PATH:$HADOOP_HOME/bin
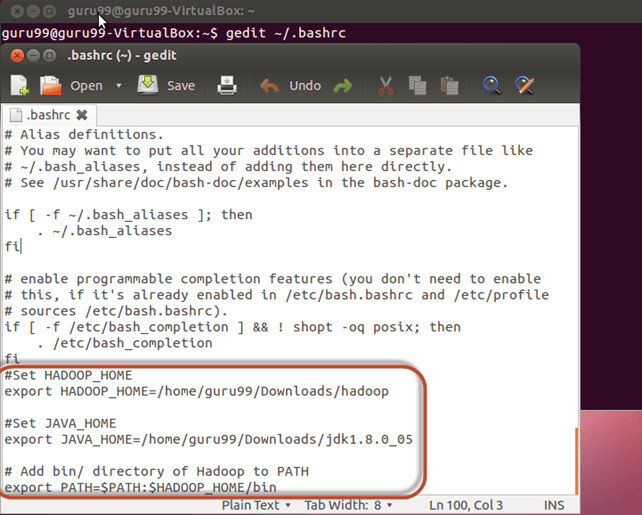
Now, source this environment configuration using the command below.
. ~/.bashrc

Step 2) Configurations related to HDFS
Set JAVA_HOME inside the file $HADOOP_HOME/etc/hadoop/hadoop-env.sh, shown below.


With

There are two parameters in $HADOOP_HOME/etc/hadoop/core-site.xml which need to be set-
1. ‘hadoop.tmp.dir’ – Used to specify a directory which will be used by Hadoop to store its data files.
2. ‘fs.defaultFS’ – This specifies the default file system. The older name for the same property, ‘fs.default.name’, is deprecated.
To set these parameters, open core-site.xml
sudo gedit $HADOOP_HOME/etc/hadoop/core-site.xml

Copy the lines below in between the <configuration></configuration> tags.
<property>
<name>hadoop.tmp.dir</name>
<value>/app/hadoop/tmp</value>
<description>Parent directory for other temporary directories.</description>
</property>
<property>
<name>fs.defaultFS </name>
<value>hdfs://localhost:54310</value>
<description>The name of the default file system. </description>
</property>

Navigate to the directory $HADOOP_HOME/etc/hadoop.

Now, create the directory mentioned in core-site.xml.
sudo mkdir -p <Path of Directory used in above setting>

Grant permissions to the directory.
sudo chown -R hduser_:Hadoop_ <Path of Directory created in above step>

sudo chmod 750 <Path of Directory created in above step>

Step 3) MapReduce Configuration
Before you begin with these configurations, let us set the HADOOP_HOME path.
sudo gedit /etc/profile.d/hadoop.sh
And Enter
export HADOOP_HOME=/home/guru99/Downloads/Hadoop

Next enter
sudo chmod +x /etc/profile.d/hadoop.sh

Exit the Terminal and restart again.
Type echo $HADOOP_HOME to verify the path.

Now copy files
sudo cp $HADOOP_HOME/etc/hadoop/mapred-site.xml.template $HADOOP_HOME/etc/hadoop/mapred-site.xml

Open the mapred-site.xml file
sudo gedit $HADOOP_HOME/etc/hadoop/mapred-site.xml

Add the settings below in between the <configuration> and </configuration> tags.
<property>
<name>mapreduce.jobtracker.address</name>
<value>localhost:54311</value>
<description>MapReduce job tracker runs at this host and port.
</description>
</property>

Open $HADOOP_HOME/etc/hadoop/hdfs-site.xml as below,
sudo gedit $HADOOP_HOME/etc/hadoop/hdfs-site.xml

Add the settings below between the <configuration> and </configuration> tags.
<property>
<name>dfs.replication</name>
<value>1</value>
<description>Default block replication.</description>
</property>
<property>
<name>dfs.datanode.data.dir</name>
<value>/home/hduser_/hdfs</value>
</property>

Create the directory specified in the setting above.
sudo mkdir -p <Path of Directory used in above setting>
sudo mkdir -p /home/hduser_/hdfs

Then grant ownership and permissions on it.
sudo chown -R hduser_:hadoop_ <Path of Directory created in above step>
sudo chown -R hduser_:hadoop_ /home/hduser_/hdfs

sudo chmod 750 <Path of Directory created in above step>
sudo chmod 750 /home/hduser_/hdfs

Step 4) Format HDFS
Before we start Hadoop for the first time, format HDFS using the command below.
$HADOOP_HOME/bin/hdfs namenode -format

Step 5) Start the Hadoop single node cluster
Start the Hadoop single node cluster using the command below.
$HADOOP_HOME/sbin/start-dfs.sh
The output of the command above is shown below.

Then start the YARN daemons.
$HADOOP_HOME/sbin/start-yarn.sh

Using the ‘jps’ tool, verify whether all the Hadoop-related processes are running.
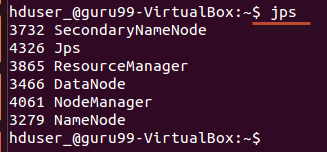
If Hadoop has started successfully, the jps output should list NameNode, NodeManager, ResourceManager, SecondaryNameNode, and DataNode.
Step 6) Stopping Hadoop
Shut the cluster down in the reverse order.
$HADOOP_HOME/sbin/stop-dfs.sh

$HADOOP_HOME/sbin/stop-yarn.sh

How to Verify Hadoop Is Running and Fix Common Errors
The jps output confirms that processes started, but not that the cluster is usable. Four extra checks settle that question.
- Open the NameNode web interface at
http://localhost:9870(port 50070 on Hadoop 2.x) and confirm the summary reports one live node. - Open the ResourceManager interface at
http://localhost:8088to confirm YARN accepted the NodeManager. - Run
hdfs dfsadmin -reportfor capacity, live DataNodes and any under-replicated blocks. - Write something:
hdfs dfs -mkdir /testfollowed byhdfs dfs -ls /proves the namespace accepts changes.
Most first-time failures fall into one of five buckets.
| Symptom | Cause | Fix |
|---|---|---|
| JAVA_HOME is not set and could not be found | The variable is exported in .bashrc but not in hadoop-env.sh | Set the absolute JDK path inside hadoop-env.sh as well |
| Permission denied (publickey,password) on ssh localhost | authorized_keys is missing or too permissive | Re-append id_rsa.pub, then run chmod 600 on ~/.ssh/authorized_keys |
| Connection refused on port 22 | openssh-server is not installed or not running | Install openssh-server and start the ssh service |
| DataNode missing from jps after a re-format | Cluster ID mismatch between the formatted NameNode and the old DataNode directory | Empty the dfs.datanode.data.dir folder, then format once more |
| start-dfs.sh: command not found | HADOOP_HOME and PATH were never sourced in the current shell | Run . ~/.bashrc or open a fresh terminal |
