
SQLite Query: Select, Where, LIMIT, OFFSET, Count, Group By
 Editorial Team
⚡ Smart Summary
SQLite queries retrieve and filter data using the SELECT, FROM, WHERE, GROUP BY, ORDER BY, and LIMIT clauses. Combining these clauses with operators, aggregates, subqueries, and set operations lets you read, shape, and summarize records from any SQLite database.

The sections below walk through reading data with SELECT and FROM, filtering rows with WHERE and its operators, ordering and limiting results, aggregate functions, GROUP BY and HAVING, subqueries, set operations, NULL handling, CASE expressions, and common table expressions.
To write SQL queries in an SQLite database, you have to know how the SELECT, FROM, WHERE, GROUP BY, ORDER BY, and LIMIT clauses work and how to use them.
During this tutorial, you will learn how to use these clauses and how to write SQLite clauses.
Reading Data with Select
The SELECT clause is the main statement you use to query an SQLite database. In the SELECT clause, you state what to select. But before the select clause, let’s see from where we can select data using the FROM clause.
The FROM clause is used to specify where do you want to select data. In the from clause, you can specify one or more table or subquery to select the data from, as we will see later on the tutorials.
Note that, for all the following examples, you have to run the sqlite3.exe and open a connection to the sample database as flowing:
Step 1) In this step,
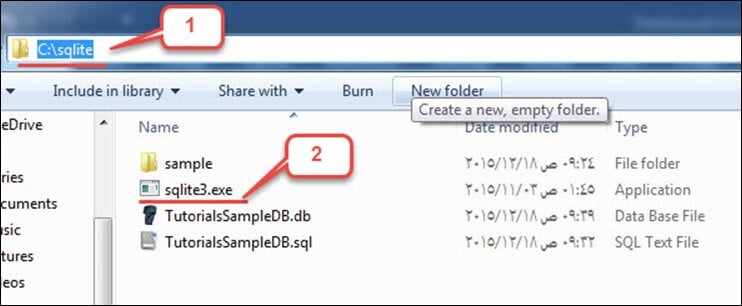
Open My Computer and navigate to the following directory “C:\sqlite” and Then open “sqlite3.exe“:
Step 2) Open the database “TutorialsSampleDB.db” by the following command:
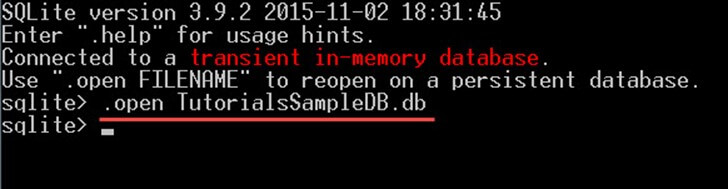
Now you are ready to run any type of query on the database.
In the SELECT clause, you can select not only a column name but you have a lot of other options to specify what to select. As following:
SELECT *
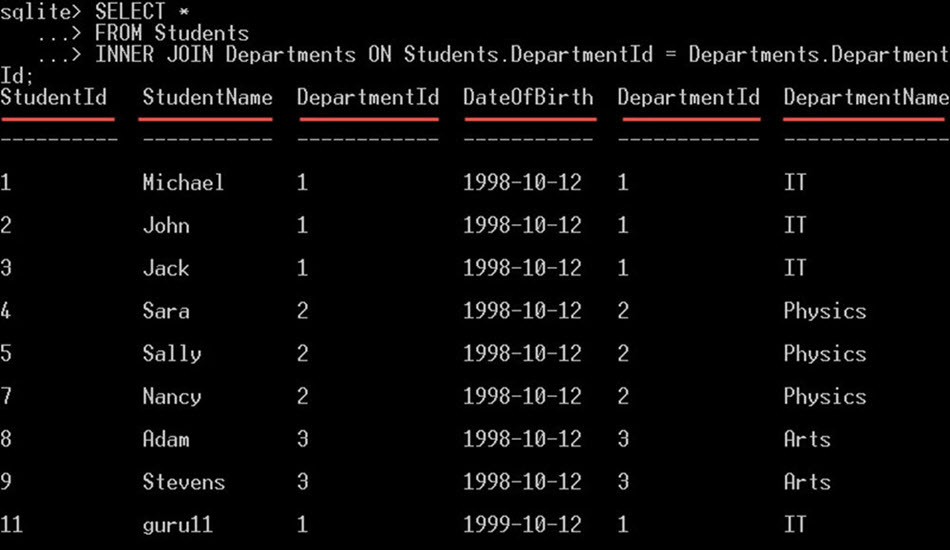
This command will select all the columns from all the referenced tables (or subqueries) in the FROM clause. For example:
SELECT *
FROM Students
INNER JOIN Departments ON Students.DepartmentId = Departments.DepartmentId;
This will select all the columns from both the tables students and the departments tables:
SELECT tablename.*
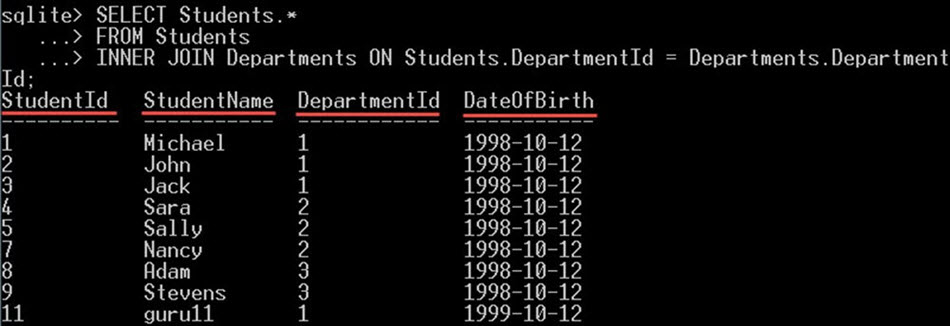
This will select all the columns from only the table “tablename”. For example:
SELECT Students.*
FROM Students
INNER JOIN Departments ON Students.DepartmentId = Departments.DepartmentId;
This will select all the columns from the students table only:
A literal value
A literal value is a constant value that can be specified in the select statement. You can use literal values normally the same way you use column names in the SELECT clause. These literal values will be displayed for each row from the rows returned by the SQL query.
Here are some examples of different literal values that you can select:
- Numeric Literal – numbers in any format like 1, 2.55, … etc.
- String literals – Any string ‘USA’, ‘this is a sample text’, … etc.
- NULL – NULL value.
- Current_TIME – It will give you the current time.
- CURRENT_DATE – this will give you the current date.
This can be handy in some situations where you have to select a constant value for all the returned rows. For example, if you want to select all the students from Students table, with a new column called a country which contains the value “USA”, you can do this:
SELECT *, 'USA' AS Country FROM Students;
This will give you all the students’ columns, plus a new column “Country” like this:
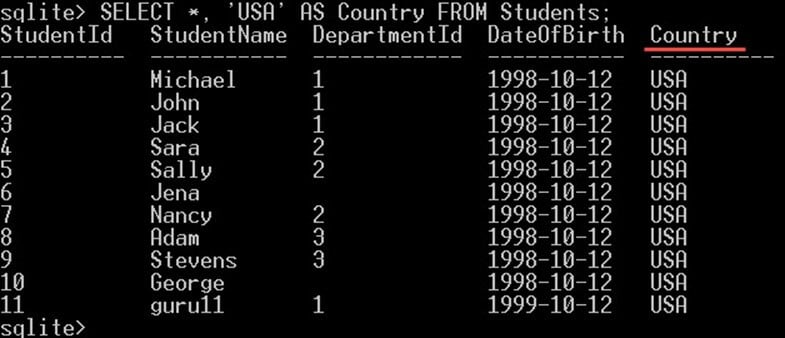
Note that, this new column Country is not actually a new column added to the table. It is a virtual column, created in the query for displaying the results and it won’t be created on the table.
Names and Alias
The alias is a new name for the column that lets you select the column with a new name. The column aliases are specified using the keyword “AS”.
For example, if you want to select the StudentName column to be returned with “Student Name” instead of “StudentName” you can give it an alias like this:
SELECT StudentName AS 'Student Name' FROM Students;
This will give you the students’ names with the name “Student Name” instead of “StudentName” like this:

Note that, the column name still “StudentName“; the column StudentName is still the same, it doesn’t change by the alias.
The alias won’t change the column name; it will just change the display name in the SELECT clause.
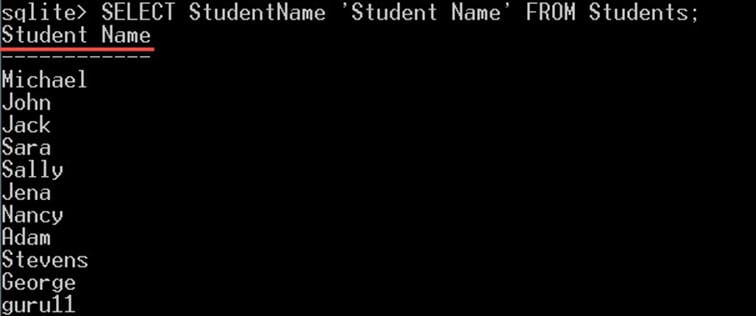
Also, note that, the keyword “AS” is optional, you can put the alias name without it, something like this:
SELECT StudentName 'Student Name' FROM Students;
And it will give you the exact same output as the previous query:
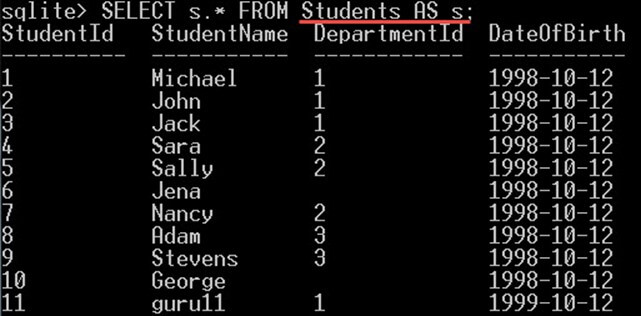
You can also give tables aliases, not just columns. With the same keyword “AS”. For example, you can do this:
SELECT s.* FROM Students AS s;
This will give you all the columns in the table Students:
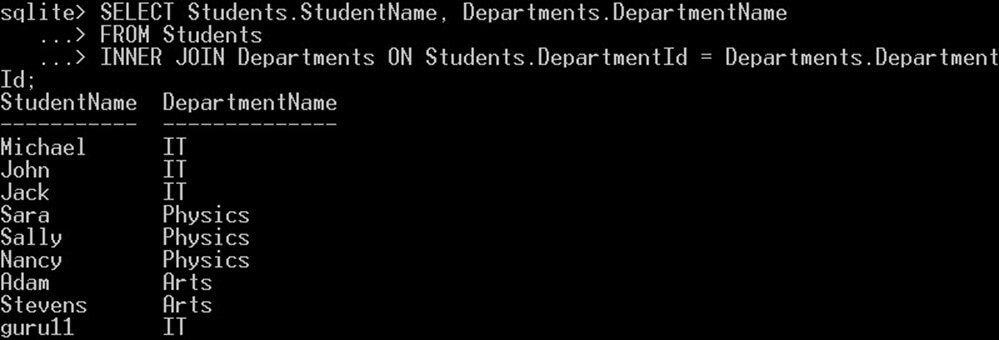
This can be very useful if you are joining more than one table; instead of repeating the full table name in the query, you can give each table a short alias name. For example, in the following query:
SELECT Students.StudentName, Departments.DepartmentName
FROM Students
INNER JOIN Departments ON Students.DepartmentId = Departments.DepartmentId;
This query will select each student name from the “Students” table with its department name from the “Departments” table:
However, the same query can be written like this:
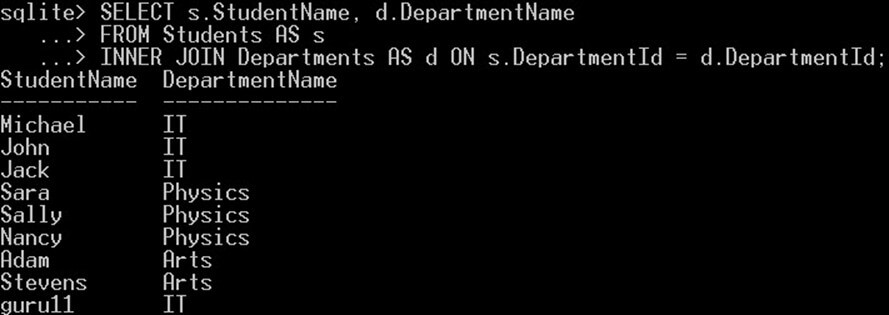
SELECT s.StudentName, d.DepartmentName
FROM Students AS s
INNER JOIN Departments AS d ON s.DepartmentId = d.DepartmentId;
We gave the Students table an alias “s” and the departments table an alias “d”. Then instead of using the full table’s name, we used their aliases to refer to them. INNER JOIN joins two or more tables together using a condition. In our example, we joined Students table with Departments table with DepartmentId column. There is also an in-depth explanation for the INNER JOIN in the “SQLite Joins” tutorial.
This will give you the exact output as the previous query:
WHERE
Writing SQL queries using SELECT clause alone with the FROM clause as we saw in the previous section, will give you all the rows from the tables. However, if you want to filter the returned data, you have to add a “WHERE” clause.
The WHERE clause is used to filter the result set returned by the SQL query. This how the WHERE clause works:
- In the WHERE clause, you can specify an “expression”.
- That expression will be evaluated for each row returned from the table(s) specified in the FROM clause.
- The expression will be evaluated as a Boolean expression, with a result either true, false, or null.
- Then only rows for which the expression was evaluated with a true value will be returned, and those with false, or null results will be ignored and not included in the result set.
To filter the results set using the WHERE clause, you have to use expressions and operators.
List of operators in SQLite and how to use them
In the following section, we will explain how you can filter using expression and operators.
Expression is one or more literal values or columns combined with each other with an operator.
Note that, you can use expressions in both the SELECT clause and in the WHERE clause.
In the following examples, we will try the expressions and operators in both the select clause and the WHERE clause. In order to show you how they perform.
There are different types of expressions and operators that you can specify as follows:
SQLite the concatenation operator “||”
This operator is used to concatenate one or more literal values or columns with each other. It will produce one string of results from all the concatenated literal values or columns. For example:
SELECT 'Id with Name: '|| StudentId || StudentName AS StudentIdWithName
FROM Students;
This will concatenate into a new alias “StudentIdWithName“:
- The literal string value “Id with Name: “
- with the value of the “StudentId” column and
- with the value from “StudentName” column

SQLite CAST operator:
The CAST operator is used to convert a value from a data type to another data type.
For example, if you have a numeric value stored as a string value like this ” ‘12.5’ ” and you want to convert it to be a numeric value you can use the CAST operator to do this like this “CAST( ‘12.5’ AS REAL)“. Or if you have a decimal value like 12.5, and you need to get the integer part only, you can cast it to an integer like this “CAST(12.5 AS INTEGER)”.
Example
In the following command we will try to convert different values into other data types:
SELECT CAST('12.5' AS REAL) ToReal, CAST(12.5 AS INTEGER) AS ToInteger;
This will give you:

The result is as following:
- CAST(‘12.5’ AS REAL) – the value ‘12.5’ is a string value, it will be converted to a REAL value.
- CAST(12.5 AS INTEGER) – the value 12.5 is a decimal value, it will be converted to be an integer value. The decimal part will be truncated, and it becomes 12.
SQLite Arithmetic Operators:
Take two or more numeric literal values or numeric columns and return one numeric value. The arithmetic operators supported in SQLite are:
- Addition “+” – give the sum of the two operands.
- Subtraction “–” – subtracts the two operands and results in the difference.
- Multiplication “*” – the product of the two operands.
- Reminder (modulo) “%” – gives the remainder that results from dividing one operand by the second operand.
- Division “/” – returns the quotient results from dividing the left operand by the right operand.
Example:
In the following example, we will try the five arithmetic operators with literal numeric values in the same select clause:
SELECT 25+6, 25-6, 25*6, 25%6, 25/6;
This will give you:

Notice how we used a SELECT statement without a FROM clause here. And this is allowed in SQLite as long as we select literal values.
SQLite Comparison operators
Compare two operands with each other and return a true or false as follows:
- “<” – returns true if the left operand is less than the right operand.
- “<=” – returns true if the left operand is less than or equal to the right operand.
- “>” – returns true if the left operand is greater than the right operand.
- “>=” – returns true if the left operand is greater than or equal to the right operand.
- “=” and “==” – returns true if the two operands are equal. Note that both operators are the same, and there is no difference between them.
- “!=” and “<>” – returns true if the two operands are not equal. Note that both operators are the same, and there is no difference between them.
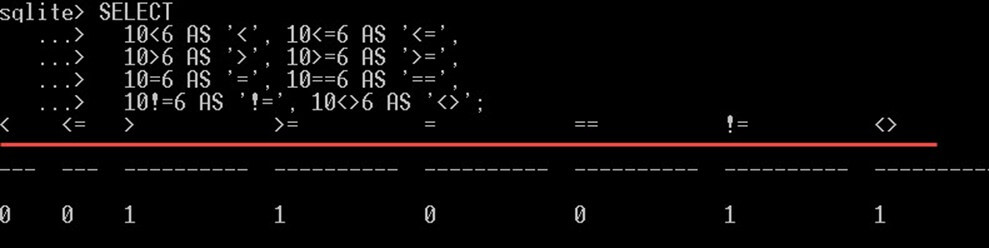
Note that, SQLite expresses the true value with 1 and the false value with 0.
Example:
SELECT
  10<6 AS '<', 10<=6 AS '<=',
  10>6 AS '>', 10>=6 AS '>=',
  10=6 AS '=', 10==6 AS '==',
  10!=6 AS '!=', 10<>6 AS '<>';
This will give something like this:
SQLite Pattern Matching operators
“LIKE” – is used for pattern matching. Using “Like“, you can search for values that match a pattern specified using a wildcard.
The operand on the left can be either a string literal value or a string column. The pattern can be specified as follows:
- Contains pattern. For example, StudentName LIKE ‘%a%’ – this will search for the students’ names that contain the letter “a” in any position on the StudentName column.
- Starts with the pattern. For example, “StudentName LIKE ‘a%’” – search for the students’ names that start with the letter “a”.
- Ends with the pattern. For example, “StudentName LIKE ‘%a’” – Search for the students’ names that end with the letter “a”.
- Matching any single character in a string using the underscore letter “_”. For example, “StudentName LIKE ‘J___’” – Search for students’ names that are 4 characters’ length. It must start with the “J” letter and can have any other three more characters after the “J” letter.
Pattern matching examples:
Get Students names that start with the ‘j’ letter:
SELECT StudentName FROM Students WHERE StudentName LIKE 'j%';
Result:

Get Students’ names end with the ‘y’ letter:
SELECT StudentName FROM Students WHERE StudentName LIKE '%y';
Result:

Get Students’ names that contain the ‘n’ letter:
SELECT StudentName FROM Students WHERE StudentName LIKE '%n%';
Result:

“GLOB” – is equivalent to the LIKE operator, but GLOB is case sensitive, unlike LIKE operator. For example, the following two commands will return different results:
SELECT 'Jack' GLOB 'j%';
SELECT 'Jack' LIKE 'j%';
This will give you:

The first statement returns 0(false) because the GLOB operator is case sensitive, so ‘j’ is not equal to ‘J’. However, the second statement will return 1 (true) because the LIKE operator is case insensitive, so ‘j’ is equal to ‘J’.
Other operators:
SQLite AND
A logical operator that combines one or more expressions. It will return true, only if all the expressions yield a “true” value. However, it will return false only if all the expressions yield a “false” value.
Example:
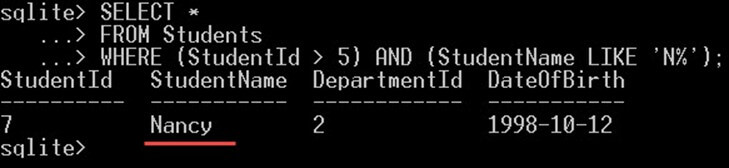
The following query will search for students that have StudentId > 5 and StudentName begins with the letter N, the returned students must meet the two conditions:
SELECT *
FROM Students
WHERE (StudentId > 5) AND (StudentName LIKE 'N%');
As an output, in the above screenshot, this will give you only “Nancy”. Nancy is the only student that meets both conditions.
SQLite OR
A logical operator that combines one or more expressions, so that if one of the combined operators yields true, then it will return true. However, if all the expressions yield false, it will return false.
Example:
The following query will search for students that have StudentId > 5 or StudentName begins with the letter N, the returned students must meet at least one of the conditions:
SELECT *
FROM Students
WHERE (StudentId > 5) OR (StudentName LIKE 'N%');
This will give you:
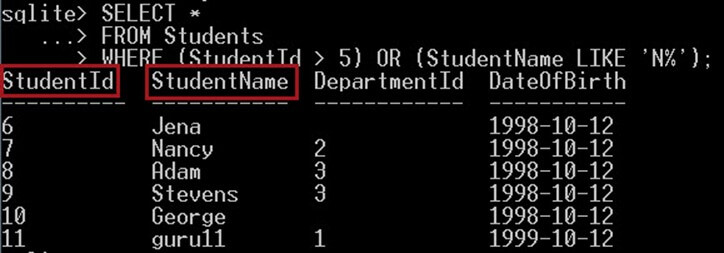
As an output, in the above screenshot, this will give you the name of a student with having letter “n” in their name plus the student id having value>5.
As you can see the result is different than the query with AND operator.
SQLite BETWEEN
BETWEEN is used to select those values that are within a range of two values. For example, “X BETWEEN Y AND Z” will return true (1) if the value X is between the two values Y and Z. Otherwise, it will return false (0). “X BETWEEN Y AND Z” is equivalent to “X >= Y AND X <= Z“, X must be greater than or equal to Y and X is less than or equal to Z.
Example:
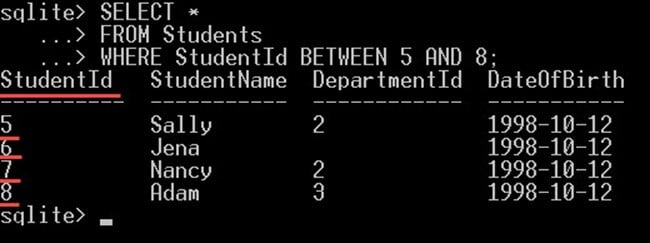
In the following example query, we will write a query to get students with Id value between 5 and 8:
SELECT *
FROM Students
WHERE StudentId BETWEEN 5 AND 8;
This will give only the students with ids 5, 6, 7, and 8:
SQLite IN
Takes one operand and a list of operands. It will return true if the first operand value equal to one of the operands’ value from the list. The IN operator returns true (1) if the list of operands contains the first operand value within its values. Otherwise, it will return false (0).
Like this: “col IN(x, y, z)“. This is equivalent to ” (col=x) or (col=y) or (col=z) ”.
Example:
The following query will select students with ids 2, 4, 6, 8 only:
SELECT *
FROM Students
WHERE StudentId IN(2, 4, 6, 8);
Like this:

The previous query will give the exact result as the following query because they are equivalent:
SELECT *
FROM Students
WHERE (StudentId = 2) OR (StudentId =  4) OR (StudentId =  6) OR (StudentId = 8);
Both queries give the exact output. However, the difference between the two queries is, the first query we used the “IN” operator. In the second query, we used multiple “OR” operators.
The IN operator is equivalent to using multiple OR operators. The “WHERE StudentId IN(2, 4, 6, 8)” is equivalent to ” WHERE (StudentId = 2) OR (StudentId = 4) OR (StudentId = 6) OR (StudentId = 8);“
Like this:

SQLite NOT IN
“NOT IN” operand is the opposite of the IN operator. But with the same syntax; it takes one operand and a list of operands. It will return true if the first operand value not equal to one of the operands’ value from the list. i.e., it will return true (0) if the list of operands doesn’t contain the first operand. Like this: “col NOT IN(x, y, z)“. This is equivalent to “(col<>x) AND (col<>y) AND (col<>z)“.
Example:
The following query will select students with ids not equal to one of these Ids 2, 4, 6, 8:
SELECT *
FROM Students
WHERE StudentId NOT IN(2, 4, 6, 8);
Like this
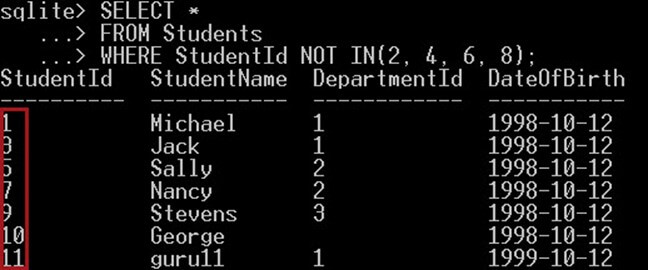
The previous query we give the exact result as the following query because they are equivalent:
SELECT *
FROM Students
WHERE (StudentId <> 2) AND (StudentId <> 4) AND (StudentId <> 6) AND (StudentId <> 8);
Like this:
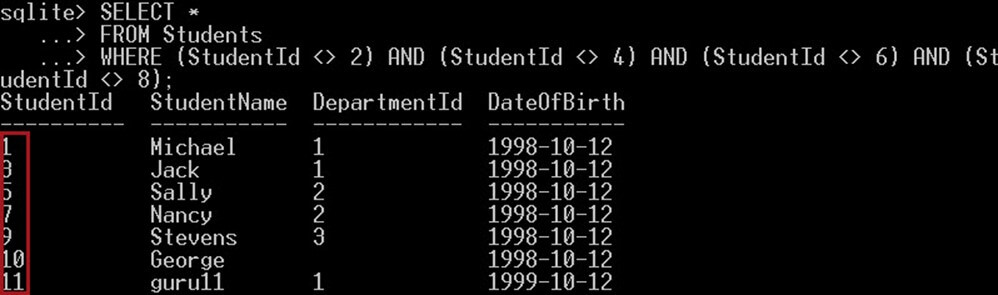
In the above screenshot,
We used multiple not equal operators “<>” to get a list of students, that are not equal to neither of the following Id’s 2, 4, 6, nor 8. This query will return all other students other than these list of Id’s.
SQLite EXISTS
The EXISTS operators don’t take any operands; it takes only a SELECT clause after it. The EXISTS operator will return true (1) if there are any rows returned from the SELECT clause, and it will return false (0) if there are no rows at all returned from the SELECT clause.
Example:
In the following example, we will select the department’s name, if the department id exists in the students table:
SELECT DepartmentName
FROM Departments AS d
WHERE EXISTS (SELECT DepartmentId FROM Students AS s WHERE d.DepartmentId = s.DepartmentId);
This will give you:

Only the three departments “IT, Physics, and Arts” will be returned. And the department name “Math” won’t be returned because there is no student in that department, so the department Id doesn’t exist in the students table. That’s why the EXISTS operator ignored the “Math” department.
SQLite NOT
Reverses the result of the preceding operator that comes after it. For example:
- NOT BETWEEN – It will return true if BETWEEN returns false and vice versa.
- NOT LIKE – It will return true if LIKE returns false and vice versa.
- NOT GLOB – It will return true if GLOB returns false and vice versa.
- NOT EXISTS – It will return true if EXISTS returns false and vice versa.
Example:
In the following example, we will use the NOT operator with the EXISTS operator to get the departments’ names that don’t exist in the Students table, which is the reverse result of the EXISTS operator. So, the search will be done through DepartmentId that don’t exist in the department table.
SELECT DepartmentName
FROM Departments AS d
WHERE NOT EXISTS (SELECT DepartmentId
                  FROM Students AS s
                  WHERE d.DepartmentId = s.DepartmentId);
Output:

Only the department “Math ” will be returned. Because the “Math” department is the only department, that doesn’t exist in the students table.
Limiting and Ordering
SQLite Order
SQLite Order is to sort your result by one or more expressions. To order the results set, you have to use the ORDER BY clause as follows:
- First, you have to specify the ORDER BY clause.
- The ORDER BY clause must be specified at the end of the query; only the LIMIT clause can be specified after it.
- Specify the expression to order the data with, this expression can be a column name or an expression.
- After the expression, you can specify an optional sort direction. Either DESC, to order the data descending or ASC to order the data ascending. If you didn’t specify any of them, the data would be sorted ascending.
- You can specify more expressions using the “,” between each other.
Example
In the following example, we will select all the students ordered by their names but in descending order, then by the department name in ascending order:
SELECT s.StudentName, d.DepartmentName
FROM Students AS s
INNER JOIN Departments AS d ON s.DepartmentId = d.DepartmentId
ORDER BY d.DepartmentName ASC , s.StudentName DESC;
This will give you:
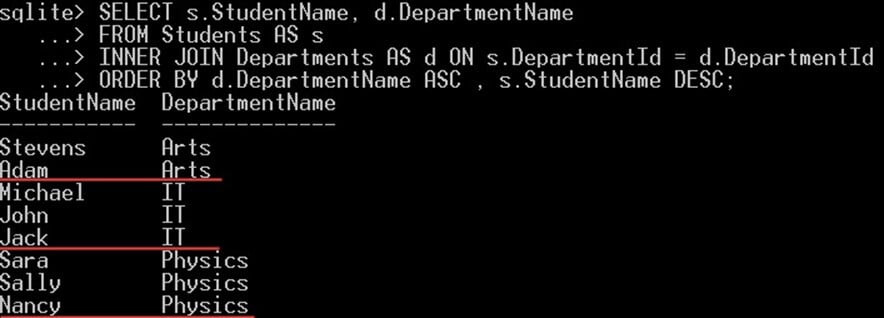
- SQLite will first order all the students by their department name in ascending order
- Then for each department name, all the students under that department name will be displayed in descending order by their names
SQLite Limit:
You can limit the number of rows returned by your SQL query, by using the LIMIT clause. For example, LIMIT 10 will give you only 10 rows and ignore all the other rows.
In the LIMIT clause, you can select a specific number of rows starting from a specific position using the OFFSET clause. For example, “LIMIT 4 OFFSET 4” will ignore the first 4 rows, and returned 4 rows starting from the fifth rows, so you will get rows 5,6,7, and 8.
Note that the OFFSET clause is optional, you can write it like “LIMIT 4, 4” and it will give you the exact results.
Example:
In the following example, we will return only 3 students starting from the student id 5 using the query:
SELECT * FROM Students LIMIT 4,3;
This will give you only three students starting from row 5. So it will give you the rows with StudentId 5, 6, and 7:

Removing duplicates
If your SQL query returns duplicate values, you can use the “DISTINCT” keyword to remove those duplicates and return on distinct values. You can specify more than one column after the DISTINCT key work.
Example:
The following query will return duplicate “department name values”: Here we have duplicate values with names IT, Physics and Arts.
SELECT d.DepartmentName
FROM Students AS s
INNER JOIN Departments AS d ON s.DepartmentId = d.DepartmentId;
This will give you duplicate values for the department name:
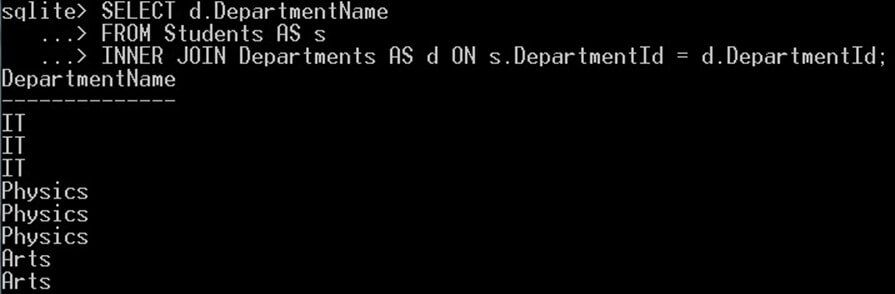
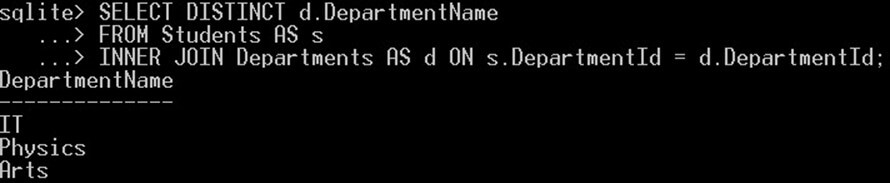
Notice, how there are duplicate values for the department name. Now, we will use the DISTINCT keyword with the same query to remove those duplicates and get only unique values. Like this:
SELECT DISTINCT d.DepartmentName
FROM Students AS s
INNER JOIN Departments AS d ON s.DepartmentId = d.DepartmentId;
This will give you only three unique values for the department name column:
Aggregate
SQLite Aggregates are built-in functions defined in SQLite that will group multiple values of multiple rows into one value.
Here are the aggregates supported by SQLite:
SQLite AVG()
Returned the average for all the x values.
Example:
In the following example we will get the average mark students to get from all the exams:
SELECT AVG(Mark) FROM Marks;
This will give you the value “18.375”:

These results come from the summation of all the mark values divided by their count.
COUNT() – COUNT(X) or COUNT(*)
Returns the total count of the number of times the x value appeared. And here are some options you can use with COUNT:
- COUNT(x): Counts only x values, where x is a column name. It will ignore NULL values.
- COUNT(*): Count all the rows from all the columns.
- COUNT (DISTINCT x): You can specify a DISTINCT keyword before the x which will get the count of the distinct values of x.
Example
In the following example, we will get the total count of Departments with COUNT(DepartmentId), COUNT(*), and COUNT(DISTINCT DepartmentId) and how they are different:
SELECT COUNT(DepartmentId), COUNT(DISTINCT DepartmentId), COUNT(*) FROM Students;
This will give you:

As following:
- COUNT(DepartmentId) will give you the count of all the department id, and it will ignore the null values.
- COUNT(DISTINCT DepartmentId) give you distinct values of DepartmentId, which are only 3. Which are the three different values of department name. Notice that there are 8 values of department name in the student name. But only the different three values which are Math, IT, and Physics.
- COUNT(*) counts the number of the rows in the students table which are 10 rows for 10 students.
GROUP_CONCAT() – GROUP_CONCAT(X) or GROUP_CONCAT(X,Y)
GROUP_CONCAT aggregate function concatenates multiples values into one value with a comma to separate them. It has the following options:
- GROUP_CONCAT(X): This will concatenate all the value of x into one string, with the comma “,” used as a separator between the values. NULL values will be ignored.
- GROUP_CONCAT(X, Y): This will concatenate the values of x into one string, with the value of y used as a separator between each value instead of the default separator ‘,’. NULL values also will be ignored.
- GROUP_CONCAT(DISTINCT X): This will concatenate all the distinct values of x into one string, with the comma “,” used as a separator between the values. NULL values will be ignored.
GROUP_CONCAT(DepartmentName) Example
The following query will concatenate all the department name’s values from the students and the departments table into one string comma separated. So instead of returning a list of values, one value on each row. It will return only one value on one row, with all the values comma separated:
SELECT GROUP_CONCAT(d.DepartmentName)
FROM Students AS s
INNER JOIN Departments AS d ON s.DepartmentId = d.DepartmentId;
This will give you:

This will give you the list of 8 departments’ names values concatenated into one string comma separated.
GROUP_CONCAT(DISTINCT DepartmentName) Example
The following query will concatenate the distinct values of the department name from the students and departments table into one string comma separated:
SELECT GROUP_CONCAT(DISTINCT d.DepartmentName)
FROM Students AS s
INNER JOIN Departments AS d ON s.DepartmentId = d.DepartmentId;
This will give you:

Notice how the result is different than the previous result; only three values returned which are the distinct departments’ names, and the duplicate values were removed.
GROUP_CONCAT(DepartmentName ,’&’) Example
The following query will concatenate all the values of the department name column from the students and departments table into one string, but with the character ‘&’ instead of a comma as a separator:
SELECT GROUP_CONCAT(d.DepartmentName, '&')
FROM Students AS s
INNER JOIN Departments AS d ON s.DepartmentId = d.DepartmentId;
This will give you:

Notice how the character “&” is used instead of the default character “,” to separate between the values.
SQLite MAX() & MIN()
MAX(X) returns you the highest value from the X values. MAX will return a NULL value if all the values of x are null. Whereas MIN(X) returns you the smallest value from the X values. MIN will return a NULL value if all the values of X are null.
Example
In the following query, we will use the MIN and MAX functions to get the highest mark and the lowest mark from the “Marks” table:
SELECT MAX(Mark), MIN(Mark) FROM Marks;
This will give you:

SQLite SUM(x), Total(x)
Both of them will return the sum of all the x values. But they are different in the following:
- SUM will return null if all the values are null, but Total will return 0.
- TOTAL always returns floating point values. SUM returns an integer value if all the x values are an integer. However, if the values are not an integer, it will return a floating point value.
Example
In the following query we will use SUM and total to get the sum of all the marks in the “Marks” tables:
SELECT SUM(Mark), TOTAL(Mark) FROM Marks;
This will give you:

As you can see, TOTAL always returns a floating point. But SUM returns an integer value because the values in the “Mark” column might be in integers.
Difference between SUM and TOTAL example:
In the following query we will show the difference between SUM and TOTAL when they get the SUM of NULL values:
SELECT SUM(Mark), TOTAL(Mark) FROM Marks WHERE TestId = 4;
This will give you:

Note that there are no marks for TestId = 4, so there are null values for that test. SUM returns a null value as a blank, whereas TOTAL returns 0.
Group BY
The GROUP BY clause is used to specify one or more columns that will be used to group the rows into groups. The rows with the same values will be gathered (arranged) together into groups.
For any other column that is not included in the group by columns, you can use an aggregate function for it.
Example:
The following query will give you the total number of students present in each department.
SELECT d.DepartmentName, COUNT(s.StudentId) AS StudentsCount
FROM Students AS s
INNER JOIN Departments AS d ON s.DepartmentId = d.DepartmentId
GROUP BY d. DepartmentName;
This will give you:
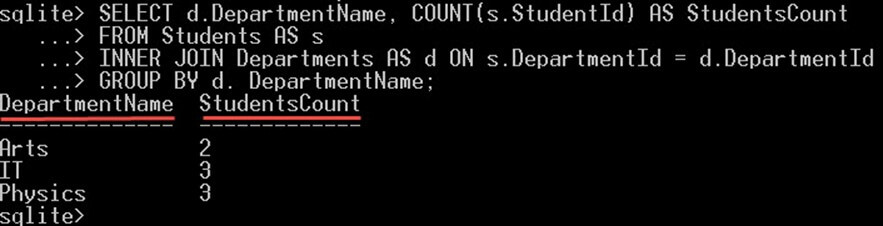
The GROUPBY DepartmentName clause will group all the students into groups one for each department name. For each group of “department”, it will count the students on it.
HAVING clause
If you want to filter the groups returned by the GROUP BY clause, then you can specify a “HAVING” clause with expression after the GROUP BY. The expression will be used to filter these groups.
Example
In the following query, we will select those departments that have only two students on it:
SELECT d.DepartmentName, COUNT(s.StudentId) AS StudentsCount
FROM Students AS s
INNER JOIN Departments AS d ON s.DepartmentId = d.DepartmentId
GROUP BY d. DepartmentName
HAVING COUNT(s.StudentId) = 2;
This will give you:
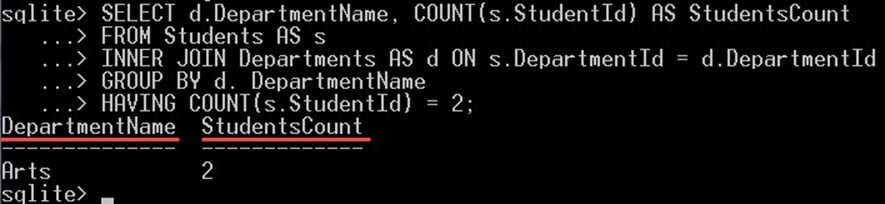
The clause HAVING COUNT(S.StudentId) = 2 will filter the groups returned and return only those groups that contain exactly two students on it. In our case, the Arts department has 2 students, so it is displayed in the output.
SQLite Query & Subquery
Inside any query, you can use another query either in a SELECT, INSERT, DELETE, UPDATE or inside another subquery.
This nested query is called a subquery. We will see now some examples of using subqueries in the SELECT clause. However, in the Modifying Data tutorial, we will see how we can use subqueries with INSERT, DELETE, and UPDATE statement.
Using subquery in the FROM clause example
In the following query we will include a subquery inside the FROM clause:
SELECT
  s.StudentName, t.Mark
FROM Students AS s
INNER JOIN
(
   SELECT StudentId, Mark
   FROM Tests AS t
   INNER JOIN Marks AS m ON t.TestId = m.TestId
)  ON s.StudentId = t.StudentId;
The query:
   SELECT StudentId, Mark
   FROM Tests AS t
   INNER JOIN Marks AS m ON t.TestId = m.TestId
The above query is called a subquery here because it is nested inside the FROM clause. Notice that we gave it an alias name “t” so that we can refer to the columns returned from it in the query.
This query will give you:
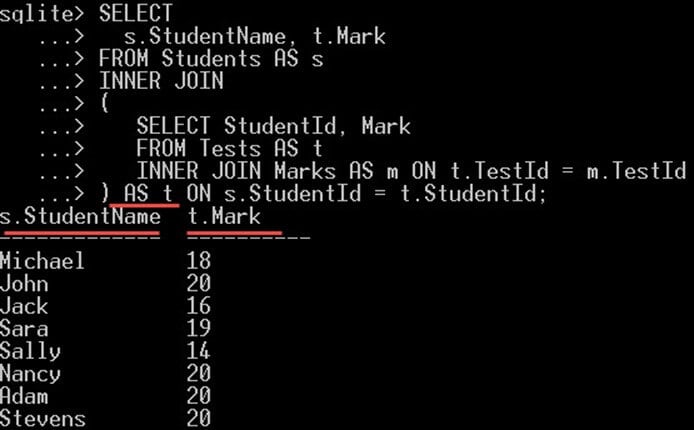
So in our case,
- s.StudentName is selected from the main query that gives the name of students and
- t.Mark is selected from the subquery; that gives marks obtained by each of these students
Using subquery in the WHERE clause example
In the following query we will include a subquery in the WHERE clause:
SELECT DepartmentName
FROM Departments AS d
WHERE NOT EXISTS (SELECT DepartmentId
                  FROM Students AS s
                  WHERE d.DepartmentId = s.DepartmentId);
The query:
SELECT DepartmentId
FROM Students AS s
WHERE d.DepartmentId = s.DepartmentId
The above query is called a subquery here because it is nested in the WHERE clause. The subquery will return the DepartmentId values that will be used by the operator NOT EXISTS.
This query will give you:
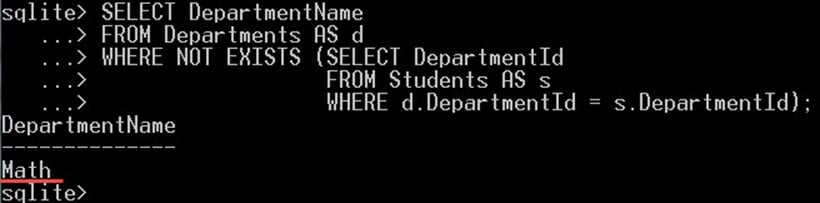
In the above query, we have selected the department which has no student enrolled in it. Which is the “Math” department over here.
Set Operations – UNION,Intersect
SQLite supports the following SET operations:
UNION & UNION ALL
It combines one or more result sets ( a group of rows) returned from multiple SELECT statements into one result set.
UNION will return distinct values. However, UNION ALL will not and will include duplicates.
Note that the column name will be the column name specified in the first SELECT statement.
UNION Example
In the following example, we will get the list of DepartmentId from the students table and the list of the DepartmentId from the departments table in the same column:
SELECT DepartmentId AS DepartmentIdUnioned FROM Students
UNION
SELECT DepartmentId FROM Departments;
This will give you:
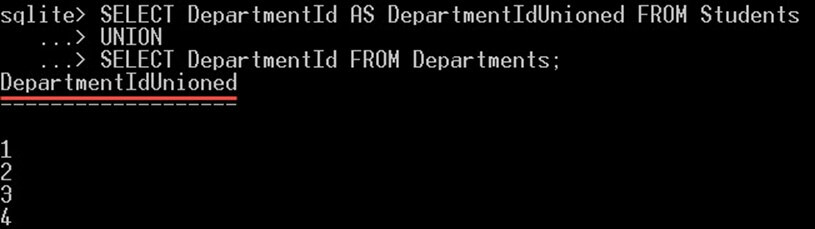
The query returns only 5 rows which are the distinct department id values. Notice the first value which is the null value.
SQLite UNION ALL Example
In the following example, we will get the list of DepartmentId from the students table and the list of the DepartmentId from the departments table in the same column:
SELECT DepartmentId AS DepartmentIdUnioned FROM Students
UNION ALL
SELECT DepartmentId FROM Departments;
This will give you:
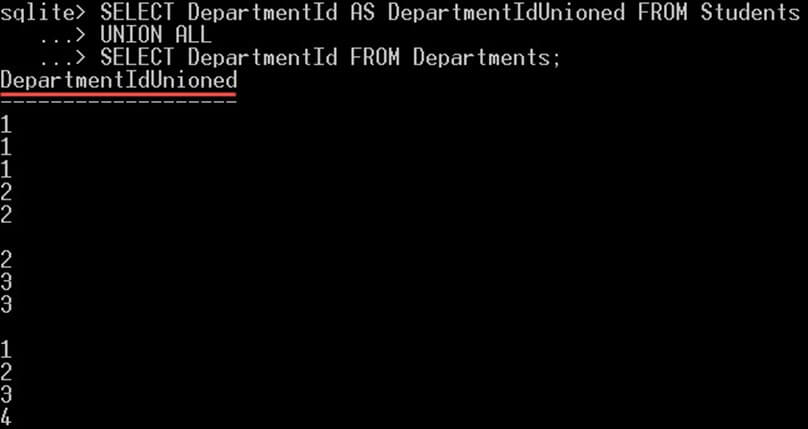
The query will return 14 rows, 10 rows from the students table, and 4 from the departments table. Note that, there are duplicates in the values returned. Also, note that the column name was the one specified in the first SELECT statement.
Now, let’s see how UNION all will give different results if we replace UNION ALL with UNION:
SQLite INTERSECT
Returns the values exists in both the combined results set. Values that exist in one of the combined results set will be ignored.
Example
In the following query, we will select the DepartmentId values that exist in both the tables Students and Departments in the DepartmentId column:
SELECT DepartmentId FROM Students
Intersect
SELECT DepartmentId FROM Departments;
This will give you:
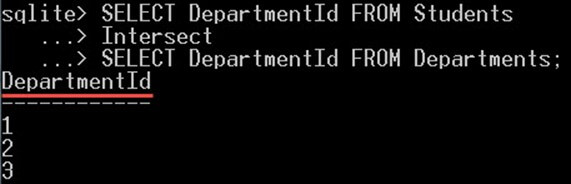
The query returns only three values 1, 2, and 3. Which are the values that exist in both the tables.
However, the values null and 4 were not included because the null value exists in the students table only and not in the departments table. And the value 4 exists in the departments table and not in the students table.
That’s why both the values NULL and 4 were ignored and not included in the returned values.
EXCEPT
Suppose if you have two lists of rows, list1 and list2, and you want the rows only from list1 that doesn’t exist in list2, you can use “EXCEPT” clause. The EXCEPT clause compares the two lists and returns those rows that exist in list1 and doesn’t exist in list2.
Example
In the following query, we will select the DepartmentId values that exist in the departments table and doesn’t exist in the students table:
SELECT DepartmentId FROM Departments
EXCEPT
SELECT DepartmentId FROM Students;
This will give you:

The query returns only the value 4. Which is the only value that exists in the departments table, and doesn’t exist in the students table.
NULL handling
The “NULL” value is a special value in SQLite. It is used to represent a value that is unknown or missing value. Note that null value is totally different than “0” or blank “” value. Because 0 and the blank value is a known value, however, the null value is unknown.
NULL values require a special handling in SQLite, we will see now how to handle the NULL values.
Search for NULL values
You can’t use the normal equality operator (=) to search the null values. For example, the following query searches for the students that have a null DepartmentId value:
SELECT * FROM Students WHERE DepartmentId = NULL;
This query won’t give any result:

Because the NULL value doesn’t equal to any other value included a null value itself, that’s why it didn’t return any result.
However, in order to make the query work, you have to use the “IS NULL” operator to search for null values as following:
SELECT * FROM Students WHERE DepartmentId IS NULL;
This will give you:

The query will return those students that have a null DepartmentId value.
If you want to get those values that are not null, then you have to use the “IS NOT NULL” operator like this:
SELECT * FROM Students WHERE DepartmentId IS NOT NULL;
This will give you:
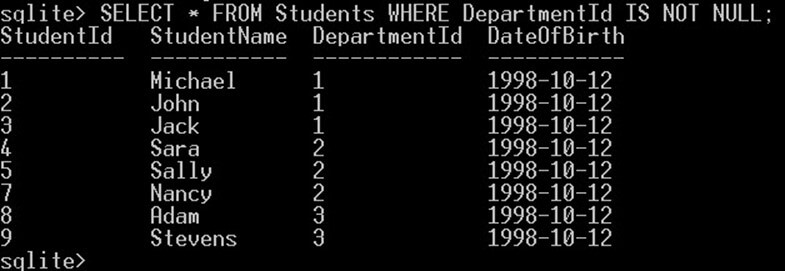
The query will return those students that don’t have a NULL DepartmentId value.
Conditional results
If you have a list of values and you want to select any one of them based on some conditions. For that, the condition for that particular value should be true in order to be selected.
CASE expression will evaluate these list of conditions for all the values. If the condition is true, it will return that value.
For example, if you have a column “Grade” and you want to select a text value based on the grade value as following:
– “Excellent” if the grade is higher than 85.
– “Very Good” if the grade is between 70 and 85.
– “Good” if the grade is between 60 and 70.
Then you can use the CASE expression to do that.
This can be used to define some logic in the SELECT clause so that you can select certain results depending on certain conditions like if statement for example.
The CASE operator can be defined with different syntaxes as following:
You can use different conditions:
CASE
  WHEN condition1 THEN result1
  WHEN condition2 THEN result2
  WHEN condition3 THEN result3
  …
  ELSE resultn
END
Or, you can use only one expression and put different possible values to choose from:
CASE expression
  WHEN value1 THEN result1
  WHEN value2 THEN result2
  WHEN value3 THEN result3
  …
  ELSE restuln
END
Note that the ELSE clause is optional.
Example
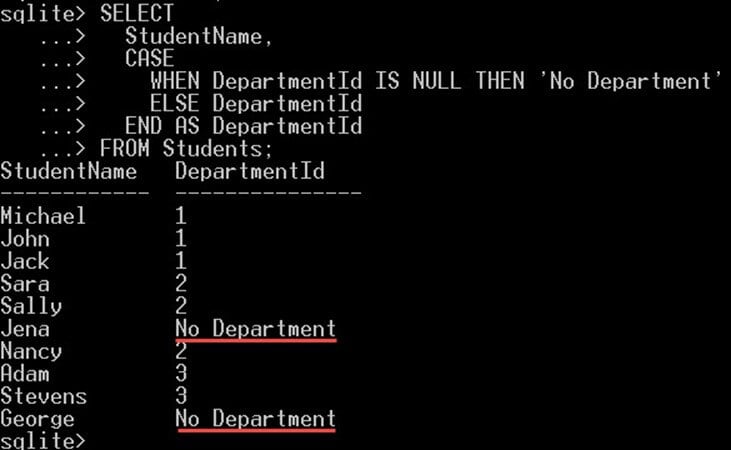
In the following example, we will use the CASE expression with NULL value in the department Id column in the Students table to display the text ‘No Department’ as following:
SELECT
  StudentName,
  CASE
    WHEN DepartmentId IS NULL THEN 'No Department'
    ELSE DepartmentId
  END AS DepartmentId
FROM Students;
- The CASE operator will check the value of the DepartmentId whether it is null or not.
- If it is a NULL value, then it will select the literal value ‘No Department’ instead of the DepartmentId value.
- If is not a null value, then it will select the value of the DepartmentId column.
This will give you the output as shown below:
Common table expression
Common table expressions (CTEs) are subqueries that are defined inside the SQL statement with a given name.
It has an advantage over the subqueries because it is defined out of the SQL statements and will make the queries easier to read, maintain, and understand.
A common table expression can be defined by putting the WITH clause in front of a SELECT statements as following:
WITH CTEname
AS
(
   SELECT statement
)
SELECT, UPDATE, INSERT, or update statement here FROM CTE
The “CTEname” is any name you can give for the CTE, you can use it to refer to it later. Note that, you can define SELECT, UPDATE, INSERT, or DELETE statement on CTEs
Now, let’s see an example of how to use CTE in the SELECT clause.
Example
In the following example, we will define a CTE from a SELECT statement, and then we will use it later on another query:
WITH AllDepartments
AS
(
  SELECT DepartmentId, DepartmentName
  FROM Departments
)
SELECT
  s.StudentId,
  s.StudentName,
  a.DepartmentName
FROM Students AS s
INNER JOIN AllDepartments AS a ON s.DepartmentId = a.DepartmentId;
In this query, we defined a CTE and gave it the name “AllDepartments“. This CTE was defined from a SELECT query:
SELECT DepartmentId, DepartmentName
  FROM Departments
Then after we defined the CTE we used it in the SELECT query which come after it.
Note that, Common table expressions doesn’t affect the output of the query. It is a way to define a logical view or subquery in order to reuse them in the same query. Common table expressions are like a variable that you declare, and reuse it as a subquery. Only the SELECT statement affect the output of the query.
This query will give you:

Advanced queries
Advanced queries are those queries that contain complex joins, subqueries, and some aggregates. In the following section we will see an example of an advanced query:
Where we get the,
- Department’s names with all the students for each department
- Students name separated with comma and
- Showing the department having at least three students in it
SELECT
  d.DepartmentName,
  COUNT(s.StudentId) StudentsCount,
  GROUP_CONCAT(StudentName) AS Students
FROM Departments AS d
INNER JOIN Students AS s ON s.DepartmentId = d.DepartmentId
GROUP BY d.DepartmentName
HAVING COUNT(s.StudentId) >= 3;
We added a JOIN clause to get the DepartmentName from the Departments table. After that we added a GROUP BY clause with two aggregate functions:
- “COUNT” to count the students for each department group.
- GROUP_CONCAT to concatenate students for each group with comma separated in one string.
After the GROUP BY, we used the HAVING clause to filter the departments and select only those departments that have at least 3 students.
The result will be as following:

