
JavaScript DOM Tutorial with Example
 Editorial Team
⚡ Smart Summary
JavaScript DOM and Events give scripts full control over a webpage, letting code read, change, add, or remove any element the browser rendered, then respond instantly whenever a visitor clicks, types, or scrolls.
What is DOM in JavaScript?
JavaScript can access all the elements in a webpage making use of the Document Object Model (DOM). In fact, the web browser creates a DOM of the webpage when the page is loaded. The DOM model is created as a tree of objects like this:
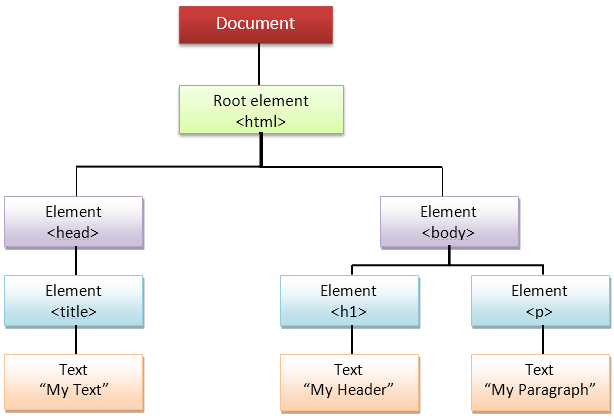
Each HTML element on a page becomes a node inside this tree. Browsers group DOM nodes into a few core types: element nodes represent tags such as <p> or <div>, text nodes hold the visible words inside a tag, attribute nodes store values such as id or class, and comment nodes preserve <!-- --> markup. The topmost node is always the document object, and every other element is a descendant of it.
Using the DOM, JavaScript can perform multiple tasks. It can create new elements and attributes, change existing elements and attributes, and even remove existing elements and attributes. JavaScript can also react to existing events and create new events on the page. The sections below walk through selecting elements, modifying them, and wiring up event handlers with practical, runnable examples.
It helps to remember that the DOM is not the same thing as the HTML source file. The HTML a browser downloads is static text, but the DOM it builds from that text is a live, dynamic object model. Any change JavaScript makes to the DOM shows up on screen immediately, without the original HTML file ever being touched.
How to Select DOM Elements in JavaScript
Before JavaScript can change anything on a page, it first needs to select the target node. The DOM provides several selector methods, each suited to different situations:
- getElementById(): returns the single element that matches a given
idattribute. - getElementsByClassName(): returns a live HTMLCollection of every element that carries a given class.
- getElementsByTagName(): returns a live HTMLCollection of every element with a given tag name, such as
porli. - querySelector(): returns the first element that matches any CSS selector.
- querySelectorAll(): returns a static NodeList of every element that matches a CSS selector.
The table below compares the four most commonly used selection methods so you can pick the right one for the job.
| Method | Returns | Best Used When |
|---|---|---|
| getElementById | Single element | You know the exact, unique id of the target. |
| getElementsByClassName | Live HTMLCollection | You need every element sharing one class name. |
| querySelector | Single element (first match) | You want to use any CSS selector, not just id or class. |
| querySelectorAll | Static NodeList | You need to loop over every match with forEach. |
querySelector and querySelectorAll accept any valid CSS selector, which makes them the most flexible choice for modern code. Try the snippet below in a page that contains an element with id="title" and several elements with class="item":
const heading = document.getElementById("title");
const itemsByClass = document.getElementsByClassName("item");
const firstItem = document.querySelector(".item");
const allItems = document.querySelectorAll(".item");
console.log(heading.textContent, itemsByClass.length, allItems.length);
getElementById and getElementsByClassName remain faster for simple lookups, while querySelector and querySelectorAll are preferred whenever the selection logic needs the power of full CSS syntax, such as attribute or descendant selectors.
How to Modify, Create, and Remove DOM Elements
Once an element is selected, JavaScript can read or rewrite its content, attributes, and even its existence in the tree. Using DOM, JavaScript can create new elements and attributes, change existing elements and attributes, and remove existing elements and attributes entirely.
Change Content with getElementById and innerHTML
- getElementById: To access elements and attributes whose id is set.
- innerHTML: To access the content of an element.
Try this example yourself:
<html>
<head>
<title>DOM!!!</title>
</head>
<body>
<h1 id="one">Welcome</h1>
<p>This is the welcome message.</p>
<h2>Technology</h2>
<p>This is the technology section.</p>
<script type="text/javascript">
var text = document.getElementById("one").innerHTML;
alert("The first heading is " + text);
</script>
</body>
</html>
The alert box confirms that getElementById located the heading and innerHTML returned the text stored inside it.
Read Every Paragraph with getElementsByTagName
getElementsByTagName: To access elements and attributes using tag name. This method will return an array of all the items with the same tag name.
Try this example yourself:
<html>
<head>
<title>DOM!!!</title>
</head>
<body>
<h1>Welcome</h1>
<p>This is the welcome message.</p>
<h2>Technology</h2>
<p id="second">This is the technology section.</p>
<script type="text/javascript">
var paragraphs = document.getElementsByTagName("p");
alert("Content in the second paragraph is " + paragraphs[1].innerHTML);
document.getElementById("second").innerHTML = "The orginal message is changed.";
</script>
</body>
</html>
Because getElementsByTagName returns a live collection, paragraphs[1] refers to the second paragraph in the document, and updating innerHTML immediately overwrites its text on screen.
Create and Remove Elements with createElement and removeChild
Besides changing what is already on the page, the DOM lets you add brand-new elements or take existing ones away:
- createElement(): builds a new element node in memory.
- appendChild(): attaches a node as the last child of a parent element.
- setAttribute(): adds or updates an attribute, such as
classorhref, on an element. - removeChild(): removes a specified child node from its parent.
The example below creates a new list item, gives it text and a class, appends it to an existing list, and then removes the very first item from that same list:
const list = document.getElementById("myList");
const newItem = document.createElement("li");
newItem.textContent = "Freshly added item";
newItem.setAttribute("class", "highlight");
list.appendChild(newItem);
list.removeChild(list.firstElementChild);
createElement() alone does not display anything, since the node still lives only in memory. It only appears once appendChild(), or a similar method such as prepend(), attaches it somewhere inside the visible tree. Modern browsers also support a shorter node.remove() method, which deletes an element directly without needing a reference to its parent, unlike the older parent.removeChild(node) syntax.
How to Handle Events in JavaScript
An event is any action the browser can detect, such as a click, a key press, or a page load. You can add an event handler to a particular element in two main ways.
Attach a Handler with onclick or addEventListener
The first, older approach assigns a function directly to an element’s on-event property:
document.getElementById(id).onclick=function()
{
lines of code to be executed
}
OR, using the modern and more flexible addEventListener() method:
document.getElementById(id).addEventListener("click", functionname)
addEventListener() is generally preferred because it lets you attach more than one handler to the same event on the same element, and it accepts an optional third argument that controls capturing, covered later in this section. It also pairs with removeEventListener(), which detaches a handler when it is no longer needed, something the onclick property cannot do on its own.
HTML also supports a third style: an inline handler written directly on the tag, such as <button onclick="clicked()">Click Me</button>. Inline handlers mix markup with logic and quickly become hard to maintain, so most JavaScript developers reserve them for quick demos and rely on addEventListener() for real applications.
Try It: A Complete Click Event Example
Try this example yourself:
<html>
<head>
<title>DOM!!!</title>
</head>
<body>
<input type="button" id="btnClick" value="Click Me!!" />
<script type="text/javascript">
document.getElementById("btnClick").addEventListener("click", clicked);
function clicked()
{
alert("You clicked me!!!");
}
</script>
</body>
</html>
Clicking the button fires the clicked() function, which triggers a JavaScript alert box confirming that the event handler ran successfully.
The Event Object
Every event handler automatically receives an event object as its first argument. This object carries useful details about what happened, including event.target (the exact element the action originated on), event.type (the event name, such as “click”), and methods such as event.preventDefault(), which stops a browser’s default behavior, like following a link or submitting a form.
document.getElementById("btnClick").addEventListener("click", function(event) {
console.log("Clicked element: " + event.target.id);
});
Two more properties round out the event object: event.currentTarget always refers to the element the listener is attached to, even if event.target reports a nested child, and event.stopPropagation() halts an event before it continues bubbling or capturing any further. Together with preventDefault(), these tools give a handler precise control over what happens next.
Event Bubbling, Capturing, and Delegation
When an event fires on a nested element, it does not stop there. In the bubbling phase, the event travels upward from the target element through each ancestor, all the way to the document. In the capturing phase, which runs first and is opt-in, the event instead travels downward from the document to the target before bubbling begins. Pass {capture: true} as the third argument to addEventListener() to listen during the capturing phase.
Event delegation takes advantage of bubbling: instead of attaching a separate listener to every child element, you attach one listener to a shared parent and inspect event.target to determine which child triggered it. This uses less memory and automatically covers elements added to the page later.
const list = document.getElementById("myList");
list.addEventListener("click", function(event) {
  if (event.target.tagName === "LI") {
    alert("You clicked " + event.target.textContent);
  }
});
Delegation, along with bubbling and capturing, gives you fine-grained control over how DOM and Events in JavaScript respond as a page grows more interactive.
