How to Recover Deleted Files in Windows 11 (10 Methods)
That’s because ordinary recovery apps and using off-the-wall methods can lead to more harm, such as exposing your device to malware, compromising your data privacy, etc. Some poor-quality tools also lead to permanent data loss, file corruption, system instability, damaged disks, incomplete data recovery, and more. Therefore, I spent over 290 hours in total testing 40+ tools and 20+ methods for file recovery in Windows 11, to shortlist the most reliable ones. I urge you to use these tips and tricks depending on your situation, since not every method fits every scenario.
Stellar’s data recovery feature can easily retrieve photos and videos. It can recover the deleted images from SD cards, GoPros, DSLs, PCs, and more. It also offers repair tools for videos that can fix damaged items such as MP4, MOV, etc.
To recover the deleted files in Windows 11, you can use third-party tools like Stellar, Wondershare Recoverit, and Glarysoft. You can also check the Recycle Bin, use Windows Recovery Tool, Undo Delete Feature, and File History. In the case of Word file, the Auto-recovery feature is quite helpful. Using Windows.old in File Explorer is an excellent choice for finding missing files after an upgrade. Techniques that involve using Settings, Older Backup, and File Versions are also some of the reliable methods, depending on the use case.
Method 1) Using Third-Party Tools for Recovering Deleted Files in Windows 11
Success Rate: Very High.
To find the best third-party tools for recovering deleted files in Windows 11, I spent over 250 hours testing 40+ recovery software. After extensive research and testing, I shortlisted the top 3 software that are most reliable and have the highest success rate in multiple damage and deletion scenarios. This method is suitable for everyone, such as working professionals and students. They are also quite easy to use; however, do take a tech-savvy user’s help if you get confused.
1) Stellar
Stellar’s data recovery feature can easily retrieve photos and videos. I used it to recover the deleted images from SD cards, GoPros, DSLs, PCs, and more. It also offers repair tools for videos that can fix damaged items such as MP4, MOV, etc. Additionally, what I like about Stellar is that it helps convert orphaned OST files to PST format and export contacts to CSV. Moreover, it enabled me to move offline OST files to M365.
However, at times, I noticed permission errors like “Access Denied” while scanning. I suggest running Stellar as an admin or disabling BitLocker temporarily if it is enabled, and make sure that you have a recovery key. Checking NTFS permissions under the drive properties and turning off anti-virus also helped me remove this access block.

Here is a step-by-step demonstration of how to use Stellar to recover deleted files in Windows 11:
Step 1) First, download and install Stellar Data Recovery for Windows on a Windows 11 PC.
Step 2) Now, launch the software and go to the “What to Recover” option and choose what you want to recover or the file type.

Step 3) Once you have selected what to recover, you can tap on Next to choose the location from where you want to recover the files and click Scan.

Step 4) Once the scanning begins, you can look into the files that appear on the screen and choose the Deleted List to see what you need to recover.

Step 5) Finally, select the recovered file that you want to save once the scanning is complete. Then select the file destination and choose the folder to store it.

Lifetime Free Basic Plan
2) Wondershare Recoverit
Wondershare’s Recoverit is widely known for being an exclusive recovery software. It is AI-powered and supports 1000+ file formats, and is suitable for 10,000+ corrupted or lost scenarios. I used it to recover my old high school trip’s photos and videos that I accidentally deleted while decluttering my computer. It recovers multiple types of files such as images, MP4, MP3, Word, Excel, PPT, PDF, Email, Game, and more.
The main drawback I noticed is that the software crashes or freezes at times during scanning. In such situations, I close the background apps to free up RAM and CPU. You must also check if Recoverit requires an update, as it crashes frequently, or simply reinstall it. I also suggest you avoid scanning unstable external drives if there isn’t a stable power supply.

Follow the given steps below on how to use Recoverit to retrieve the deleted files:
Step 1) Start by installing Recoverit and then launch it. Now, select the location from which you want to recover the file and tap on Start.

Step 2) Once you have selected the file path, tap on Recover. This will trigger the recovery process. You can also pause the process if you see your lost file already on the screen.

Step 3) Once the scanning is complete, you can select the file, preview it, and recover it.
Lifetime Free Basic Plan
3) Glarysoft
Glarysoft effortlessly restores the deleted files from the Recycle Bin, SD cards, SSDs, HSDs, and USB drives. I noticed that it sorts the files automatically based on the file type, size, name, and creation date. It also performs a complete device scan to help you find where the file is located. It scans FAT, NTFS, and NTFS+ EFS file systems, which makes sure that you get comprehensive data retrieval.
However, at times, the files may come up with incorrect names. When this occurs, you can sort the results by file type and date modified, and also preview the files before you recover them. You must also use file signature search instead of relying on filenames, and organize the recovered files manually once they are restored.

Here’s a step-by-step process for using Glarysoft to recover your files:
Step 1) Start by downloading and installing Glarysoft on your Windows 11 PC. Then launch the app and select the location where you want to scan the deleted files.

Step 2) After the scan is complete, you can go through the available files. Then click on the file you want to recover, and preview it.
Step 3) Next, tap on Recover to save it in your preferred location.

Lifetime Free Basic Plan
Method 2) Using the Recycle Bin
Success Rate: High
Searching the Recycle Bin and recovering deleted files is one of the top and easiest retrieval methods. It is best for users who accidentally deleted a file and are within a 30-day window. You do not have to be tech-savvy to use it, since it is a simple function in your Windows 11 PC.
However, the issue is that if the Recycle Bin has also been emptied, then the recovery can be almost impossible with this method. In other cases, if you emptied the Recycle Bin as well, then immediately stop using the drive to prevent overwriting. You can also restore the files from File History by going to the settings > system > storage > advanced storage settings > backup options. If this method fails, do try the recovery tools.
Use the steps given below to recover the deleted files in your Windows 11 device:
Step 1) Open your device and go to the Recycle Bin; it might be available on your desktop itself.

Step 2) Now, open the Recycle Bin and go through the deleted files that are stored in it and select the file or files you want to restore.

Method 3) Using the Windows File Recovery Tool
Success Rate: High
Using the Windows File Recovery tool is an excellent choice for businesses and tech-savvy individuals. It is basically a free command-line utility developed by Microsoft that helps recover deleted files from hard drives, SSDs, USB drives, and memory cards on Windows. I could scan the storage devices with it and use different recovery modes to restore the accidentally deleted files.
Even if it is a helpful tool, it might not recognize the internal or external command at times, and this could be due to incorrect installation. To overcome this challenge, you must open Command Prompt as an administrator. In my case, when I restarted the PC and refreshed the system path, it began running smoothly. Furthermore, you must confirm its installation by searching for it in the Start Menu.
Here’s how I used Windows File Recovery to retrieve the accidentally deleted files:
Step 1) Go to the Microsoft Store, type Windows File Recovery in the search bar, and install it.

Step 2) Once it is installed, go to All Apps and open it. I suggest you have a tech-savvy person assist you while using it, although it is quite easy to use. Always make sure that you type Winfr, the drive where the files were previously stored for example, here it is C. Then put a colon and space, and then type the drive where you want to restore your files, here I will add E, then a colon, and then the filter. For example, here my filter is pdf, hence after the E and colon I shall put a space and add forward /n, * and then type .pdf. Hence, it will look like– “winfr C: E: /n* .pdf”

Step 3) Now, hit Enter, which will ask you if you want to continue, select “y” in the yes or no option. It will then start scanning your drive.
Step 4) This action will give you the list of recovered files, which you can view in the recovered folders. The viewing option leads you directly to your folders, where you will find your retrieved docs and files.

Link: https://apps.microsoft.com/detail/9N26S50LN705?hl=en-us&gl=IN&ocid=pdpshare
Method 4) Using the Undo Delete Feature
Success Rate: Medium
The Undo feature on Windows 11 is a suitable recovery method for teens, non-technical users in panic, etc., who accidentally deleted a file before saving it. It works if you deleted the file just now; all you have to do is press Ctrl+Z or choose the Undo button on File Explorer so that it reverses your action. Its instant recovery functionality, without any steps or processes to follow, makes it a user-friendly choice.
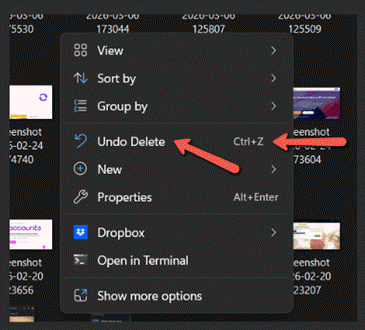
However, at times it might be grayed out in File Explorer, so ensure that no other action was performed after deletion to avoid losing the file. It is an immediate restoration process and does not work if you perform another action after the deletion.
Method 5) Using File History
Success Rate: Medium
File History is a built-in backup feature that you will find in Windows 11. It automatically saves copies of files in folders such as Documents, Pictures, and Desktop, to an external or network drive. File History keeps multiple versions of the files over time, allowing users to restore deleted files or roll back to previous versions. This recovery system is great for organizations, professionals, etc., since it lets you keep track of the file changes.
However, sometimes there are unexpected errors like “no usable drive found”. You must connect an external USB drive or configure a network location when this happens. Additionally, ensure the drive is formatted as NTFS and check the disk management to confirm the drive has a healthy partition and assign a drive letter if it is missing.
Here’s how I use File History to recover the deleted files on Windows 11:
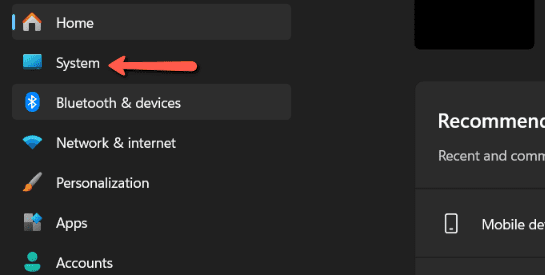
Step 1) First, go to Settings, then select System in the settings.
Step 2) Once you select System, go to the Storage and choose Advanced Storage Settings.
Step 3) In the advanced storage settings, you will find Backup Options. You must make sure that File History is enabled in the backup drive.

Step 4) Now, search and open the Control Panel on the search bar, go to File History, and finally, tap on Restore Personal files. Here you can browse the previous versions and select the deleted file or folder, and click the Restore button.

Method 6) Recovering a Deleted Word File
Success Rate: Medium
Usually, recovering a deleted Word file is simple; if you deleted it not too long ago, it will still be available in your Recycle Bin. The best part is that if you turn off your computer without saving your Word file, it will be available as Autorecovered once you turn on your PC. I usually find all my unsaved files as Autorecovered, which has saved my back multiple times during a sudden shutdown with no powerbackup.

The main issue with Word is that it lags or crashes out of the blue, leading to unsaved work. When this happens, I suggest you close and reopen the Word, then go to File and select Info. In Info, choose Manage Document and tap on Recover Unsaved Documents. You can also view version history in Info if you need to roll back to the older versions.
Method 7) Recovering Files After an Upgrade
Success Rate: Medium
This method is great for users who are scared of losing their files after an upgrade. It is best to keep a backup so that you do not have to panic. However, if you forgot to back up or some of your files have disappeared, even if you did store them in a backup, this method can be helpful. You can either check your system folders, go through backups, or use the Windows File Recovery tool.
Sometimes, OneDrive files may appear missing or unsynced even when you have already backed them up. I overcame this issue by opening OneDrive and checking the sync status. All I had to do was visit onedrive.live.com and verify the files exist in the cloud. Additionally, I suggest checking OneDrive Recycle Bin and enabling the backup for desktop, documents, pictures, etc., if it is disabled.
Here are the steps on how to recover deleted files in Windows 11 after an upgrade:
Step 1) First, you must open the File Explorer and check Windows.old folder created after the Windows upgrade process.
Step 2) Now, browse the user folder inside Windows.old to locate documents, pictures, downloads, and other personal files.

Step 3) Next, copy the recovered files from Windows.old and paste them into your new Windows user folders.

Step 4) If files are missing, then use the File History feature to restore the previous versions of the important folders.
Step 5) Finally, run the Windows Recovery software, which will scan the drive and find the deleted files.
While upgrade recovery works for files affected by the upgrade itself. If there is an app issue that caused the loss, you will need to use the next method.
Method 8) Recovering a Windows 11 App Files Using Settings
Success Rate: Medium
Using this method, I was able to recover deleted data from a malfunctioning Windows 11 app using the Settings. In the Settings, I went to the Apps and then tapped on Installed Apps. Here, I selected the app that was malfunctioning and hit the Repair and Reset option. This restored the app’s files and helped the software function properly without reinstallation. It is a helpful method for students and professionals alike.

However, in this one scenario, the Repair option failed and didn’t fix anything. In such a situation, I hit the Restart button for my Windows 11 PC and then reattempted Repair. You can also run sfc/scannow in Command Prompt (Admin) to fix corrupted system files if you are technically inclined. I would also suggest checking Windows updates and installing any pending updates.
Restoring an app through Settings can recover files stored within it. But this method only works for app-related data. If you need more generic file recovery, the backups created earlier can help restore the lost data, which I shall discuss in the upcoming method.
Method 9) Recovering Files From Older Backups
Success Rate: Low
This Older-Backup method leads you to the older versions that were edited, lost, or damaged. It is best for small business owners and people who have formatted their device by mistake. Although the “Restore personal files” option may not always be visible in the control panel. When this happens, open the Control Panel manually. You can do so by pressing Win+R and then typing Control Panel and pressing the Enter button. Finally, just navigate to the System and Security and then select File History. Now, click on Restore personal files when it appears. This will restore the deleted files. If anything else is missing, I suggest you verify if the backup drive is connected.

If your files weren’t found in an older backup, don’t worry—Windows 11 has another built-in option that can help recover earlier copies. The “Previous Versions” feature lets you restore files or folders from restore points and shadow copies automatically created by the system. Let’s look at how to use it to bring back your deleted files.
Method 10) Recovering the Files Using Previous Versions
Success Rate: Low
Many non-tech-savvy users are unaware that Windows automatically creates shadow copies during restore points. I have used this several times to roll back to the earlier versions of files or folders without File History. However, make sure that System Protection is enabled so that you can find the previous versions easily.
Here’s how you can recover the files using previous versions:
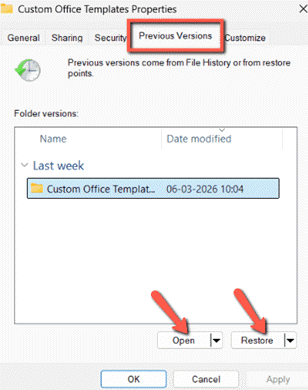
Step 1) First, right-click on the folder where the deleted file was located.
Step 2) Now, select Properties, then open the Previous Versions tab, and choose a restore point.

Step 3) Next, click on Restore or Open to view and restore the file.
How to Recover Data from a Corrupted or Unbootable Windows 11 PC?
Here’s a simple step-by-step method to recover data from a corrupted or unbootable Windows 11 PC:
Step 1) You must use another working computer to create a bootable USB drive with Windows recovery tools or a data recovery tool. Then insert a USB of at least 8GB to create this bootable drive.
Step 2) Next, insert the USB into the problematic PC, restart it, and enter the BIOS/Boot Menu by pressing the keys F2, F12, DEL, or ESC. Then select the USB drive as the boot device.
Step 3) Once the system boots from the USB, open the Windows Recovery environment or recovery software interface. This allows you to access the hard drive without starting Windows.
Step 4) Now, run a deep scan on the affected drive to locate recoverable files like documents, photos, and videos.
Step 5) After the scanning is complete, preview the files that you find in the scan and select the ones you want to recover.
Step 6) Finally, recover the files and save them to another external drive/USB, and the corrupted disk to avoid any data overwriting.
What Affects the Success Rate of File Recovery in Windows 11?
In this section, we shall discuss the top reasons that affect the success rate of file recovery in Windows 11:
- Time Since Deletion: The sooner recovery is attempted, the higher the success rate, because new data may overwrite deleted files quickly.
- Disk Usage After Deletion: If you continue to use the drive, it increases the chance that the deleted file sectors get overwritten. Thus, this action reduces recovery possibilities significantly.
- Type of Storage Device: The SSDs with TRIM enabled often erase deleted data quickly, while traditional HDDs usually provide better recovery chances.
- File System Type: File systems like NTFS, FAT32, or exFAT store metadata differently. This affects how easily recovery tools locate deleted files.
- Cause of Data Loss: The recovery depends on whether the data loss was caused by accidental deletion, formatting, partial loss, malware, or system crashes. Additionally, system crashes also affect the recovery difficulty, depending on how the data structure has changed.
- Condition of SD: Any physical damage, bad sectors, or failing drives can reduce the ability of the recovery software. Such issues also prevent the software from scanning or reconstructing the lost files.
- Quality of Recovery Software: You need advanced recovery tools that come with deeper scanning algorithms for better chances of locating fragmented/partially overwritten files.
- File Fragmentation Level: The highly fragmented files are harder to recover because their pieces are scattered across the drive. Thus, it complicates the reconstruction during the recovery process.
What Type of Files Can Be Recovered in Windows 11?
Here is a list of types of files that can be recovered in Windows 11:
- Documents (DOC, DOCX, PDF, TXT): All of your common and personal files, such as reports, notes, and eBooks, can be recovered if you accidentally delete them.
- Images (JPG, PNG, GIF, BMP): You can recover photos, screenshots, and graphics if they were recently deleted from the drive.
- Videos (MP4, AVI, MKV, MOV): The video files, such as camera and screen recordings or downloads, can be recovered.
- Audio Files (MP3, WAV, AAC): Music, voice recordings, and podcasts can often be recovered from the drives after you delete them by mistake.
- Compressed Files (ZIP, RAR,7Z): Your archived folders that contain multiple files can be recovered if the storage sector remains intact.
- Emails and PST Files: The Outlook email data files, including messages, contacts, and calendars, can sometimes be recovered from deleted storage.
- Application Files (EXE, DLL): Certain software-related files may be restored, though reinstalling the programs is usually recommended instead.
- Spreadsheets (XLS, XLSX, CSV): The financial records, data sheets, and reports created in spreadsheet software are easily recoverable after deletion.
- Presentations (PPT, PPTX): The slide decks that you used for meetings or classes can often be restored from storage drives or backup locations.
- System and Configuration Files: Some Windows configuration or system files may be recoverable, however, restoring them requires caution to avoid system instability.
FAQs
Conclusion
After spending hours testing the methods and using them in real-life scenarios, I must say that using third-party tools like Stellar, Recoverit, and Glarysoft is my go-to option for recovering deleted files. These tools do most of the task without you needing to configure or follow too many complicated processes. Moreover, these tools offer a high level of guarantee when it comes to restoring deleted files in Windows 11. However, depending on the situation, I also found using the Windows Recovery tool, Recycle Bin, Undo Delete feature, and File History quite helpful. Overall, the recovery method also depends on the type of file deleted, the duration of the deletion, and other factors.
Important: Please note that you must use the above methods only on your device or the devices that you have complete access permission to.
Stellar’s data recovery feature can easily retrieve photos and videos. It can recover the deleted images from SD cards, GoPros, DSLs, PCs, and more. It also offers repair tools for videos that can fix damaged items such as MP4, MOV, etc.