How to Install HBase on Ubuntu: Step-by-Step Guide
⚡ Smart Summary
HBase installation on Ubuntu runs in three modes — standalone, pseudo-distributed, and fully distributed — covering how to download the release tarball, edit hbase-env.sh and hbase-site.xml, start the daemons, and fix common startup errors.

Apache HBase is a distributed, column-oriented database that runs on top of the Hadoop Distributed File System (HDFS). Before you begin, make sure a supported Java runtime is installed and JAVA_HOME is set; the pseudo-distributed and fully distributed modes also require a working Hadoop installation.
Apache HBase Installation Modes
Apache HBase can be installed in three modes. The features of these modes are mentioned below.
1) Standalone mode installation (No dependency on Hadoop system)
- This is the default mode of HBase.
- It runs against the local file system.
- It does not use Hadoop HDFS.
- Only the HMaster daemon can run.
- Not recommended for a production environment.
- Runs in a single JVM.
2) Pseudo-Distributed mode installation (Single node Hadoop system + HBase installation)
- It runs on Hadoop HDFS.
- All daemons run on a single node.
- Recommended for a production environment.
3) Fully Distributed mode installation (Multinode Hadoop environment + HBase installation)
- It runs on Hadoop HDFS.
- All daemons run across all nodes present in the cluster.
- Highly recommended for a production environment.
For Hadoop installation, refer to this Hadoop installation guide.
The screenshots below use HBase 1.1.2. Current stable releases are the HBase 2.5.x and 2.6.x series (Java 8 or 11), but the installation steps and configuration files remain essentially the same.
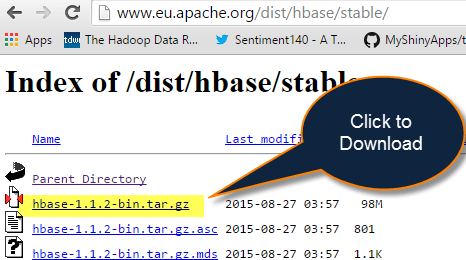
How to Download HBase tar file stable version
Step 1) Go to the official Apache HBase downloads page to download HBase. It will open the downloads webpage as shown below.

Step 2) Select the stable version as shown below, HBase 1.1.2 version.

Step 3) Click on hbase-1.1.2-bin.tar.gz. It will download the tar file. Copy the tar file into an installation location.
How To Install HBase in Ubuntu with Standalone Mode
Here is the step-by-step process of HBase standalone mode installation in Ubuntu:
Step 1) Place the below command. Place hbase-1.1.2-bin.tar.gz in /home/hduser.
Step 2) Unzip it by executing the command $tar -xvf hbase-1.1.2-bin.tar.gz. It will unzip the contents, and it will create hbase-1.1.2 in the location /home/hduser.
Step 3) Open hbase-env.sh as below and mention the JAVA_HOME path in the location, as shown below.

Step 4) Open the ~/.bashrc file and mention the HBASE_HOME path as shown below.
export HBASE_HOME=/home/hduser/hbase-1.1.1
export PATH= $PATH:$HBASE_HOME/bin
The updated ~/.bashrc file with the HBASE_HOME entry is shown below.

Step 5) Add properties in the file. Open hbase-site.xml and place the following properties inside the file.
hduser@ubuntu$ gedit hbase-site.xml (code as below)
<property>

<name>hbase.rootdir</name>

<value>file:///home/hduser/HBASE/hbase</value>

</property>

<property>

<name>hbase.zookeeper.property.dataDir</name>

<value>/home/hduser/HBASE/zookeeper</value>

</property>
The hbase-site.xml file opened in gedit is shown below.

Here we are placing two properties:
- One for the HBase root directory, and
- The second one for the data directory that corresponds to ZooKeeper.
All HMaster and ZooKeeper activities point to this hbase-site.xml.
Step 6) Mention the IPs. Open the hosts file present in the /etc. location and mention the IPs as shown below.

Step 7) Now run start-hbase.sh in the hbase-1.1.1/bin location as shown below. You can then check with the jps command to see whether HMaster is running or not.

Step 8) Start the HBase Shell. The HBase shell can be started by using the hbase shell command, and it will enter interactive shell mode as shown in the screenshot below. Once it enters shell mode, we can perform all types of commands.

The standalone mode does not require Hadoop daemons to start. HBase can run independently.
HBase Pseudo Distributed Mode of Installation
This is another method for Apache HBase installation, known as Pseudo Distributed mode of installation. Below are the steps to install HBase through Pseudo Distributed mode.
Step 1) Place hbase-1.1.2-bin.tar.gz in /home/hduser.
Step 2) Unzip it by executing the command $tar -xvf hbase-1.1.2-bin.tar.gz. It will unzip the contents, and it will create hbase-1.1.2 in the location /home/hduser.
Step 3) Open hbase-env.sh as below, mention the JAVA_HOME path and the Region Servers’ path in the location, and export the command as shown below.

Step 4) In this step, we are going to open the ~/.bashrc file and mention the HBASE_HOME path as shown in the screenshot below.

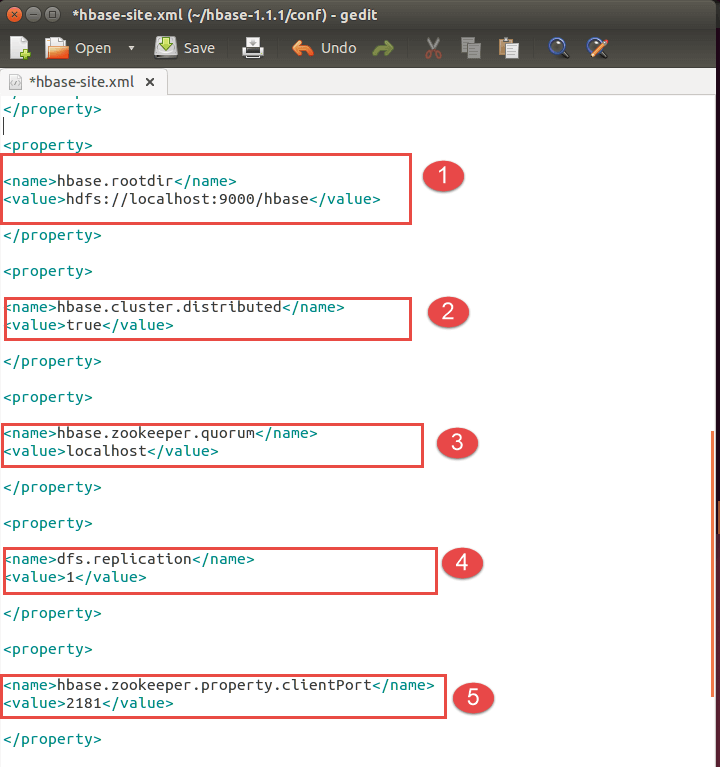
Step 5) Open hbase-site.xml and mention the below properties in the file (code as below).
<property>

<name>hbase.rootdir</name>

<value>hdfs://localhost:9000/hbase</value>

</property>

<property>

<name>hbase.cluster.distributed</name>

<value>true</value>

</property>

<property>

<name>hbase.zookeeper.quorum</name>

<value>localhost</value>

</property>

<property>

<name>dfs.replication</name>

<value>1</value>

</property>

<property>

<name>hbase.zookeeper.property.clientPort</name>

<value>2181</value>

</property>

<property>

<name>hbase.zookeeper.property.dataDir</name>

<value>/home/hduser/hbase/zookeeper</value>

</property>
The hbase-site.xml file with the pseudo-distributed properties is shown below.
The remaining ZooKeeper configuration is shown below.

Each property in the file plays a specific role:
- Setting up the HBase root directory in the hbase.rootdir property.
- For a distributed setup, hbase.cluster.distributed must be set to true.
- The ZooKeeper quorum property should be set up here.
- Replication is set up in the dfs.replication property. By default we place replication as 1. In fully distributed mode, multiple data nodes are present, so you can increase replication by placing a value greater than 1 in the dfs.replication property.
- The client port should be mentioned in the hbase.zookeeper.property.clientPort property.
- The ZooKeeper data directory can be mentioned in the hbase.zookeeper.property.dataDir property.
Step 6) Start the Hadoop daemons first, and after that start the HBase daemons as shown below. First you have to start the Hadoop daemons by using the ./start-all.sh command as shown below.

After that, start the HBase daemons with hbase-start.sh, as shown below.

Now check the running processes with the jps command, as shown below.

HBase Fully Distributed Mode Installation
The fully distributed mode extends the pseudo-distributed setup across a real cluster.
- This setup works in Hadoop cluster mode, where multiple nodes spawn across the cluster and are running.
- The installation is the same as pseudo distributed mode; the only difference is that it will spawn across multiple nodes.
- The configuration files mentioned in hbase-site.xml and hbase-env.sh are the same as mentioned in pseudo mode.
In fully distributed mode, ensure the Hadoop version on your cluster matches the Hadoop libraries bundled with HBase so the daemons communicate correctly.
HBase Installation Troubleshooting
1) Problem Statement: Master server initializes but region servers do not initialize
The communication between the Master and the region servers happens through their IP addresses. The Master listens for region servers that are running or that have the IP address 127.0.0.1. The IP address 127.0.0.1 is the local host and resolves to the Master server’s own local host.
Cause:
In the dual communication between region servers and the Master, the region server continuously informs the Master server that its IP address is 127.0.0.1.
Solution:
- Remove the Master server name node from the local host entry that is present in the hosts file.
- Host file location: /etc/hosts.
What to change:
Open /etc/hosts and go to this location.
127.0.0.1 fully.qualified.regionservernameregionservername localhost.localdomain localhost
: : 1              localhost3.localdomain3 localdomain3
Modify the above configuration as below (remove the region server name as highlighted above).
127.0.0.1    localhost.localdomainlocalhost
: : 1 localhost3.localdomain3 localdomain3
2) Problem Statement: Could not find my address: XYZ in the list of ZooKeeper quorum servers
Cause:
- The ZooKeeper server was not able to start, and it throws an error such as .xyz in the name of the server.
- HBase attempts to start a ZooKeeper server on a machine, but at the same time the machine is not able to find itself in the quorum configuration present in the hbase.zookeeper.quorum configuration.
Solution:
- Replace the host name with a hostname that is presented in the error message.
- If you have a DNS server, you can set the below configurations in hbase-site.xml: hbase.zookeeper.dns.interface and hbase.zookeeper.dns.nameserver.
3) Problem Statement: Created a root directory for HBase through Hadoop DFS
- The Master says that you need to run the HBase migrations script.
- Upon running that, the HBase migrations script responds that there are no files in the root directory.
Cause:
- A new directory was created for HBase using the Hadoop Distributed File System.
- Here HBase expects two possibilities:
1) The root directory does not exist.
2) A previous HBase running instance was initialized before.
Solution:
- Confirm that the HBase root directory does not currently exist or has been initialized by a previous run of the HBase instance.
- As part of the solution, follow these steps.
Step 1) Use Hadoop dfs to delete the HBase root directory.
Step 2) HBase creates and initializes the directory by itself.
4) Problem Statement: ZooKeeper session expired events
Cause:
- The HMaster or HRegion servers shut down by throwing exceptions.
- If you observe the logs, you can find out the actual exceptions that were thrown.
The following shows the exception thrown because of a ZooKeeper expired event. The highlighted events are some of the exceptions that occurred in the log file.
Log files code as displayed below:
WARN org.apache.zookeeper.ClientCnxn: Exception
closing session 0x278bd16a96000f to sun.nio.ch.SelectionKeyImpl@355811ec

java.io.IOException: TIMED OUT
at org.apache.zookeeper.ClientCnxn$SendThread.run(ClientCnxn.java:906)
WARN org.apache.hadoop.hbase.util.Sleeper: We slept 79410ms, ten times longer than scheduled: 5000
INFO org.apache.zookeeper.ClientCnxn: Attempting connection to server hostname/IP:PORT
INFO org.apache.zookeeper.ClientCnxn: Priming connection to java.nio.channels.SocketChannel[connected local=/IP:PORT remote=hostname/IP:PORT]
INFO org.apache.zookeeper.ClientCnxn: Server connection successful
WARN org.apache.zookeeper.ClientCnxn: Exception closing session 0x278bd16a96000d to sun.nio.ch.SelectionKeyImpl@3544d65e

java.io.IOException: Session Expired
at org.apache.zookeeper.ClientCnxn$SendThread.readConnectResult(ClientCnxn.java:589)
at org.apache.zookeeper.ClientCnxn$SendThread.doIO(ClientCnxn.java:709)
at org.apache.zookeeper.ClientCnxn$SendThread.run(ClientCnxn.java:945)
ERROR org.apache.hadoop.hbase.regionserver.HRegionServer: ZooKeeper session expired
Solution:
- The default RAM size is 1 GB. For long-running imports, maintain a RAM capacity of more than 1 GB.
- Increase the session timeout for ZooKeeper.
- To increase the session timeout of ZooKeeper, modify the following property in hbase-site.xml, present in the hbase/conf folder path.
- The default session timeout is 60 seconds. You can change it to 120 seconds as mentioned below.
<property>
    <name> zookeeper.session.timeout </name>
    <value>1200000</value>
</property>
<property>
    <name> hbase.zookeeper.property.tickTime </name>
    <value>6000</value>
</property>