How to Download & Install SAP GUI
⚡ Smart Summary
SAP GUI (Graphical User Interface), also called the SAP FrontEnd, is the desktop client used to connect to and operate an SAP system. This tutorial explains how to download SAP GUI from the SAP Marketplace and configure a connection to a SAP server on Windows.
What is SAP GUI?
SAP GUI (Graphical User Interface) is the desktop client application used to access and operate a SAP system. It is commonly called the SAP FrontEnd because it is the front-end layer through which users log on to a backend SAP server and run transactions. Before you can configure and use SAP GUI, you must download the software from the SAP Marketplace, then install and configure it as described below.
How to Download SAP GUI
Follow the steps below to download the SAP GUI installation package from the SAP Marketplace.
Step 1) Go to service.sap.com to download SAP GUI for Windows.
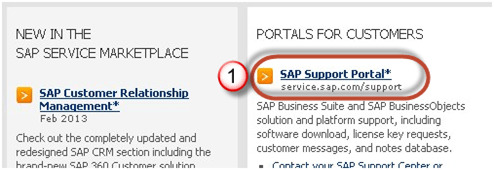
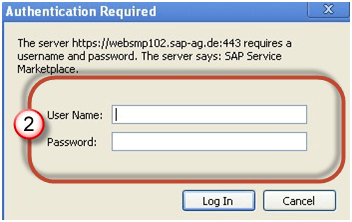
Step 2) Enter the S-user and password provided by SAP.
Step 3) Go to “Software Downloads.”
![]()
Step 4) Choose “Browse our Download Catalog.”

Step 5) Choose SAP Frontend Components.

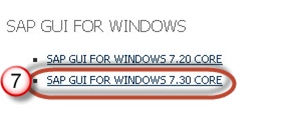
Step 6) Choose SAP GUI for your operating system. In this demo, we select Windows.

Step 7) Choose the latest SAP GUI Core version available in the catalog.
Step 8) Choose the installation package.

Step 9) Choose “Add” to add it to the Download Basket.

Step 10) Open the Download Basket.

Step 11) Choose your download and it will begin.
![]()
How to Configure SAP GUI
Once the download is complete and you have installed the software, it is time to configure a connection to your SAP server.
Step 1) Click the “New” (create) button as shown below.

Step 2) Click the Next button.

Step 3) Fill in the server details.
- Connection Type: Custom Application Server (a particular host).
- Description: name of the instance.
- Application Server: IP address of the remote application server.
- Instance number: found at the OS level (Unix). Go to
/usr/sap/SID/DVEBMGS00— here the instance number is 00. - System ID: as per the setting you specified during installation.

Step 4) The created system appears in the list, as shown below.
![]()
Double-click the instance to log on to the SAP server.