Defect Management Process in Software Testing
⚡ Smart Summary
Defect Management Process in Software Testing is a structured framework for identifying, categorizing, resolving, verifying, closing, and reporting bugs. It enables predictable communication between testers and developers, improves release quality, and reduces production-level escapes across the project lifecycle.

What is Defect Management Process?
The Defect Management Process is a systematic approach used in software testing to identify, classify, fix, and verify bugs before software is released. The lifecycle includes six core stages: 1) Discovery of the defect, 2) Categorization, 3) Resolution by developers, 4) Verification by testers, 5) Closure, and 6) Defect Reporting at the end of the project.
This article explains how to apply the Defect Management Process using the Guru99 Bank website example, so beginners and intermediate testers can understand each step in a real project context.

Why do you need Defect Management Process?
Imagine your team has found several bugs while testing the Guru99 Banking project. Without a structured process, the communication between testers and developers happens verbally or through scattered messages.

A week later, the developer responds with a different understanding of the issue.

The following week, the tester replies again, creating yet more confusion.
When defect communication is handled verbally or informally, things become complicated very quickly. To control and effectively manage bugs, you need a defined defect lifecycle that standardizes how teams report, track, and close issues.
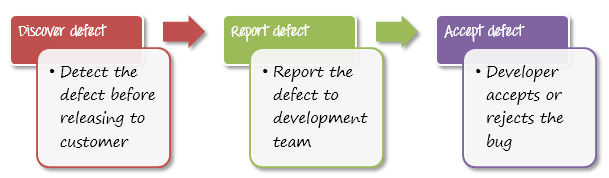
Step 1) Discovery
In the Discovery phase, the project team must identify as many defects as possible before the end customer encounters them. A defect is considered “discovered” once it is acknowledged and accepted by the development team, at which point its status changes to Accepted.
In the example scenario, testers discovered 84 defects on the Guru99 Bank website.
However, testers and developers do not always agree. Look at the following case, in which the testing team identifies issues on the Guru99 Bank website and reports them, but the development team disputes whether they are defects:

In such a case, as a Test Manager, what should you do?
A) Agree with the testing team that it is a defect.
B) Take the role of judge and decide whether the problem is a defect or not.
C) Agree with the development team that it is not a defect.
The correct approach is option B. A resolution process should be applied to resolve the conflict, and the Test Manager should evaluate the issue impartially before deciding whether it qualifies as a defect.
Step 2) Categorization
Defect categorization helps developers prioritize their work so that the most business-critical issues are fixed first. Categorization is typically performed by the Test Manager and is based on severity and business impact.

Defects are usually grouped into four priority levels: Critical, High, Medium, and Low. Try assigning the correct priority to each of the following defects:
- The website performance is too slow.
- The login function of the website does not work properly.
- The GUI of the website does not display correctly on mobile devices.
- The website cannot remember the user login session.
- Some links do not work.
Here are the recommended answers:
| No. | Description | Priority | Explanation |
|---|---|---|---|
| 1 | The website performance is too slow | High | Performance issues cause major inconvenience to end users. |
| 2 | The login function does not work properly | Critical | Login is a core function of a banking website. If it fails, the entire user journey is blocked. |
| 3 | The GUI does not display correctly on mobile devices | Medium | The defect affects users who view the website on smartphones. |
| 4 | The website cannot remember the user login session | High | Users can log in, but cannot perform any further transactions. |
| 5 | Some links do not work | Low | An easy fix for developers, and users can still access the rest of the site. |
Step 3) Defect Resolution
Defect Resolution in software testing is a step-by-step process of fixing the defects. The resolution process begins with assigning defects to developers, who then schedule the fixes based on priority, implement the corrections, and finally send a resolution report back to the Test Manager. This sequence makes defect tracking transparent and accountable.
You can follow these steps to fix a defect:
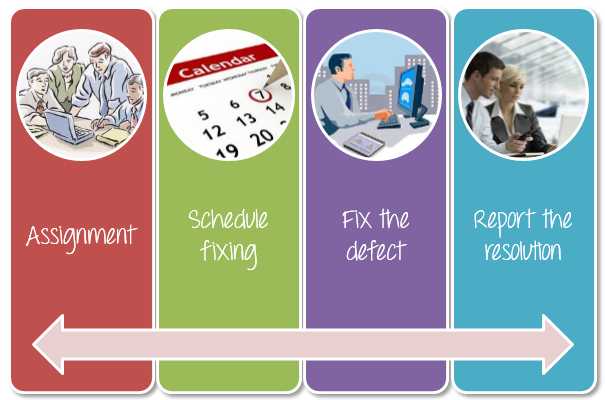
- Assignment: The defect is assigned to a developer or technician, and its status changes to Responding.
- Schedule fixing: The development team takes over and creates a fixing schedule based on the defect priority.
- Fix the defect: While the developers fix the defects, the Test Manager tracks progress against the planned schedule.
- Report the resolution: Developers send a report confirming which defects have been fixed and how.
Step 4) Verification
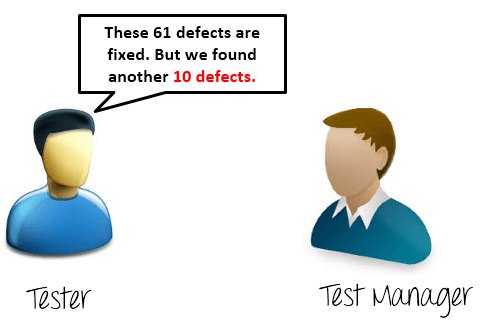
After the development team has fixed and reported the defects, the testing team verifies that the issues have been resolved.
For example, when the development team reports that 61 defects have been fixed, the testing team retests each one to confirm whether the fixes work correctly under the same conditions that caused the original failure.
Step 5) Closure
Once a defect has been fixed and verified, its status is changed to Closed. If the defect is not properly resolved during verification, you must send a notice back to the development team to investigate it again. Closure indicates that the defect is no longer active in the system.
Step 6) Defect Reporting
Defect Reporting in software testing is the process by which Test Managers prepare and share defect status with the management team. The management team reviews the report and provides feedback or additional support if required. Defect reporting improves communication, tracking, and visibility around defects.
Leadership has the right to understand the defect status to support the project effectively. Therefore, you must regularly report on the current defect situation so they can provide guidance and resources.
Important Defect Metrics
Coming back to the original scenario, the developer and testing teams review the defects together. The combined results are shown below.

How can you measure and evaluate the quality of test execution?
This is a critical question every Test Manager wants to answer. Two key parameters are typically used:

In the above scenario, the Defect Rejection Ratio (DRR) is calculated as 20/84 = 0.238 (23.8%).
As another example, suppose the Guru99 Bank website has a total of 64 defects, but the testing team detects only 44 — meaning 20 defects were missed. The Defect Leakage Ratio (DLR) is calculated as 20/64 = 0.312 (31.2%).
In summary, test execution quality is evaluated using the two parameters below:

The smaller the DRR and DLR values, the better the quality of test execution. The acceptable range is generally defined by project targets or benchmarked against similar projects. In this example, the recommended acceptable range is 5% to 10%. The current execution falls outside this range, which signals that test quality should be improved through the following measures:
- Improve the testing skills of team members.
- Spend more time on test execution, particularly when reviewing execution results.
Best Practices for Effective Defect Management
Following structured best practices is what separates a mature defect management process from a chaotic one. The goal is not just to fix bugs, but to create a system that prevents them from leaking into production and minimizes communication breakdowns between testers and developers.
Here are the best practices that beginner and intermediate testers should adopt right away:
- Standardize the defect template: Use a fixed defect report template containing fields such as Defect ID, Description, Steps to Reproduce, Severity, Priority, Environment, and Attachments. Consistency reduces back-and-forth between testers and developers.
- Prioritize before assigning: Always categorize defects by severity and priority before sending them to developers. This ensures that critical issues do not get stuck behind cosmetic ones.
- Reproduce before reporting: Reproduce the defect at least twice on a clean environment before raising it. Reproducible defects close faster and reduce the rejection ratio.
- Adopt a defect tracking tool: Use tools such as JIRA, Bugzilla, or Mantis to centralize tracking, history, and reporting.
- Conduct triage meetings: Run short, focused defect triage meetings to align priorities between QA, development, and product teams.
- Measure leakage and rejection: Track DLR and DRR every sprint or cycle. A rising leakage rate is an early warning that test coverage is incomplete.
- Perform root cause analysis: For recurring or high-severity defects, run a root cause analysis so that the same class of bug does not return in future releases.
- Close the loop with reporting: Share weekly defect dashboards with stakeholders so that issues stay visible and actionable.
Applied consistently, these practices stabilize the defect lifecycle and elevate the overall quality of every release.
Resources:
Download a sample Defect Reporting Template