
How to Create/Add Users in Jenkins & Manage Permissions
 Thomas Hamilton
⚡ Smart Summary
Creating users in Jenkins takes four clicks, but assigning different permissions to each of them requires the Role-based Authorization Strategy plugin, which replaces the single global role every built-in Jenkins account otherwise shares.

Generally, in a large organization, there are multiple, separate teams to manage and run jobs in Jenkins. But managing this crowd of users and assigning roles to them can prove troublesome.
By default, Jenkins comes with very basic user creation options. You can create multiple users but can only assign the same global roles and privileges to them. This is not ideal, especially for a large organization.
The Role Strategy Plugin enables you to assign different roles and privileges to different users. You will first need to install the plugin in your Jenkins environment, so the walkthrough below covers user creation first, then the plugin, then the role screens it unlocks.
How to Create/Add a User in Jenkins
Below are the steps to create a new user in Jenkins:
Step 1) Login to Jenkins Dashboard
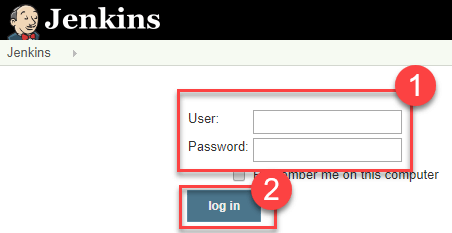
Login to your Jenkins dashboard by visiting http://localhost:8080/
If you have not installed Jenkins in your local server, go to the appropriate URL and access your dashboard by using your login credentials. The dashboard you land on is shown below.
Step 2) Choose the option
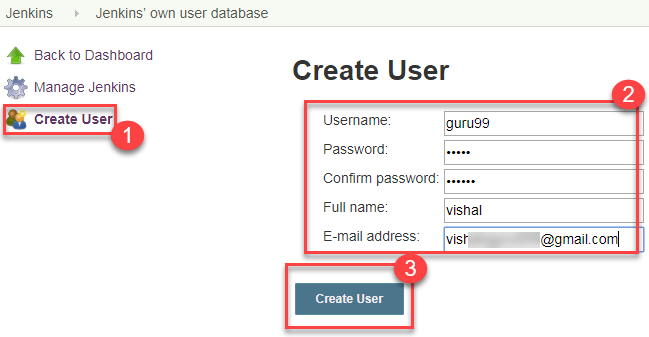
You will now see options to create and add a user in Jenkins and manage current users.
Step 3) Create a new User
- Under Manage Jenkins, Click Create User
- Enter Jenkins add user details like password, name, email etc.
- Click Create User
Step 4) User is created
You will see on the dashboard that a new Jenkins user has been created as per the details entered, as in the user list below.
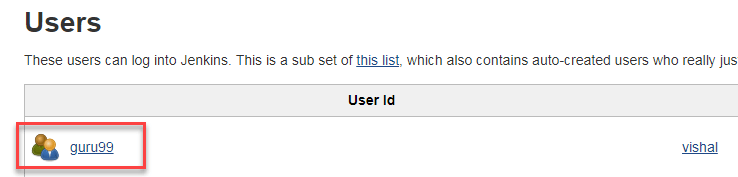
⚠️ Version note: current Jenkins releases list this screen as Manage Jenkins > Users rather than Manage Users. The Create User button and the fields on it are unchanged, and the screen only exists while Jenkins’ own user database is the security realm — an LDAP or single sign-on realm manages accounts externally instead.
How to Install Role Strategy Plugin in Jenkins
The built-in user screen creates accounts but cannot give them different permissions. That capability arrives with the Role-based Authorization Strategy plugin, installed as follows.
There are two methods for installing plugins in Jenkins:
- Installing it through your Jenkins dashboard
- Downloading the plugin from Jenkins website and installing it manually.
Step 1)
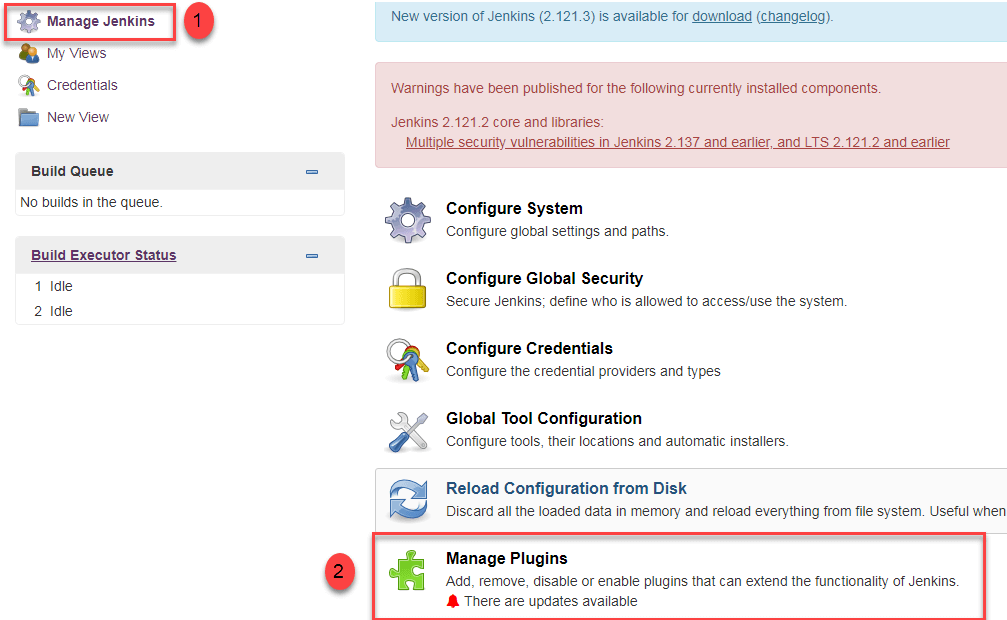
- Go to Manage Jenkins
- Click on the Manage Plugins option
Step 2)
- In the available section screen, search for “role”.
- Select Role-based Authorization Strategy plugin
- Click on “Install without restart” (make sure you have an active internet connection)
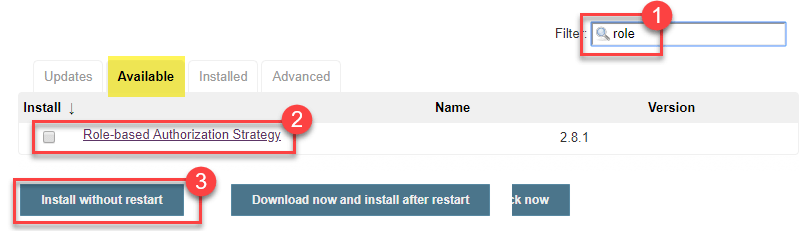
⚠️ Version note: the path is now Manage Jenkins > Plugins and the tab is labelled Available plugins. The search box and the plugin name are the same, so the two steps above still apply.
Step 3)
Once the plugin is installed, a “success” status will be displayed, as the installation screen below shows.
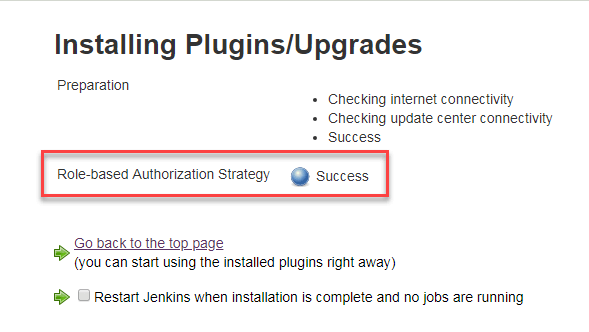
Click on Go back to the top page.
Step 4) Go to Manage Jenkins -> Configure Global Security -> Under Authorization, select Role Based Strategy. Click on Save. The Authorization section looks like this.
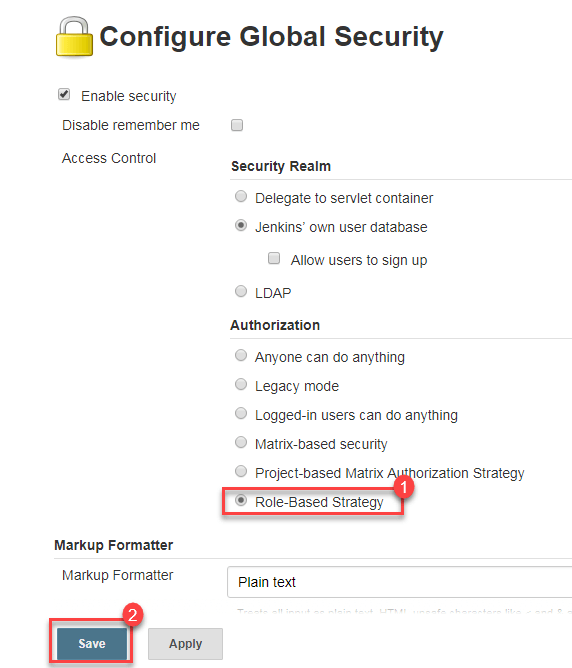
In current Jenkins the link to this page is Manage Jenkins > Security, and the page itself is still headed Configure Global Security with the same Authorization drop-down.
Types of Roles in the Role Strategy Plugin
Once Role Based Strategy is active, the plugin offers three separate role scopes. Choosing the wrong scope is the most common reason a permission appears to have no effect, so it is worth knowing what each one covers before creating anything.
| Role type | Scope | Typical use |
| Global roles | The whole Jenkins controller, and they override anything set in item roles | admin, an authenticated read-only role, anonymous |
| Item roles | Jobs, pipelines and folders whose full name matches a regular-expression pattern | Giving one team Build and Configure rights on its own jobs only |
| Agent roles | Build agents matched by a pattern | Letting a team connect or disconnect its own agents |
The tutorial below uses a global role for developer and an item role for tester. Note the naming: the plugin now calls the second scope Item roles, because it covers folders and pipelines as well as plain jobs. Older releases — and the screenshots further down this page — label the same table Project Roles.
How to Manage Users and Roles in Jenkins
Following are the steps on how to manage and assign roles in Jenkins:
Step 1)
- Go to Manage Jenkins
- Select Manage and Assign Roles
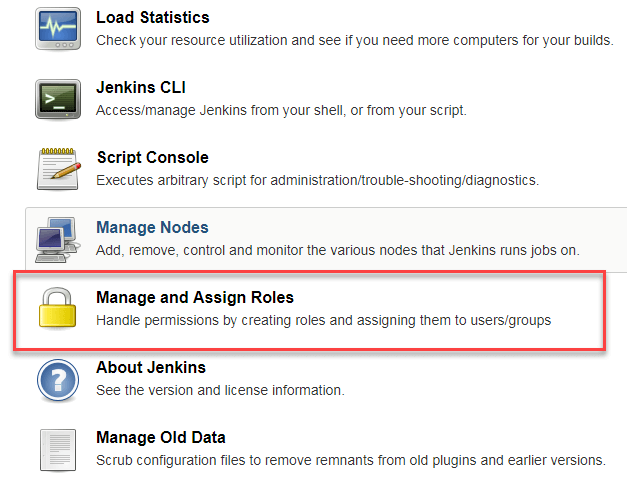
Note: that the Manage and Assign Roles option will only be visible if you have installed the role strategy plugin and switched Authorization over to Role Based Strategy.
Step 2) Click on Manage Roles to add new roles based on your organization.
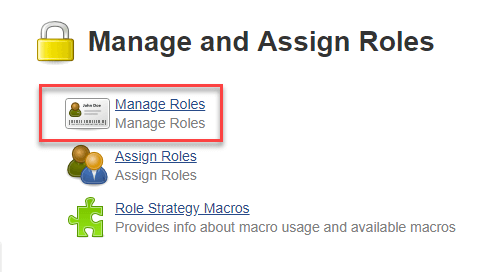
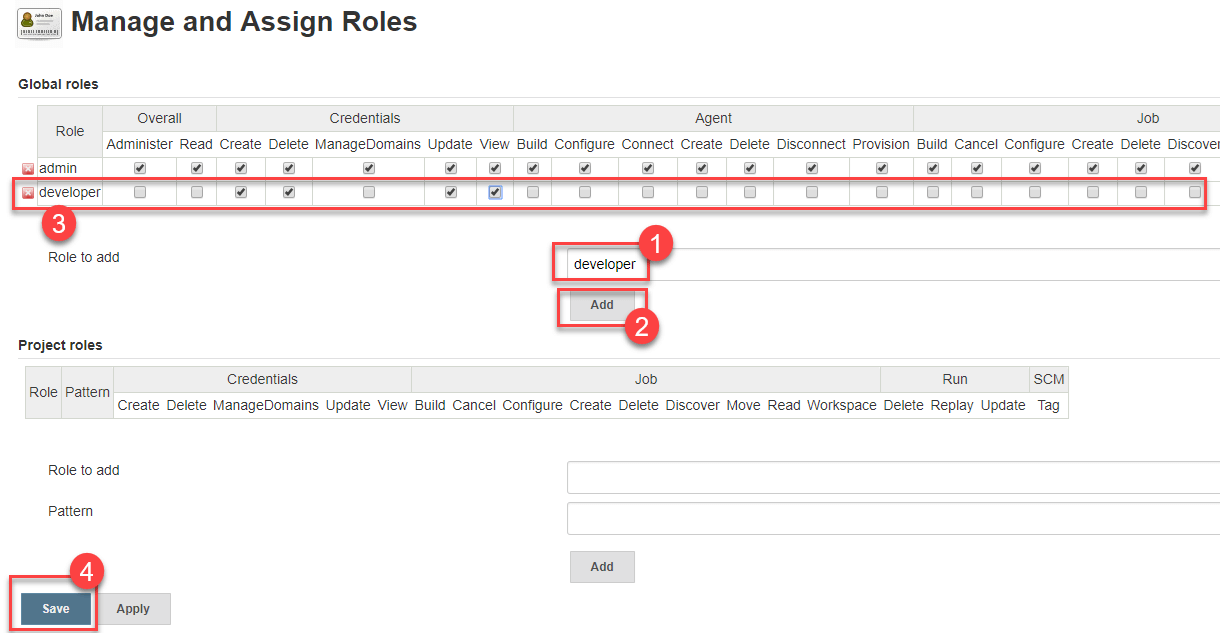
Step 3) To create a new role called “developer”,
- Type “developer” under “role”.
- Click on “Add” to create a new role.
- Now, select the Jenkins user permissions you want to assign to the “Developer” role.
- Click Save
The grid of tick boxes that appears is shown below.
Jenkins Permission Groups You Can Assign to a Role
The tick boxes on the Manage Roles screen are grouped by the object each permission acts on. The table below explains what each group controls, which makes it far easier to grant the minimum a team actually needs.
| Permission group | What it grants |
| Overall | Administer, Read and the other controller-wide rights. Administer is full control, so grant it sparingly. |
| Credentials | Viewing, creating and updating stored credentials |
| Agent | Configuring, connecting, disconnecting and deleting build agents |
| Job | Build, Cancel, Configure, Create, Delete, Read, Workspace and Move on jobs |
| Run | Deleting, replaying and updating an individual build record |
| View | Creating, configuring, deleting and reading dashboard views |
| SCM | Triggering a build from a source-control hook |
Start every new role with Overall/Read plus Job/Read. Without those two, a signed-in user sees an empty dashboard even when other permissions are ticked, which is the single most reported confusion with this plugin.
How to Assign Roles in Jenkins
Step 1) Now that you have created roles, let us assign them to specific users.
- Go to Manage Jenkins
- Select Manage and Assign Roles
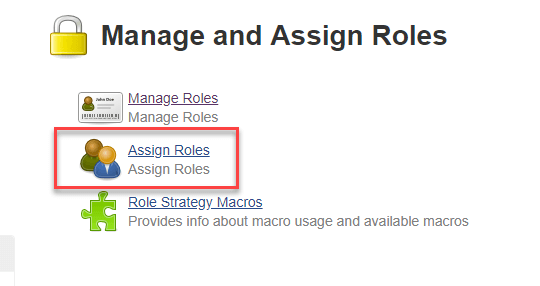
Step 2) We shall add the new role “developer” to user “guru99”
- Select the developer role checkbox
- Click Save
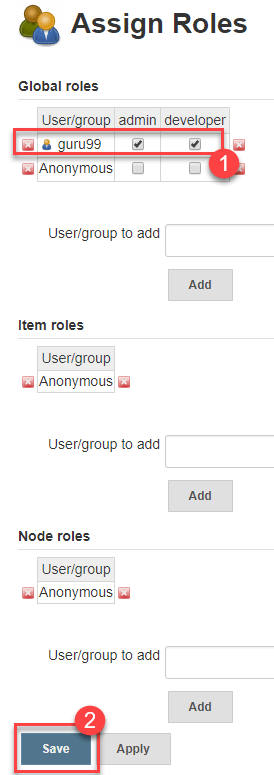
You can assign any role to any user, as per your need.
How to Create Project Roles in Jenkins
Global roles apply everywhere. When a permission should apply to one set of jobs only, create a project role instead — the scope the plugin now calls an item role.
You can create project specific roles under Project Roles.
Step 1) In Jenkins’ Manage and Assign Roles
- Enter a role as “tester”
- Add a pattern to this by adding tester.*, so that any username starting with “tester” will be assigned the project role you specify.
- Click Add
- Select privileges
- Click Save
The completed Project Roles table is shown below.
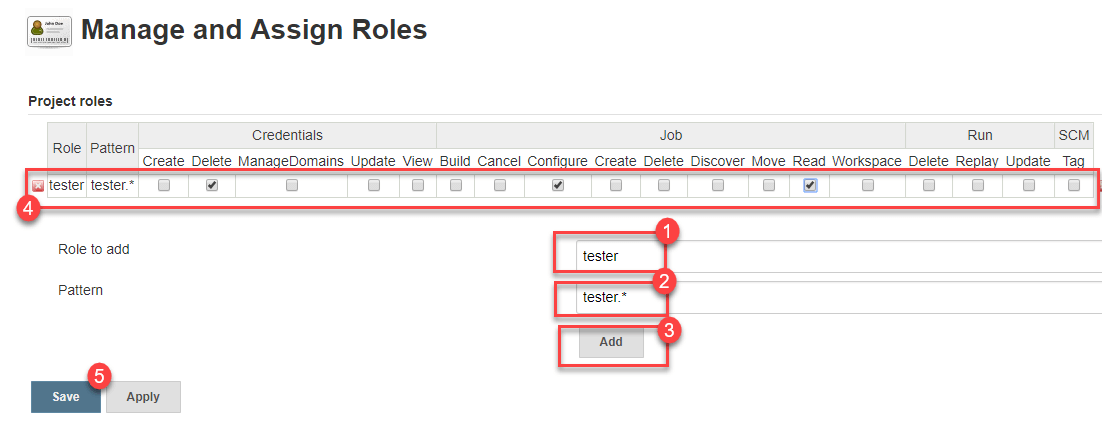
The pattern is a regular expression matched against the full name of the item, so tester.* also matches a folder named tester-suite and everything inside it. Test a new pattern on a throwaway job before applying it to a live freestyle project or a pipeline job.
Matrix-Based Security vs Role-Based Strategy
Role Based Strategy is not the only authorization option in that drop-down. Jenkins ships with matrix-based security built in, and for a small installation it may be all that is needed.
| Point of comparison | Matrix-based security | Role-based strategy |
| Installation | Built into Jenkins | Needs the Role-based Authorization Strategy plugin |
| Unit of assignment | Each user or group is granted permissions directly | Permissions belong to a named role, and users are attached to the role |
| Adding the tenth user | The whole permission row is repeated by hand | Tick one role checkbox |
| Per-job control | Project-based matrix authorization, configured job by job | One item role with a pattern covers every matching job |
| Best fit | A handful of users with near-identical access | Several teams, many jobs, access that changes as people move |
The rule of thumb is the number of times a permission is repeated. Once the same tick pattern is being entered for a third user, a role is cheaper to maintain — the same argument that pushes teams from ad-hoc jobs toward a reviewed CI/CD pipeline.
