
Vector in C++ Standard Template Library (STL) with Example
 Editorial Team
⚡ Smart Summary
Vector in C++ is a dynamic array from the Standard Template Library that resizes itself automatically as elements are added or removed, storing items in contiguous memory so programmers can access and traverse them using iterators.
What is a C++ Vector?
A C++ Vector is a dynamic array capable of resizing itself automatically. The resizing occurs after an element has been added or deleted from the vector. The storage is handled automatically by the container. The elements of a vector are stored in contiguous storage. This allows C++ programmers to access and traverse the vector elements using iterators.
The insertion of new data to a vector is done at its end. This takes a differential time. The removal of an element from a vector takes constant time. The reason is that there is no need to resize the vector. Insertion or deletion of an element at the beginning of the vector takes linear time.
Before writing code with vectors, it helps to know when they are the right container to reach for.
When to Use a Vector?
A C++ vector should be used under the following circumstances:
- When dealing with data elements that change consistently.
- If the size of the data is not known before beginning, the vector will not require you to set the maximum size of the container.
How to Initialize Vectors in C++
The syntax of vectors in C++ is:
vector <data-type> name (items)
As shown above, we begin with the vector keyword.
- The data-type is the data type of the elements to be stored in the vector.
- The name is the name of the vector or the data elements.
- The items denote the number of elements for the vector data. This parameter is optional.
Once a vector exists, iterators give you a pointer-like way to move across its elements.
Iterators
The purpose of iterators is to help us access the elements that are stored in a vector. It is an object that works like a pointer. Here are the common iterators supported by C++ vectors:
- vector::begin(): it gives an iterator that points to the first element of the vector.
- vector::end(): it gives an iterator that points to the past-the-end element of the vector.
- vector::cbegin(): it is the same as vector::begin(), but it does not have the ability to modify elements.
- vector::cend(): it is the same as vector::end() but cannot modify vector elements.
The following example populates a vector and then walks through it with both mutable and constant iterators.
Example 1
#include <iostream>
#include <vector>

using namespace std;
int main()
{
	vector<int> nums;

	for (int a = 1; a <= 5; a++)

		nums.push_back(a);

	cout << "Output from begin and end: ";

	for (auto a = nums.begin(); a != nums.end(); ++a)

		cout << *a << " ";

	cout << "\nOutput from cbegin and cend: ";

	for (auto a = nums.cbegin(); a != nums.cend(); ++a)

		cout << *a << " ";

	return 0;
}
Output:

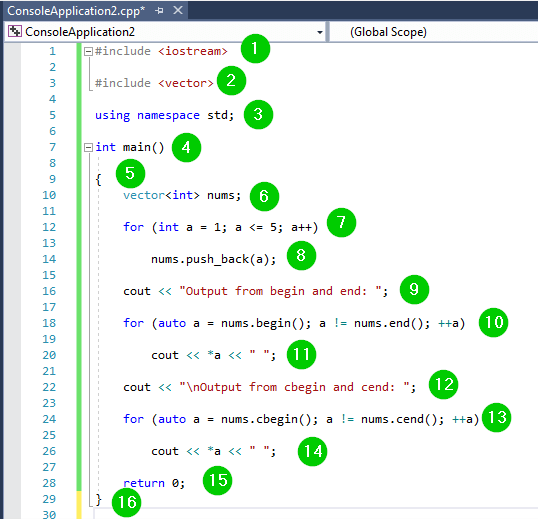
Here is a screenshot of the code:
Code Explanation:
- Include the iostream header file in our code. It will allow us to read from and write to the console.
- Include the vector header file in our code. It will allow us to work with vectors in C++.
- Include the std namespace so as to use its classes and functions without calling it.
- Call the main() function inside which the logic of the program should be added.
- The { marks the start of the body of the main() function.
- Declare a vector named nums to store a set of integers.
- Create a for loop to help us iterate over the vector. The variable will help us iterate over the vector elements, from 1st to 5th elements.
- Push elements into the vector num from the back. For each iteration, this will add the current value of variable a into the vector, which is 1 to 5.
- Print some text on the console.
- Use an iterator variable a to iterate over the elements of vector nums from the beginning to the past-the-end element. Note we are using vector::begin() and vector::end() iterators.
- Print the values pointed to by iterator variable a on the console for each iteration.
- Print some text on the console. The \n is a new line character, moving the cursor to the new line to print from there.
- Use an iterator variable to iterate over the elements of vector nums from the beginning to the past-the-end element. Note we are using vector::cbegin() and vector::cend() iterators.
- Print the values pointed to by iterator variable a on the console for each iteration.
- The main function should return a value if the program runs successfully.
- End of the body of the main() function.
Modifiers
Modifiers are used for changing the meaning of the specified data type. Here are the common modifiers in C++:
- vector::push_back(): This modifier pushes the elements from the back.
- vector::insert(): For inserting new items to a vector at a specified location.
- vector::pop_back(): This modifier removes the vector elements from the back.
- vector::erase(): It is used for removing a range of elements from the specified location.
- vector::clear(): It removes all the vector elements.
The next example applies these modifiers in sequence to see how a vector changes.
Example 2
#include <iostream>
#include <vector>

using namespace std;
int main()
{
	vector<int> nums;

	nums.assign(5, 1);

	cout << "Vector contents: ";
	for (int a = 0; a < nums.size(); a++)
		cout << nums[a] << " ";

	nums.push_back(2);
	int n = nums.size();
	cout << "\nLast element: " << nums[n - 1];

	nums.pop_back();

	cout << "\nVector contents: ";
	for (int a = 0; a < nums.size(); a++)
		cout << nums[a] << " ";

	nums.insert(nums.begin(), 7);

	cout << "\nFirst element: " << nums[0];

	nums.clear();
	cout << "\nSize after clear(): " << nums.size();
}
Output:

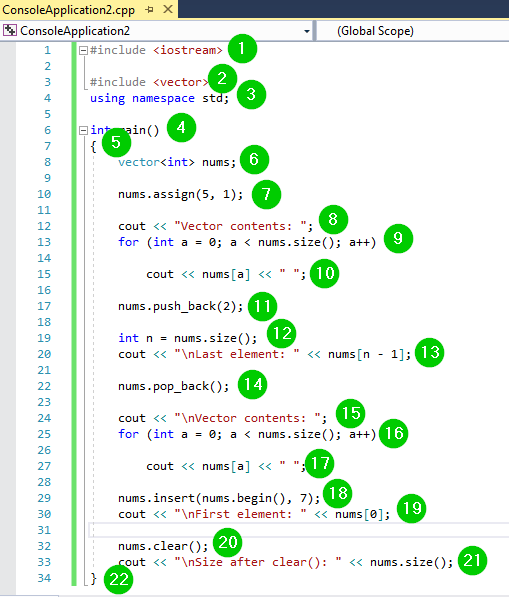
Here is a screenshot of the code:
Code Explanation:
- Include the iostream header file in our code to use its functions.
- Include the vector header file in our code to use its functions.
- Include the std namespace to use its classes without calling it.
- Call the main() function. The program logic should be added inside its body.
- The start of the body of the main() function.
- Declare a vector named nums to store some integer values.
- Store 5 elements in the vector nums. Each with a value of 1.
- Print some text on the console.
- Use an iterator variable a to iterate over the elements of vector nums.
- Print the values of vector nums on the console for each iteration.
- Add the value 2 to the end of the vector nums.
- Declare an integer variable n to store the size of the vector nums.
- Print the last value of vector nums alongside other text. It should return a 2.
- Remove the last element from the vector nums. The 2 will be removed.
- Print text on the console. The \n moves the cursor to the new line to print the text there.
- Use an iterator variable a to iterate over the elements of vector nums.
- Print the values of vector nums on the console for each iteration.
- Insert the value 7 to the beginning of the vector nums.
- Print the first value of vector nums alongside other text. It should return 7.
- Delete all elements from the vector nums.
- Print the size of the vector num alongside other text after clearing all contents. It should return 0.
- End of the body of the main() function.
Capacity
Use the following functions to determine the capacity of a vector:
- Size() – It returns the number of items in a vector.
- Max_size() – It returns the highest number of items a vector can store.
- Capacity() – It returns the amount of storage space allocated to a vector.
- Resize() – It resizes the container to contain n items. If the vector current size is greater than n, the back items will be removed from the vector. If the vector current size is smaller than n, extra items will be added to the back of the vector.
- Empty() – it returns true if a vector is empty. Else, it returns false.
This final example reports and adjusts the storage of a vector using the capacity functions above.
Example 3
#include <iostream>
#include <vector>
using namespace std;
int main() {
	vector<int> vector1;
	for (int x = 1; x <= 10; x++)
		vector1.push_back(x);
	cout << "Vector size: " << vector1.size()<< endl;
	cout << "Vector capacity: " << vector1.capacity() << endl;
	cout << "Maximum size of vector: " << vector1.max_size()<< endl;
	vector1.resize(5);
	cout << "Vector size after resizing: " << vector1.size() << endl;
	if (vector1.empty() == false)
		cout << "Vector is not empty"<<endl;
	else
		cout << "Vector is empty"<<endl;
	return 0;
}
Output:

Here is a screenshot of the code:

Code Explanation:
- Include the iostream header file in our code to use its function.
- Include the vector header file in our code to use its functions.
- Include the std namespace in our code to use its classes without calling it.
- Call the main() function. The program logic should be added within the body of this function.
- Create a vector named vector1 to store integers.
- Use a for loop to create variable x with values from 1 to 10.
- Push the values of variable x into the vector.
- Print the size of the vector alongside other text on the console.
- Print the capacity of the vector alongside other text on the console.
- Print the maximum number of items the vector can hold alongside other text on the console.
- Resize the vector to hold only 5 elements.
- Print the new size of the vector alongside other text.
- Check whether the vector is not empty.
- Print text on the console if the vector is not empty.
- Use an else statement to state what to do if the vector is empty.
- Text to print on the console if the vector is empty.
- The program must return value upon successful completion.
- End of the main() function body.
