
Parameterization, Functions, Transactions in LoadRunner
 Editorial Team
⚡ Smart Summary
Parameterization, transactions and run-time settings are the three enhancements that turn a plain VuGen recording into a script which behaves like a real user and reports timings you can actually trust.
A recorded script can simulate a virtual user; however, a mere recording may not be enough to replicate real user behavior.
When a script is recorded, it covers a single, straight flow through the subject application. A real user may perform multiple iterations of a process before logging out. The delay between clicking buttons (think time) varies from person to person, and some users reach your application over a fast connection while others do not. So, to get the real feel of an end user, we need to enhance our scripts to behave very close to real users.
That is the most significant consideration when conducting “Performance Testing”, but there is more to a VUser script. How will you gauge the time taken by a VUser while the System Under Load (SUL) is being tested? How would you know whether the VUser passed or failed at a certain point, and whether a backend process failed or server resources ran short?
We need to enhance our script to help answer all the above questions.
Brand note: VuGen shipped as HP, then Micro Focus, and is now part of OpenText Professional Performance Engineering. The functions and settings below are unchanged.
Using Transactions
Transactions measure server response time for any operation. In simple words, a “transaction” measures the time the system takes for a particular request. It can be as small as a button click or an AJAX call fired when a text box loses focus.
Applying transactions is straightforward. Write one line of code before the request is made, and close the transaction when the request ends. LoadRunner requires only a string as the transaction name.
To open a transaction, use this line of code:
lr_start_transaction(“Transaction Name”);
To close the transaction, use this line of code:
lr_end_transaction(“Transaction Name”, <status>);
The <status> tells LoadRunner whether this particular transaction was successful or unsuccessful. The possible parameters could be:
- LR_AUTO
- LR_PASS
- LR_FAIL
Example:
lr_end_transaction(“My_Login”, LR_AUTO);
lr_end_transaction(“001_Opening_Dashboard Name”, LR_PASS);
lr_end_transaction(“Business_Workflow_Transaction Name”, LR_FAIL);
Code note: the snippets are reproduced exactly as published, typographic quotes included. A real VuGen script needs straight ASCII double quotes, so retype them if you copy this code.
Points to note:
- Don’t forget, you are working with “C” and that is a case-sensitive language.
- The period (.) character is not allowed in a transaction name, although you can use spaces and underscores.
- If you’ve branched your code well and added checkpoints to verify the response from the server, you can use custom error handling such as LR_PASS or LR_FAIL. Otherwise, you can use LR_AUTO and LoadRunner will automatically handle server errors (HTTP 500, 400 etc.).
- When applying transactions, ensure there is no think-time statement sandwiched inside, otherwise your transaction will always include that period.
- Since LoadRunner requires a constant string as the transaction name, a common problem when applying transactions is a mismatch of strings. If you give a different name when opening and closing a transaction, you will get at least 2 errors. The transaction you opened was never closed, so LoadRunner yields an error; and the transaction you are trying to close was never opened, which yields a second error.
- Both errors appear in the replay log, so whenever either is reported, check the transaction name on the opening and closing statements first.
- Since LoadRunner automatically takes care of synchronization of requests and responses, you will not have to worry about the response when applying transactions.
Rendezvous Points, Comments and Script Functions
Three smaller enhancements make a script behave and read like production code: rendezvous points, comments, and the function browser built into VuGen.
Rendezvous Points
A rendezvous point is a “meeting point”. It is a single statement that tells LoadRunner to introduce concurrency. You insert rendezvous points into VUser scripts to emulate heavy user load on the server.
Rendezvous points instruct a VUser to wait during execution until multiple VUsers arrive at a certain point, so they may concurrently perform a task. For example, to emulate peak load on a bank server, insert a rendezvous point instructing 100 VUsers to deposit cash at the same time.
If the rendezvous points are not placed correctly, the VUsers will be accessing different parts of the application even for the same script. This is because every VUser gets a different response time and so a few users lag behind.
Syntax:
lr_rendezvous(“Logical Name”);
Correction note: the published page spells this lr_rendesvous. The correct function name is lr_rendezvous; the misspelled form will not compile.
Best Practices:
- Prefix a rendezvous point with “rdv_” for better code readability; e.g. “rdv_Login”
- Remove any immediately adjacent think-time statements
- Apply rendezvous points in Script view, after recording
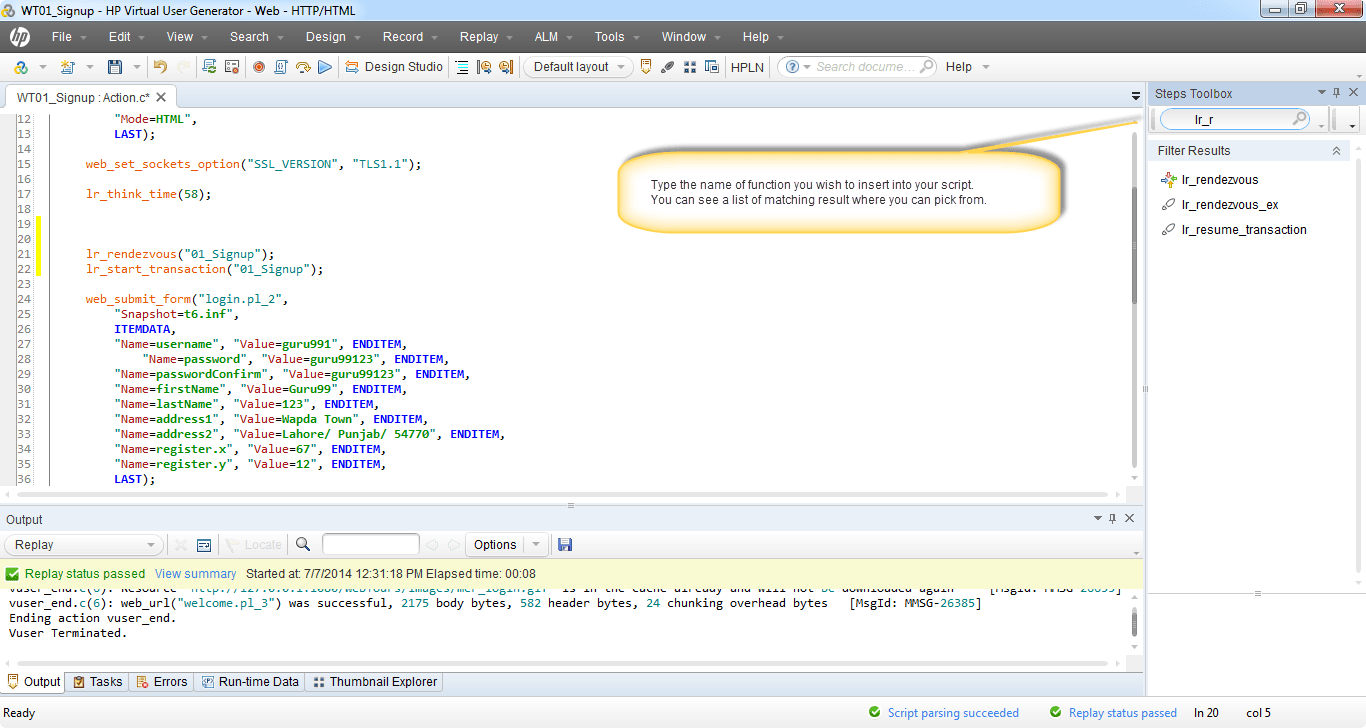
The Script view below shows a rendezvous statement inserted into a recorded action:

Comments
Add comments to describe an activity, a piece of code or a line of code. Comments help make the code understandable for anyone referring to it in the future. They provide information about a specific operation and separate two sections for distinction.
You can add comments
- While recording (using the tool)
- After recording (directly writing in code)
Best Practice: mark any comments at the top of each script file.
Inserting Functions Through the Menu
While you can directly write simple lines of code, you may need a clue to recall a function. You can also use the Steps Toolbox (known as Insert Function prior to version 12) to find and insert any function directly into your script.
You can find the Steps Toolbox under View → Steps Toolbox, as shown below.
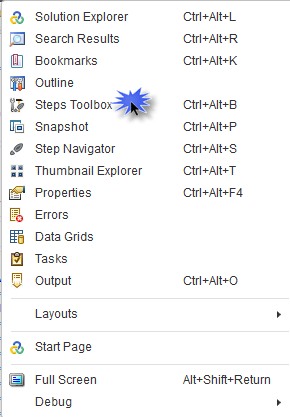
This will open a side window. Look at the snapshot:
What is Parameterization?
A parameter in VuGen is a container that holds a recorded value which is replaced for various users.
During the execution of the script (in VuGen or the Controller), a value from an external source (such as a .txt file, XML or a database) substitutes the previous value of the parameter.
Parameterization is useful for sending dynamic (or unique) values to the server. For example, a business process may be required to run 10 iterations while picking a unique user name every time.
It also helps in simulating real-life behavior against the subject system. Have a look at the examples below.
Problem examples:
- A business process works only for the current date, which comes from the server, so it cannot be passed as a hardcoded request.
- Sometimes the client application passes a unique ID to the server (for example session_id) for the process to continue, even for a single user. In such a case, parameterization helps.
- Often the client application maintains a cache of the data being sent to and from the server. As a result, the server is not receiving real user behavior (where the server runs a different algorithm depending upon the search criteria). The VUser script will execute successfully, but the performance statistics drawn will not be meaningful. Using different data through parameterization helps emulate server-side activity such as stored procedures, and exercises the system.
- A date that is hard-coded in the VUser during recording may no longer be valid once that date has passed. Parameterizing the date allows VUser execution to succeed by replacing the hard-coded date. Such fields or requests are the right candidates for parameterization.
You create one by right-clicking the recorded value in Script view and choosing Replace with a Parameter. VuGen then asks which type supplies the value:
| Parameter type | Value it supplies |
|---|---|
| File | Values read from a column in a .dat file. |
| Table | A block of rows and columns at once. |
| Date/Time | Current date and time in a chosen format. |
| Random Number | A number from a range you set. |
| Unique Number | A distinct number per VUser, from a start value and block size. |
| Iteration Number | The current iteration count. |
| Vuser ID | The identifier assigned at replay. |
| Group / Load Generator Name | The VUser group or generator machine. |
| XML | A fragment from an XML data set. |
| User-Defined Function | A value returned by your own library function. |
Two further options decide how data is consumed across iterations:
| Option | Choices | What it controls |
|---|---|---|
| Select next row | Sequential, Random, Unique | Which row a VUser reads next. |
| Update value on | Each iteration, Each occurrence, Once | When the value is refreshed. |
The walkthrough below shows parameterization applied to a recorded script:
Click here if the video is not accessible.
Run Time Settings and Their Impact on VUser Simulation
Run-time settings matter as much as your VuGen script. With varying configurations you can obtain completely different test designs, which is why inconsistent run-time settings are the usual cause of non-repeatable results. Let’s discuss each attribute one by one.
Run Logic
Run Logic defines the number of times all actions will be executed, except vuser_init and vuser_end.
This probably makes it clearer why LoadRunner suggests keeping all the login code within vuser_init and the logout part in vuser_end, both exclusively.
If you’ve created multiple actions — say Sign in, Open Screen, Calculate Rental, Submit Funds, Check Balance and Logout — then the scenario below will take place for each VUser:
All VUsers will log in, execute Open Screen, Calculate Rental, Submit Funds and Check Balance, then again Open Screen, Calculate Rental and so on, iterating 10 times, followed by logout (once).
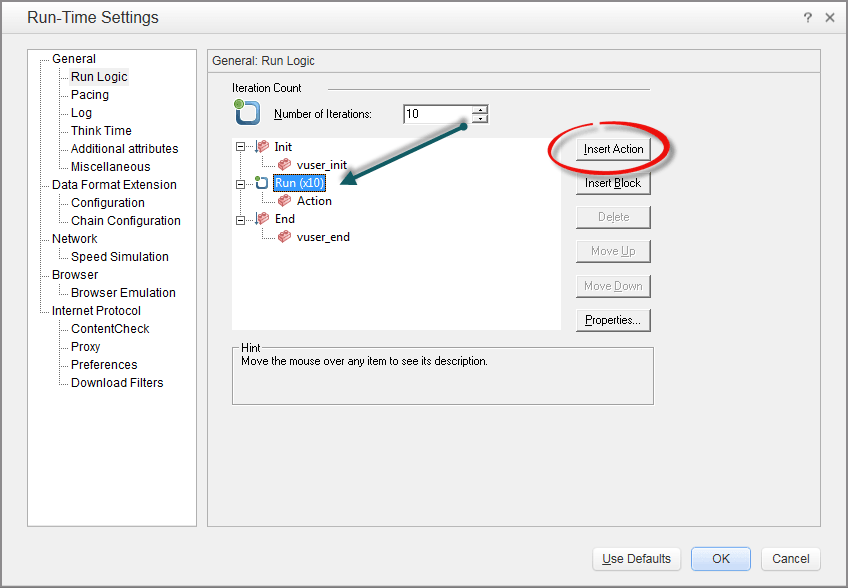
This is a powerful setting that lets the script act more like a real user. Remember, a real user does not log in and log out every time; they usually repeat the same steps.
How many times do you click “inbox” when checking your email before you log out?
Pacing
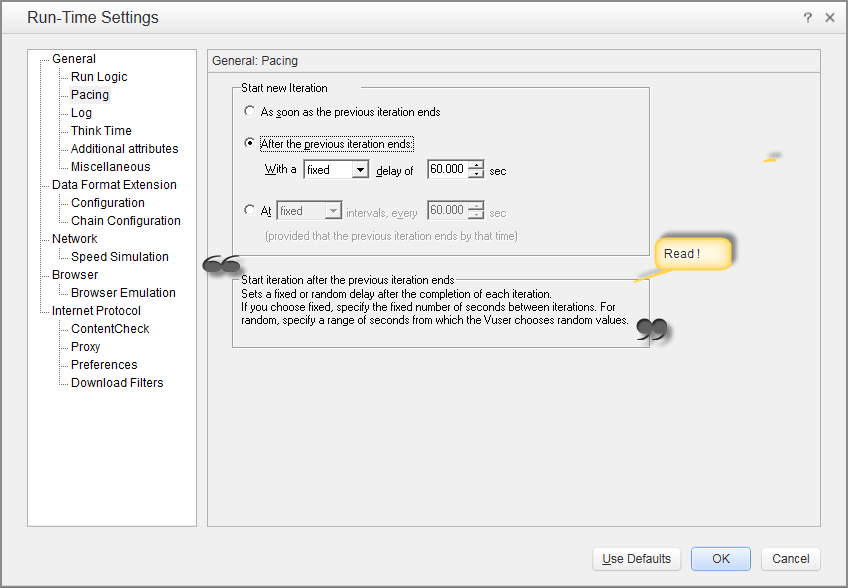
This is important. Most people are unable to understand the difference between pacing and think time. The only difference is that pacing refers to the delay between iterations, whereas think time is the delay between any 2 steps.
The recommended setting depends upon the test design. However, if you are looking to apply aggressive load, consider opting for “As soon as the previous iteration ends”, as shown below.
Log
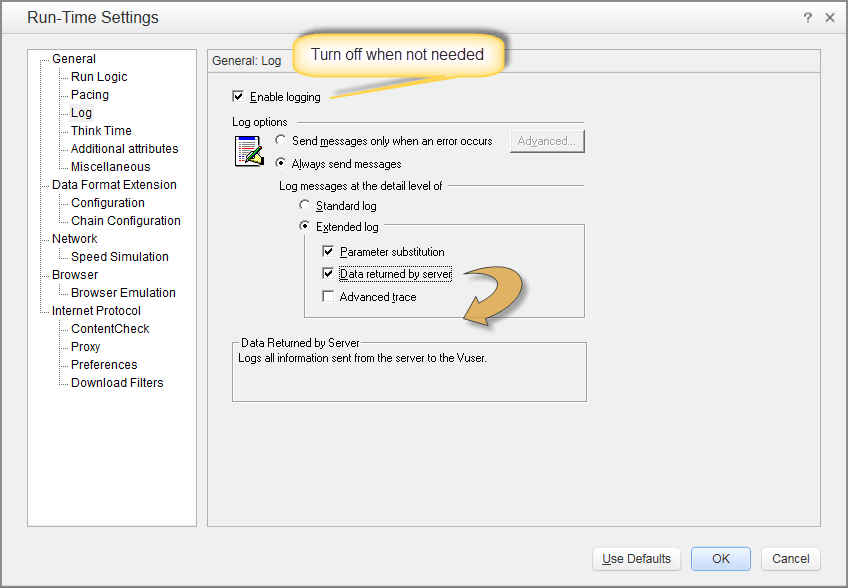
A log, as generally understood, is a record of all events while you run LoadRunner. You can enable the log to know what is happening between your application and your server.
LoadRunner gives a powerful logging mechanism which is robust and scalable on its own. It allows you to keep only a “Standard Log”, or a detailed and configurable extended log, or to disable logging altogether.
A standard log is informative and easily understandable. It contains just the right amount of information you will generally require to troubleshoot your VUser scripts.
In the case of the Extended Log, all the standard log information is a subset. Additionally, you can have parameter substitution. This tells the LoadRunner component to include complete information about all the parameters (from parameterization), including requests as well as response data.
If you include “Data Returned by Server” then your log will grow in length. It will include all the HTML, tags, resources and non-resources information right within the log. The option is good only if you need serious troubleshooting. Usually this makes the log file very big and not easily comprehensible.
As you could have guessed by now, if you opt for “Advanced Trace” your log file will be massive. You must give it a try. You will notice that the amount of time taken by VuGen also increases significantly, although this has no impact on the transaction response time reported by VuGen. This is very advanced information, and it is useful only if you understand the subject application, the client-to-server communication between your application and hardware, and protocol-level details. Usually this information requires extreme effort to read and troubleshoot.
Tips:
- No matter how much time VuGen takes when the log is enabled, it has no impact on the transaction response time — logging overhead is excluded from the measured time.
- Disable the log if it is not required.
- Disable the log when you are finished with your scripts. Including scripts with logging enabled will cause the Controller to run slower and report nagging messages.
- Disabling the log will increase the maximum number of users you can simulate from LoadRunner.
- Consider using “Send messages only when an error occurs” — this mutes unnecessary information messages and reports only error-related messages.
Think Times
Think Time is simply the delay between two steps.
Think Time helps replicate user behavior, since no real user can use an application like a machine. VuGen generates think time automatically. You still have complete control to remove, multiply or fluctuate the duration of think time.
To understand it better: a user may open a screen (a response followed by a request) and then type a username and password before hitting enter. The next interaction between the application and the server happens when the user clicks “Sign In”. The time the user took to type the username and password is Think Time in LoadRunner.
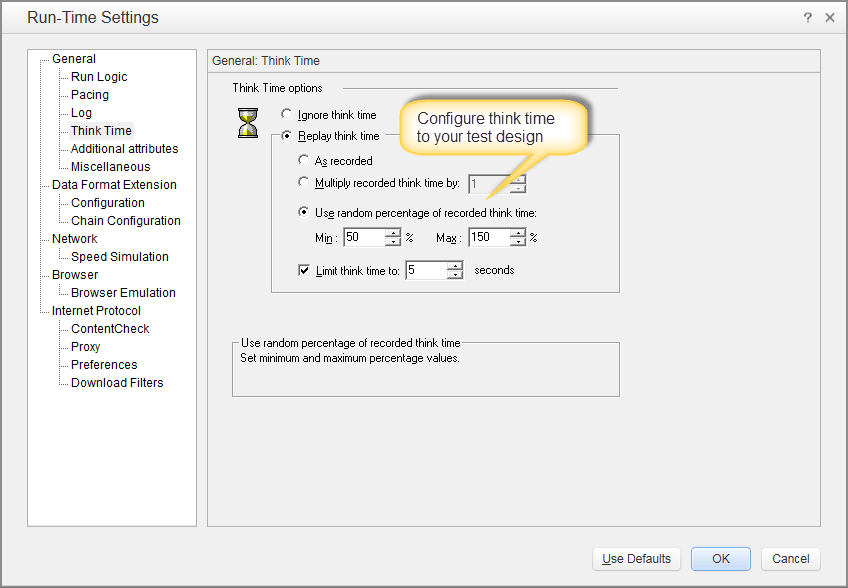
If you are looking to simulate aggressive load on the application, consider disabling think time completely.
However, to simulate real-life behavior you can choose “Use Random Think Time” and set the percentages as desired.
Consider using Limit Think Time to cap it at a legitimate period. Usually, 30 seconds is fairly good enough.
Speed Simulation
Speed simulation simply refers to the bandwidth capacity of each client machine.
Since we are simulating thousands of VUsers through LoadRunner, it is remarkable how simple LoadRunner has made bandwidth and network speed simulation.
If your customers access your application over 128 Kbps, you can control that from here. You will get to simulate real-life behavior, which should help you get the right performance statistics.
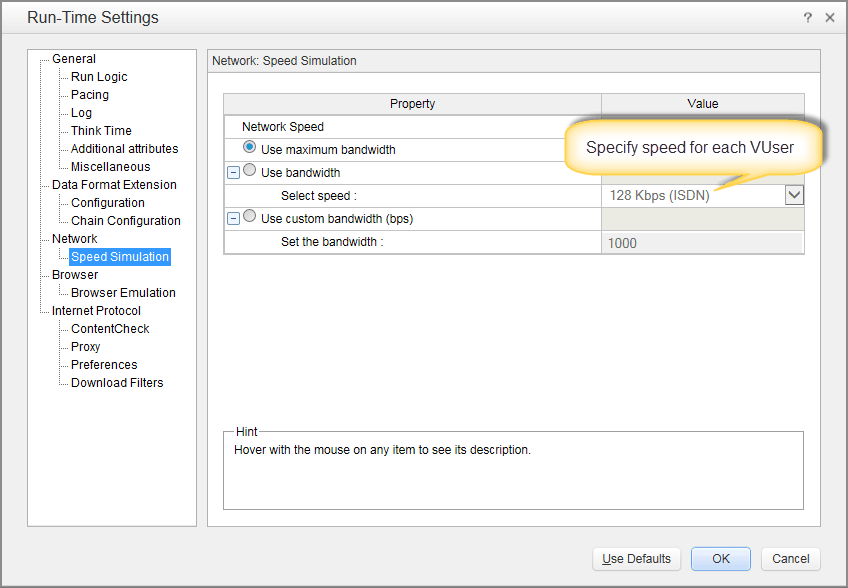
The best recommendation is to set Use maximum bandwidth. This helps you disregard any network-related performance bottlenecks and focus on potential issues in the application first. You can always run the test multiple times to see varying behavior under different circumstances.
Browser Emulation
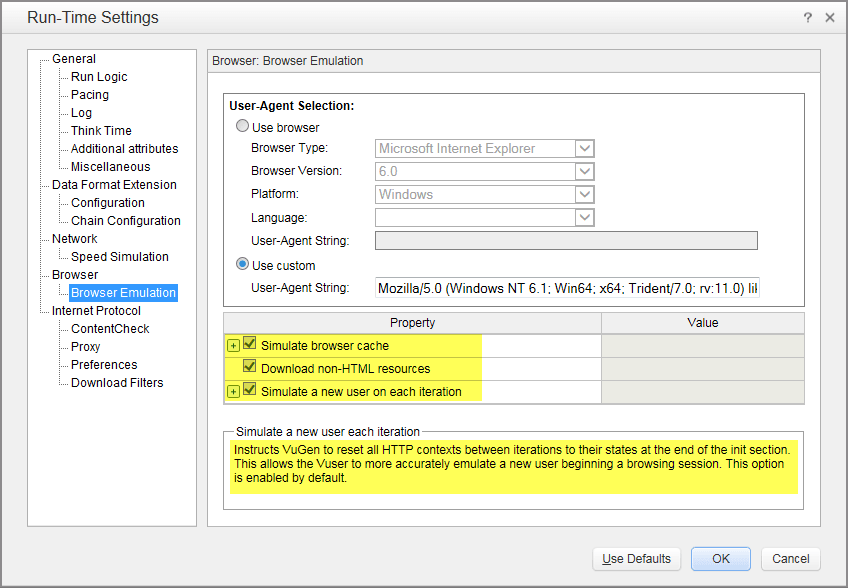
User experience does not depend upon the browser an end user is using, so this is largely beyond the scope of performance measures. However, you can choose which browser you wish to emulate, as the pane below shows.
When exactly does it really matter which browser you select in this configuration?
You will use this configuration if your subject application is a web application that returns different responses for different browsers. For example, you may see different images and content for Internet Explorer and Firefox.
Another important setting is Simulate browser cache. If you want to gauge the response time with the cache enabled, check this box. If you are looking for the worst-case situation, it is obviously not a consideration.
Download non-HTML resources will let LoadRunner download any CSS, JS and other rich media. This should remain checked. However, if you wish to eliminate it from your performance test design, you can uncheck it.
Proxy
It is best to eliminate the proxy completely from your Test Environment — a proxy sitting in the path makes the test results unreliable. However, you might face situations where it is inevitable. In such a situation, LoadRunner does provide proxy settings.
You will be working (or should be working) with the No proxy setting. You can obtain it from your default browser. However, don’t forget to check which browser is set as default and what the proxy configuration for that browser is.
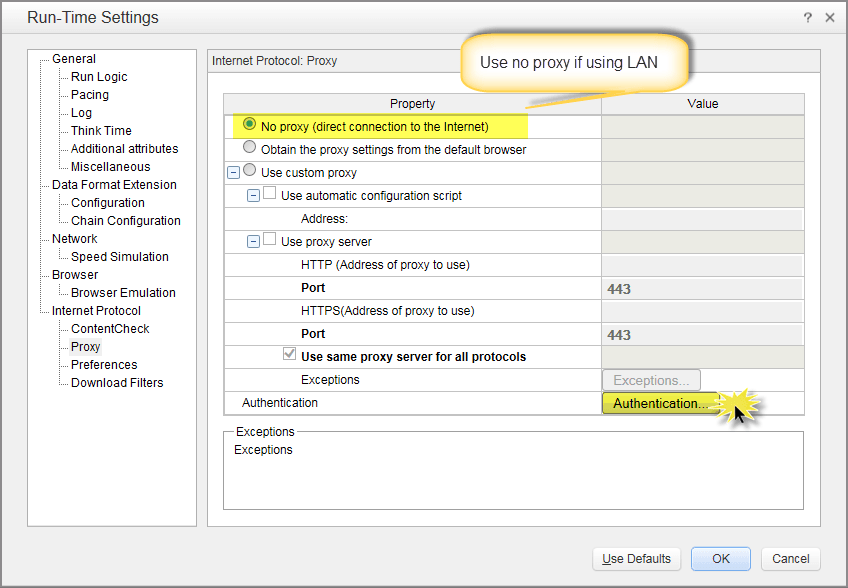
If you are using a proxy and it requires authentication (or a script), then you can click on the Authenticate button, which leads to a new window. Refer to the screenshot below.
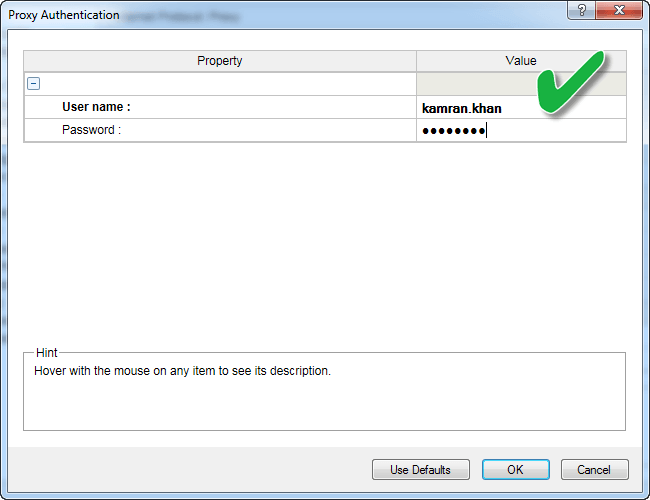
Use this screen to provide a username and password to get authenticated on the proxy server. Click OK to close the screen.
Congratulations. You are done with configuring your VuGen script. Don’t forget to configure it for all your VUser scripts.
Next come correlation, running the scenario in the Controller, and reading results in LoadRunner Analysis. See the LoadRunner architecture and Load Testing guides.
