Selenium Grid Tutorial: Setup a Hub and Node (Example)
What is Selenium Grid?
Selenium Grid is a part of the Selenium Suite that specializes in running multiple tests across different browsers, operating systems, and machines in parallel. It is achieved by routing the commands of remote browser instances where a server acts as a hub. A user needs to configure the remote server in order to execute the tests.
Selenium Grid has 2 versions – the older Grid 1 and the newer Grid 2. We will only focus on Grid 2 because Grid 1 is gradually being deprecated by the Selenium Team.
Selenium Grid Architecture
Selenium Grid has a Hub and Node Architecture.
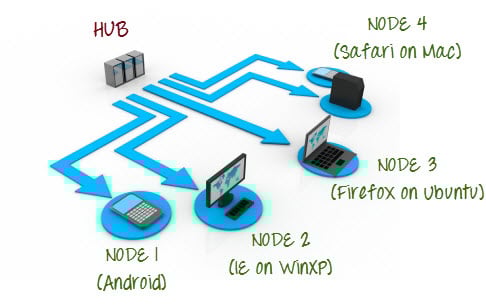
Hub
- The hub is the central point where you load your tests into.
- There should only be one hub in a grid.
- The hub is launched only on a single machine, say, a computer whose OS is Windows 7 and whose browser is IE.
- The machine containing the hub is where the tests will be run, but you will see the browser being automated on the node.
Nodes
- Nodes are the Selenium instances that will execute the tests that you loaded on the hub.
- There can be one or more nodes in a grid.
- Nodes can be launched on multiple machines with different platforms and browsers.
- The machines running the nodes need not be the same platform as that of the hub.
Selenium Grid uses a hub-node concept where you only run the test on a single machine called a hub, but the execution will be done by different machines called nodes.
How to Set Up Selenium Grid?
In this section, you will use 2 machines. The first machine will be the system that will run the hub while the other machine will run a node. For simplicity, let us call the machine where the hub runs as “Machine A” while the machine where the node runs will be “Machine B.” It is also important to note their IP addresses. Let us say that Machine A has an IP address of 192.168.1.3 while Machine B has an IP of 192.168.1.4.
Step 1) Download the Selenium Server from here.

Step 2) You can place the Selenium Server .jar file anywhere in your hard drive. But for the purpose of this tutorial, place it on the C drive of both Machine A and Machine B. After doing this, you are now done installing Selenium Grid. The following steps will launch the hub and the node.
Step 3)
- We are now going to launch a hub. Go to Machine A. Using the command prompt, navigate to the root of Machine A’s – C drive, because that is the directory where we placed the Selenium Server.
- On the command prompt, type java -jar selenium-server-standalone-2.30.0.jar -role hub
- The hub should successfully be launched. Your command prompt should look similar to the image below.

Step 4) Another way to verify whether the hub is running is by using a browser. Selenium Grid, by default, uses Machine A’s port 4444 for its web interface. Simply open up a browser and go to http://localhost:4444/grid/console

Also, you can check if Machine B can access the hub’s web interface by launching a browser there and going to where “iporhostnameofmachineA” should be the IP address or the hostname of the machine where the hub is running. Since Machine A’s IP address is 192.168.1.3, then on the browser on Machine B you should type http://192.168.1.3:4444/grid/console
Step 5)
- Now that the hub is already set up, we are going to launch a node. Go to Machine B and launch a command prompt there.
- Navigate to the root of Drive C and type the code below. We used the IP address 192.168.1.3 because that is where the hub is running. We also used port 5566 though you may choose any free port number you desire.
- NOTE: You now have to give path to the Gecko driver if using Firefox. Here is updated code that needs to be used
java -Dwebdriver.gecko.driver="C:\geckodriver.exe" -jar selenium-server-standalone-3.4.0.jar -role webdriver -hub http://192.168.1.3:4444/grid/register -port 5566

- When you press Enter, your command prompt should be similar to the image below.

Step 6) Go to the Selenium Grid web interface and refresh the page. You should see something like this.

At this point, you have already configured a simple grid. You are now ready to run a test remotely on Machine B.
When to Use Selenium Grid?
You should use Selenium Grid when you want to do either one or both of following:
- Run your tests against different browsers, operating systems, and machines all at the same time. This will ensure that the application you are Testing is fully compatible with a wide range of browser-O.S combinations.
- Save time in the execution of your test suites. If you set up Selenium Grid to run, say, 4 tests at a time, then you would be able to finish the whole suite around 4 times faster.
Grid 1.0 Vs Grid 2.0
Following are the main differences between Selenium Grid 1 and 2.
| Grid 1 | Grid 2 |
|---|---|
| Selenium Grid 1 has its own remote control that is different from the Selenium RC server. They are two different programs. | Selenium Grid 2 is now bundled with the Selenium Server jar file |
| You need to install and configure Apache Ant first before you can use Grid 1. | You do not need to install Apache Ant in Grid 2. |
| Can only support Selenium RC commands/scripts. | Can support both Selenium RC and WebDriver scripts. |
| You can only automate one browser per remote control. | One remote control can automate up to 5 browsers. |
Selenium grid can be set up in two different ways; one through command line and the other through JSON config file.
Designing Test Scripts That Can Run on the Grid
To design test scripts that will run on the grid, we need to use DesiredCapabilites and the RemoteWebDriver objects.
- DesiredCapabilites is used to set the type of browser and OS that we will automate.
- RemoteWebDriver is used to set which node (or machine) that our test will run against.
To use the DesiredCapabilites object, you must first import this package
![]()
To use the RemoteWebDriver object, you must import these packages.
![]()
Using the DesiredCapabilites Object
Go to the Grid’s web interface and hover on an image of the browser that you want to automate. Take note of the platform, and the browserName showed by the tooltip.
.png)
In this case, the platform is “XP” and the browserName is “Firefox.”
We will use the platform and the browserName in our WebDriver as shown below (of course you need to import the necessary packages first).
![]()
Using the RemoteWebDriver Object
Import the necessary packages for RemoteWebDriver and then pass the DesiredCapabilities object that we created above as a parameter for the RemoteWebDriver object.

Running a Sample Test Case on the Grid
Below is a simple WebDriver Testng code that you can create in Eclipse on Machine A. Once you run it, automation will be performed on Machine B.
import org.openqa.selenium.*;
import org.openqa.selenium.remote.DesiredCapabilities;
import java.net.MalformedURLException;
import java.net.URL;
import org.openqa.selenium.remote.RemoteWebDriver;
import org.testng.Assert;
import org.testng.annotations.*;

public class Grid_2 {
 WebDriver driver;
 String baseUrl, nodeURL;
 @BeforeTest
 public void setUpWthrows MalformedURLException {
 baseUrl = "http://newtours.demoaut.com/";
 nodeURL = "http://192.168.1.4:5566/wd/hub";
 DesiredCapabilities capability = DesiredCapabilities.firefox();
 capability. setBrowserName("firefox");
 capability. setPlatform(Platform.XP);
 driver = new RemoteWebDriver(new URL(nodeURL), capability);
}
@AfterTest
public void afterTest() {
 driver.quit();
 }
@Test
public void simpleTest() {
driver.get(baseUr1);
 Assert.assertEquas("Welcome: Mercury Tours", driver.getTitle()); }
}
The test should pass.
 |
 |
Selenium grid configuration using JSON File
JSON stands for Javascript Object Notation. It is a standard format used for interchange of data between browser and the web server. Selenium has an in-built JSON config file that can be used to set up selenium grid.
Below are the steps to configure selenium grid using JSON config file.
Step 1) Download the code for JSON config file using the below path
Here is the code
{
	  "port": 4444,
	  "newSessionWaitTimeout": -1,
	  "servlets" : [],
	  "withoutServlets": [],
	  "custom": {},
	  "capabilityMatcher": "org.openqa.grid.internal.utils.DefaultCapabilityMatcher",
	  "registryClass": "org.openqa.grid.internal.DefaultGridRegistry",
	  "throwOnCapabilityNotPresent": true,
	  "cleanUpCycle": 5000,
	  "role": "hub",
	  "debug": false,
	  "browserTimeout": 0,
	  "timeout": 1800
}
Step 2) Copy and paste the code on a text editor such as Notepad with the extension ‘.json’
Step 3)Launch the hub using the below command using command prompt
java -jar selenium-server-standalone-2.53.1.jar -role hub -hubConfig hubconfig.json
NOTE: Selenium stand alone jar file and the json file must be present on the same directory
Step 4) The below screen will appear which indicates the hub is set up successfully

Step 5) Open web browser and try connecting to the below URL
http://192.168.43.223:4444/grid/console
NOTE: The URL may vary from machine to machine. URL followed by ‘Nodes should register to’ on the above screen must be used.
Step 6) Grid Console screen will appear which indicates the hub is up and running

Configure NODES using JSON
Step 1) Download the sample node configuration file provided by Selenium using the below URL
NOTE: IF YOU ARE USING SELENIUM 3.0 OR ABOVE, THE BELOW JSON FILE MUST BE USED
Step 2) Copy and paste the code into a text editor such as Notepad and save the file with the extension ‘.json’
Step 3)
Run the below command on command prompt
Java-Dwebdriver.chrome.driver="chromedriver.exe" -Dwebdriver.ie.driver="IEDriverServer.exe" -Dwebdriver.gecko.driver="geckodriver.exe" -jar selenium-server-standalone-2.53.1.jar -role node -nodeConfig node1.json
NOTE: Before running the command, please make sure the drivers for each of the browsers have been downloaded onto local machine directory
Step 4) The below screen will appear when enter key is pressed

Step 5) Navigate to the grid console to verify if the nodes have been successfully configured

The browsers are displayed on the grid console. Hence we can be sure that nodes are configured successfully.
Sample Test Cases On Selenium Grid:
 package com.objectrepository.demo;
 import org.openqa.selenium.*;
 import org.openqa.selenium.remote.DesiredCapabilities;
 import java.net.MalformedURLException;
 import java.net.URL;
 import org.openqa.selenium.remote.RemoteWebDriver;
 import org.testng.Assert;
 import org.testng.annotations.*;

 public class SeleniumGrid {

     WebDriver driver;
     String baseURL, nodeURL;

     @BeforeTest
     public void setUp() throws MalformedURLException {
         baseURL = "https://demo.guru99.com/test/guru99home/";
         nodeURL = "http://192.168.43.223:5566/wd/hub";
         DesiredCapabilities capability = DesiredCapabilities.chrome();
         capability.setBrowserName("chrome");
         capability.setPlatform(Platform.WIN10);
         driver = new RemoteWebDriver(new URL(nodeURL), capability);
     }

     @AfterTest
     public void afterTest() {
         driver.quit();
     }
     @Test
     public void sampleTest() {
         driver.get(baseURL);


         if (driver.getPageSource().contains("MOBILE TESTING")) {
             Assert.assertTrue(true, "Mobile Testing Link Found");
         } else {
             Assert.assertTrue(false, "Failed: Link not found");
         }

     }

 }
The above code launches chrome browser and navigates to the URL specified in the ‘baseURL’ variable. It verified a link name ‘Mobile Testing’ is displayed on the page
URL on the ‘nodeURL’ variable can be modified to reflect the IP Address of the remote machine. Test result can be verified on the default TestNG report generated
Summary
- Selenium Grid is used to run multiple tests simultaneously on different browsers and platforms.
- Grid uses the hub-node concept.
- The hub is the central point wherein you load your tests.
- Nodes are the Selenium instances that will execute the tests that you loaded on the hub.
- To install Selenium Grid, you only need to download the Selenium Server jar file – the same file used in running Selenium RC tests.
- There are 2 ways to verify if the hub is running: one was through the command prompt, and the other was through a browser.
- To run test scripts on the Grid, you should use the DesiredCapabilities and the RemoteWebDriver objects.
- DesiredCapabilites is used to set the type of browser and OS that we will automate.
- RemoteWebDriver is used to set which node (or machine) that our test will run against.