
How to Lock (SU01) & Unlock (SU10) a SAP User
 Jessica Blake
⚡ Smart Summary
Locking and unlocking SAP users through transaction codes SU01 and SU10 protects system access by temporarily deactivating accounts. This resource explains single and mass user procedures, automatic lock parameters, lock status verification, and administrative best practices for secure user management.
Locking a user
In SAP, locking a user is a security action that temporarily blocks an account from signing in. The purpose of locking a user is to temporarily deactivate the account so that the person can no longer access the system, while the user master record itself stays intact and can be reactivated at any time.
Users can be locked in 2 ways:-
- Automatically
- Explicitly/Forcefully
Automatically: – There are two possibilities when users get locked automatically:
- Maximum number of failed attempts:- controlled via the parameter login/fails_to_user_lock. If a value is set to 3 it means after 3 failed attempts the user will be locked.
- Auto unlock time: – “login/failed_user_auto_unlock” defines whether a user locked due to unsuccessful logon attempts should be automatically removed at midnight.
Explicitly/Forcefully: An administrator can lock and unlock users in 2 ways-
- Lock single user (SU01)
- Lock multiple user (SU10)
SU01 vs SU10: Key Differences
Before locking or unlocking accounts, it helps to know which transaction code fits the task. Both codes manage user access, but they operate at a different scale, so choosing correctly saves time and avoids mistakes.
| Basis of comparison | SU01 (User Maintenance) | SU10 (User Mass Maintenance) |
|---|---|---|
| Primary purpose | Maintain a single user | Maintain many users together |
| Best used for | Locking or unlocking one account | Locking or unlocking several accounts at once |
| User selection | One user name is entered | A list of users is entered or selected by address and authorization data |
| Speed for bulk changes | Slower, handled one by one | Faster, a single action applies to all |
| Typical scenario | Help desk handling one request | Admin managing mass onboarding or offboarding |
In short, use SU01 for a quick change to one account, and use SU10 when the same lock or unlock action must apply to a group of users at the same time.
Procedure to lock a single user
Follow these steps in transaction SU01 to lock one specific account.
Step 1) Execute T-code SU01

Step 2) Enter a username in the User field.

Step 3) Press the Lock/Unlock button.

Step 4) In the next screen, press the Lock button again to lock the user.

Procedure to lock multiple users
When several accounts must be locked together, transaction SU10 applies the action to the whole list at once.
Step 1) Execute T-code SU10

Step 2) Enter the usernames in the User field.

Step 3) Press the Lock/Unlock button.

All the users listed will be locked.
Procedure to unlock a user
Unlocking reverses the lock and restores access. Use transaction SU01 to unlock one account.
Step 1) Execute T-code SU01

Step 2) Enter the username in the User field.

Step 3) Press the Lock/Unlock button.

Step 4) Press the Unlock button.

Procedure to unlock multiple users
To restore access for many accounts at once, unlock them together using transaction SU10.
Step 1) Execute T-code SU10

Step 2) Enter the usernames in the User field.
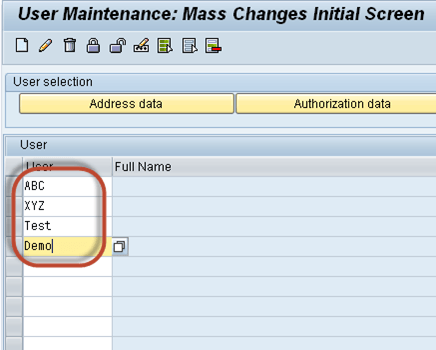
Step 3) Press the Unlock button.

Users will be unlocked.
How to Check Whether a SAP User Is Locked
After locking accounts, administrators often need to confirm the current status or review every locked account in the system. SAP records the lock state in the user master table, and several standard tools display it without changing anything. Checking the status during routine security reviews is also good practice, because it reveals accounts that were locked automatically and then forgotten.
You can review the lock status using any of the following methods:
- Transaction SU01: Open the user in SU01. The Lock/Unlock screen shows whether the account is currently locked or unlocked, and why.
- Report RSUSR200: Run report RSUSR200, which is also reached through the User Information System (transaction SUIM). It lists users by logon date and password status and can filter for locked accounts across the entire client, making it ideal for periodic audits.
- Table USR02: View table USR02 with SE16 or SE11 and check the UFLAG field for the user. Any value other than 0 means the account is locked. The same table also stores the lock date and the number of failed logon attempts, which helps with root-cause analysis.
The UFLAG field also explains the reason for the lock, which helps you decide the correct fix:
- 0 – The user is not locked.
- 64 – The user is locked by an administrator (a manual lock through SU01 or SU10).
- 128 – The user is locked after too many incorrect logon attempts.
- 192 – The user is locked both by an administrator and by failed logon attempts.
Reading the reason first tells you whether to simply unlock the account or to also investigate repeated failed logons before restoring access. For example, a value of 128 or 192 suggests you should confirm the user’s identity and check for a possible password attack before you unlock the account.
Best Practices for Locking and Unlocking SAP Users
A consistent process keeps user administration secure and audit-ready. Keep the following best practices in mind whenever you lock or unlock accounts:
- Lock promptly on offboarding: Lock accounts of employees who leave or change roles immediately, rather than deleting them, so audit history and assignments remain intact.
- Prefer SU10 for bulk work: Use SU10 for group actions such as project rollovers or department changes to save time and apply a consistent action.
- Record the reason: Note why an account was locked so that other administrators understand the context before unlocking it.
- Review failed-logon locks: Investigate accounts locked by incorrect logons before unlocking, as repeated failures may signal a forgotten password or an attack.
- Restrict lock authorization: Limit the S_USER_GRP authorization so that only trusted administrators can lock or unlock users.
- Combine automatic and manual locks: Configure the login/fails_to_user_lock parameter so accounts lock automatically after failed logons, and reserve manual SU01 or SU10 locks for planned administrative actions such as leave or offboarding.
