
SAP ME47 Tcode: How to Create Quotation in SAP MM
 Editorial Team
⚡ Smart Summary
Create Quotations in SAP MM through transaction ME47. The vendor reply is recorded against the original request for quotation, adding net price, delivery date, and pricing conditions to the existing document.
What is a Quotation in SAP MM?
A quotation is a vendor’s formal reply to a request for quotation. It states the price the supplier will charge, the quantity it can deliver, the delivery date it can meet, and any conditions such as discount or freight that apply to the offer.
The point that surprises most newcomers is that SAP does not store the quotation as a separate document. Transaction ME47 opens the existing RFQ and writes the vendor’s answer into it. The document number stays the same, and the record simply moves from an empty request to a completed offer.
Three consequences follow from that design:
- There is one quotation per vendor, because there was one RFQ per vendor. Five invited suppliers produce five documents sharing a collective number.
- A vendor who never replies leaves an RFQ with no prices. No quotation is created, and the gap is visible in the list displays.
- Comparison and rejection later operate on these same numbers, which is why the collective number entered at RFQ stage matters so much.
Using transaction code ME47, we can create a quotation based on a request for quotation. If the RFQ has not been created yet, start with the request for quotation tutorial.
Steps to Create Quotation in SAP
Step 1)
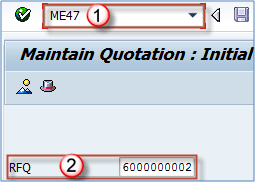
- Transaction code for quotation maintenance – ME47.
- RFQ: request for quotation that we are using as a reference document.
- Press ENTER.
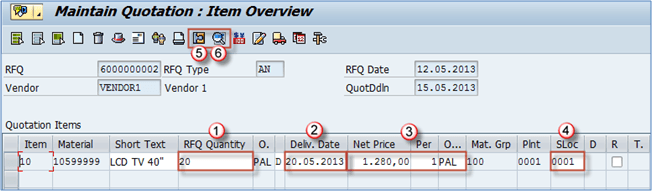
Step 2) Enter the vendor reply on the item overview screen.
- RFQ quantity
- Delivery date
- Net price per unit of measure
- Storage Location
Step 3) Item details: you will be presented the following screen. You may change details as per your requirements.
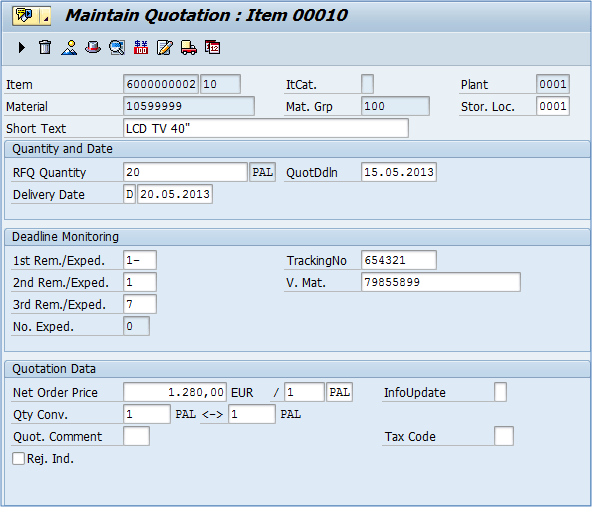
Step 4) Additional data: you can access some additional information on item level.
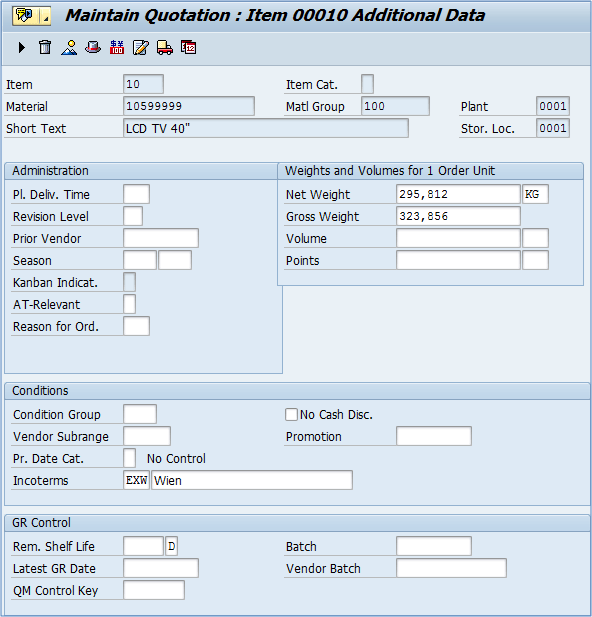
Step 5) If you want to change general header data click on the “Hat” icon.


Step 6) If you choose Item Conditions icon/button you can maintain pricing conditions for the currently selected item. Here, you can enter conditions like surcharge, freight cost, discount etc.
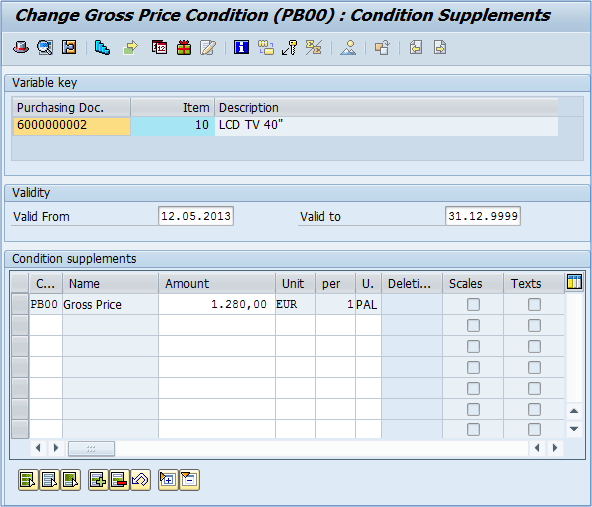
If you are done, you can save the data. If you need to change the quotation, you can do it by using the same t-code (ME47), or you can display its data by using ME48.

You can repeat the process to create quotations for all of the RFQs. If certain vendor didn’t answer your request for quotation, then you will not create a quotation for the vendor.
Quotation Header and Item Fields Explained
The screens above are dense. The table separates what belongs to the whole offer from what belongs to a single line, which is the distinction that decides where a value must be typed.
| Field | Level | What it controls |
|---|---|---|
| Quotation deadline | Header | Date by which the vendor was asked to reply; used in reminder reports |
| Collective number | Header | Groups this offer with the rest of the bidding round for comparison |
| Binding period | Header | How long the vendor guarantees the quoted terms |
| Currency | Header | Currency of the offer; comparison converts everything to one currency |
| Net price | Item | Price per price unit before discounts, surcharges, and freight |
| Price unit and order unit | Item | Quantity the price refers to, and the unit in which ordering happens |
| Delivery date | Item | Date the vendor commits to; may differ from the requested date |
| InfoUpdate | Item detail | Whether the accepted terms are written back into the info record |
| Rejection indicator | Item detail | Marks the item as declined and triggers a rejection message |
Net price alone rarely decides the winner, which is why the conditions screen deserves its own walkthrough.
Maintaining Pricing Conditions on a Quotation
A quotation with the lowest net price can still be the most expensive offer once delivery charges and discounts are applied. The Item Conditions screen is where those elements are recorded so the comparison in ME49 reflects reality.
Work through the screen in this order:
- Select the item, then choose Item Conditions. Conditions are maintained per line, so an offer covering three materials needs the screen opened three times.
- Confirm the gross price condition. The net price typed on the item overview appears here as the base condition, normally PB00 or PBXX. Everything else adjusts this figure.
- Enter discounts. Percentage or absolute discount conditions reduce the base. A quantity discount is entered with its scale so it applies only above the stated quantity.
- Enter surcharges and freight. Freight is the condition that most often overturns a ranking, because it is charged per order or per weight rather than per piece.
- Check the calculated effective price. The condition screen totals the line. If the total looks wrong, the usual cause is a condition entered as a percentage when it should be an absolute value.
- Save and repeat for each vendor. Conditions must be complete on every quotation, otherwise the comparison compares full offers against partial ones.
Conditions carry a validity period, which is what separates a one off bid from a lasting agreement. When a quotation is later accepted with an InfoUpdate indicator, these same conditions are written into the purchase info record and become the default for future orders.
With every reply recorded, the next stage is to compare prices across quotations in ME49.
