How to Install and Configure HIVE Metastore with MYSQL
What is HIVE Metastore?
Hive metastore is a repository that stores metadata (column names, data types, comments, etc.) related to Apache Hive using MySQL or PostgreSQL. This Hive metastore is implemented using tables in a relational database.
Why to Use MySQL in Hive as Metastore:
- By Default, Hive comes with derby database as metastore.
- Derby database can support only single active user at a time
- Derby is not recommended in production environment
So the solution here is
- Use MYSQL as Meta storage at backend to connect multiple users with Hive at a time
- MYSQL is Best choice for the standalone metastore
How to Install and Configure Hive Metastore to MySQL Database
Step 1) Install MySQL Server
In this step, we are going to perform two tasks
- Installation of mysql-server
- Checking the mysql-server and its process
- Using sudo apt-get install mysql-server command, we can download mysql server
Install MySQL as shown in the screenshot

- After successful installation at end, MySQL will run as shown in below screen shot

Step 2) Install MySQL Java Connector
Installing MySQL Java Connector. This is for java dependencies and connection purpose

Step 3) Create soft link for connector
Creating soft link for connector in Hive lib directory. This is for soft link between Java and MySql.
![]()
Step 4) Configuring MySql storage in Hive

- Type MySql –u root –p followed by password
- Here –u represents root username , p denotes password
- After entering the above command, the user has to enter valid password and then click enter
- Then it will enter into MySql shell mode
Step 5) Create username and password
Creating username and password for MySql, granting privileges.

We have to execute the commands as shown below,
mysql> CREATE USER 'hiveuser'@'%' IDENTIFIED BY 'hivepassword';
mysql> GRANT all on *.* to 'hiveuser'@localhost identified by 'hivepassword';
mysql>  flush privileges;
Step 6) Configuring hive-site.xml
- After Step 5 assign username and password to MySQL database and given privileges.
- Here we will configure some properties in Hive to get a connection with MySQL database.
![]()

From the above screenshot, we observe the following. Here we are defining 4 properties that could be necessary to establish MYSQL as Meta store in Hive
These are as follows:
- This property is for connection URL purpose. Here we are defining ConnectionURL in this property. It acts as JDBC connection and its representing metastore location as well
- This property is for Connection driver name. Here mysql.jdbc.Driver is the respected value we have to mention in the value tag
- This property used for defining Connection User name. In this, we defined “hiveguru” as user name
- This property used for mentioning Connection Password. In this, we defined password as user password.
Once the properties placed in hive –site.xml we have to manually save (Ctrl+S) and close the file. After closing this file, we have to create Hive table and check the table details in MySQL storage.
Place this code in hive-site.xml
hive-site.xml
<configuration>
	<property>
		<name>javax.jdo.option.ConnectionURL</name>
		<value>jdbc:mysql://localhost/metastore?createDatabaseIfNotExist=true</value>
		<description>metadata is stored in a MySQL server</description>
	</property>
	<property>
		<name>javax.jdo.option.ConnectionDriverName</name>
		<value>com.mysql.jdbc.Driver</value>
		<description>MySQL JDBC driver class</description>
	</property>
	<property>
		<name>javax.jdo.option.ConnectionUserName</name>
		<value>hiveuser</value>
		<description>user name for connecting to mysql server</description>
	</property>
	<property>
		<name>javax.jdo.option.ConnectionPassword</name>
		<value>hivepassword</value>
		<description>password for connecting to mysql server</description>
	</property>
</configuration>
Step7) Create table
Create table “guru99” in Hive.
![]()
From the above screenshot, we can observe the following
- Creation of table name”guru99″ with two column names
- The columns names mentioned with its data type as one is integer, and another one is of string type
In the next step, we are going to check whether it is stored in MySql or not
Step 8) Enter into MySql shell mode

From the above screenshot, we can observe the following
- First we have to use the database as “use metastore”
- Once it chooses meta store we can check the tables present in this by using “show” tables command as shown in the screenshot
- Whatever the tables that are created in Hive, the metadata corresponds to that tables are stored under TBLS in MySQL database.
- “Guur99 table” is created in Hive, so the corresponding metadata is stored in MySQL under TBLS.
Step 9) Enter select * from TBLS
Checking whether created table is presenting MySQL or Not
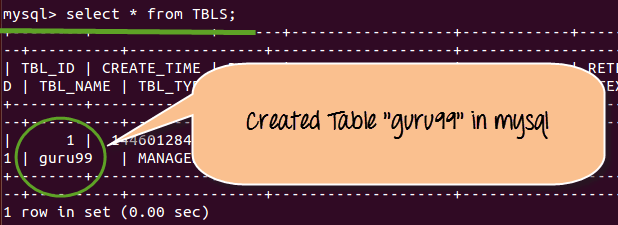
By entering select * from TBLS, it is going to display the tables that we created in Hive shell mode
From the above screenshot we can observe following things:
- Table name “guru99” that created is the Hive can be displayed in MySQL shell mode
- Beside this, it will also provide information like table creation time, accessed time and other properties as shown in screen shot above.