SAP InfoSet Tutorial: What is, Create, Joins
⚡ Smart Summary
An InfoSet in SAP BW is a special InfoProvider that does not store data physically but logically joins DataStore objects, InfoObjects, and InfoCubes through join conditions, making the combined data available for Business Explorer queries.

What is an InfoSet?
An InfoSet is a special kind of InfoProvider that does not store data physically. In other words, InfoSets are InfoProviders that logically join data and provide it for BI queries. An InfoSet collects data from the tables of the InfoProviders used to build it and describes data sources defined as a rule of join on DataStore objects, InfoObjects, or standard InfoCubes.
When to Use InfoSets?
- To join required data from basic InfoProviders.
- To allow BEx reporting on a DataStore object without turning the BEx reporting indicator on.
- To evaluate time dependencies.
- To create self joins and left outer joins.
What Are InfoSet Joins?
DSOs (DataStore Objects) and/or InfoObjects (characteristics with master data) are connected in the InfoSet using join conditions. The joined data is available for access from Business Explorer queries. InfoSets let you report on several InfoProviders (InfoCubes, DataStore objects, master data InfoObjects), but they contain no data. With activated InfoSets, you can define queries in the BI suite.
Joins are classified into four categories:
- Inner Join
- Left Outer Join
- Temporal Join
- Self Join
Inner Join: a record is only in the result set if there are entries in both joined tables. If table 2 has corresponding records of table 1, by comparing a key field (EMPNO in the example), only those records are part of the result set, with the fields of both tables filled in.
Left Table (Table 1)
| EMPNO | LASTNAME |
| 000020 | THOMPSON |
| 000250 | SMITH |
| 000100 | SPENSER |
Right Table (Table 2)
| EMPNO | PROJNO |
| 000020 | AD3112 |
| 000100 | OP2010 |
| 000150 | PL2100 |
Inner Join Result
| EMPNO | LASTNAME | PROJNO |
| 000020 | THOMPSON | AD3112 |
| 000100 | SPENSER | OP2010 |
Left Outer Join: if table 2 has corresponding records of table 1, those records are part of the result set. If table 2 has no corresponding record, those records of table 1 are still part of the result set, with the table 2 fields holding initial values, as shown below.
Left Table (Table 1)
| EMPNO | LASTNAME |
| 000020 | THOMPSON |
| 000250 | SMITH |
| 000100 | SPENSER |
Right Table (Table 2)
| EMPNO | PROJNO |
| 000020 | AD3112 |
| 000100 | OP2010 |
| 000150 | PL2100 |
Left Outer Join Result
| EMPNO | LASTNAME | PROJNO |
| 000020 | THOMPSON | AD3112 |
| 000250 | SMITH | |
| 000100 | SPENSER | OP2010 |
Temporal Join: a join is called temporal if at least one member is time-dependent.
Self Join: the same object is joined together.
How to Create an InfoSet?
Step 1)
- Go to Transaction Code RSA1.
- Click the OK button.

Step 2)
- Browse to the “InfoProvider” tab.
- Right click on the InfoArea and choose the option “Create InfoSet” from the context menu.
Transaction RSISET can also be used directly to create an InfoSet.

When the InfoSet Builder is called for the first time, two display mode options appear:
- Network (Dataflow Control)
- Tree (Tree Control)
The network display is clearer. The tree display can be read by the screen reader and is suitable for visually impaired users. You can change this setting at any time using the menu path Settings -> Display.
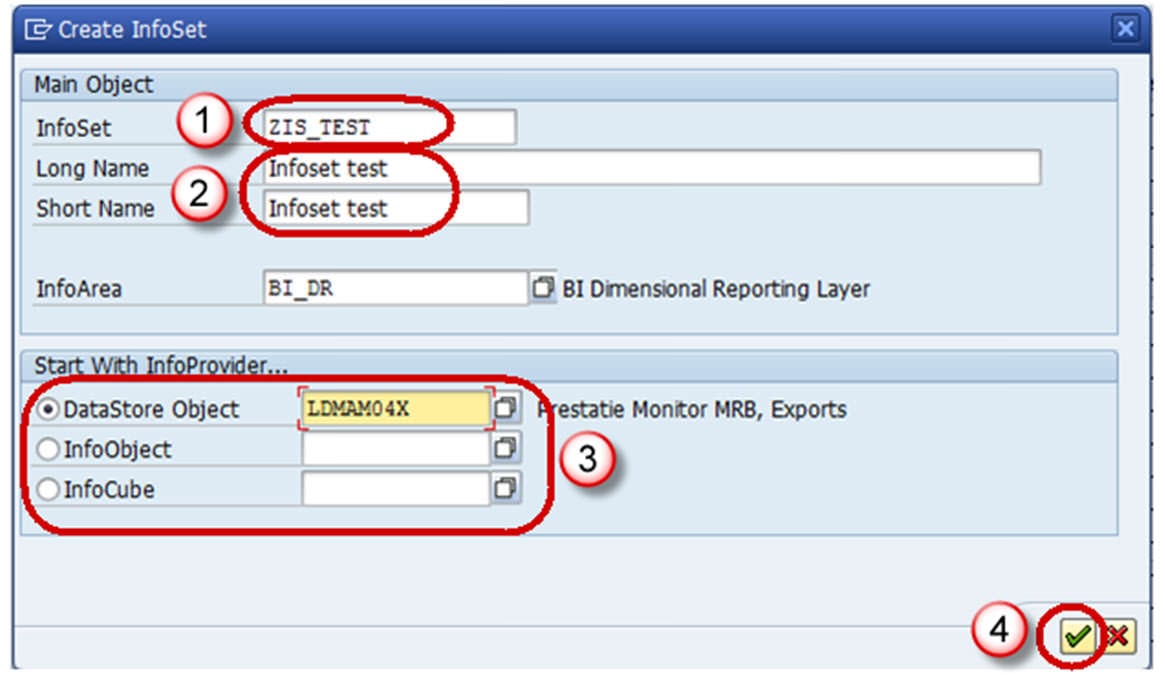
Step 3)
- Enter the Technical Name.
- Description.
- In the “Start with InfoProvider” section, determine which InfoProvider to use to start defining the InfoSet. Select one of the object types offered: DataStore object, InfoObject, or Standard InfoCube.
If you choose an InfoObject, it must be a characteristic with master data. The system provides the corresponding input help.
- Choose the Continue button.
Step 4) The Change InfoSet screen appears.

Step 5) Select the Insert InfoProvider button shown below to choose the InfoProvider with which data is to be joined.

Step 6)
- Enter the name of the DSO.
- Click the Continue button.

The below screen appears with the two InfoProviders selected.

Step 7) Activate the InfoSet by clicking on the Activate button.
