SAP Customer Master Data Tutorial: Create, Display, Block & Delete
⚡ Smart Summary
Customer Master Data in SAP FI stores the central records that drive accounts receivable postings, billing, and dunning. This walkthrough explains what the records contain, why they matter, and how to create, display changes, block, and delete a customer using the standard FD transaction codes.
What Is Customer Master Data in SAP?
The customer master holds every piece of information SAP needs to bill, collect, and report against a customer. It is split into three views: general data (address, contact, control fields) that is shared across the client, company code data (reconciliation account, payment terms, dunning) that is finance-specific, and sales area data (shipping, pricing, billing) that is maintained when the record is used in SD. A single record drives accounts receivable line items, dunning runs, credit checks, and statutory reports, so accuracy here ripples through the entire order-to-cash cycle.
Why Master Data Quality Matters
Duplicate records, missing tax IDs, or wrong reconciliation accounts cause failed postings, blocked invoices, and audit findings. Most accounts receivable cleanup projects trace back to poor customer master discipline. Setting up the record correctly the first time, and reviewing changes with FD04, keeps the subledger reconciled to the general ledger and prevents downstream surprises during month-end close.
Transactions You Will Use
- FD01 – Create customer (finance view, general data and company code data only).
- XD01 – Create customer (centrally, includes sales area data).
- FD02 / XD02 – Change customer.
- FD03 / XD03 – Display customer.
- FD04 – Display customer changes.
- FD05 – Block a customer.
- FD06 – Mark a customer for deletion.
In this tutorial, you will learn:
- How to create a customer master record
- How to display changes in the customer master
- How to block or delete a customer
How to Create a Customer Master Data
Use transaction FD01 to create a finance-only customer record. If the customer is also used in Sales and Distribution, use XD01 instead so the sales area data is captured in the same flow.
Step 1) Enter transaction code FD01 in the SAP command field.

Step 2) In the initial screen, enter the following:
- Select the account group.
- Enter a unique customer ID according to the number range assigned to the account group.
- Enter the company code in which you want to create the customer.
Step 3) Press Enter.

Step 4) On the next screen, select the Address tab and enter:
- The name of the customer.
- A search term used to look up the customer ID later.
- Street and house number.
- Postal code and city.
- Country and region.

Step 5) Choose the Control Data tab. If the customer belongs to a corporate group, enter the corporate group key here so consolidated reporting can roll the record up correctly.

Step 6) Click the Company Code Data button to move from general data into the finance-specific views.
![]()
Step 7) Select the Account Management tab and enter the reconciliation account. This is the general ledger account that all postings on this customer will hit, so it must match your chart of accounts setup.

Step 8) Select the Payment Transactions tab and enter the terms of payment. These default into every invoice for this customer and drive dunning and cash-flow forecasts.

Step 9) Choose Save.

Step 10) Check the status bar at the bottom of the screen to confirm the customer master record has been created. The customer number is shown here for the new record.
How to Display Changes in Customer Master
Once a record is live, every edit needs to be traceable. Transaction FD04 shows the audit trail of which fields changed, who changed them, and the old versus new values. This is essential for internal audit and for resolving disputes when a customer claims a different payment term or address.
Step 1) Enter the transaction code FD04 in the SAP command field.

Step 2) On the next screen, enter the following:
- The customer account number.
- The company code.

Step 3) On the next screen, select the field from the list of changed fields you want to review.

Step 4) The next screen lists the new value and old value of the field, together with the user ID and timestamp of the change.

How to Block or Delete a Customer
When a customer is no longer active, the right action is rarely an immediate delete. SAP separates blocking from deletion so the data stays in the system for reporting while preventing new postings or orders.
- Block a customer to stop further posting or sales activity.
- Mark for deletion when the record should be archived and removed.
Block a Customer
Step 1) Enter transaction code FD05 in the SAP command field.

Step 2) On the next screen, enter the following:
- The customer ID to be blocked.
- The company code of the customer for which the company code data is to be blocked.

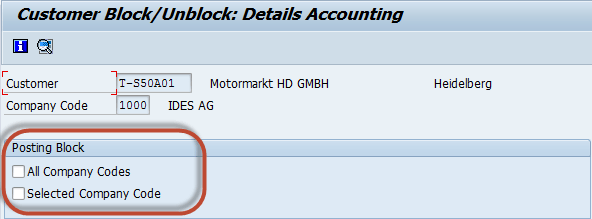
Step 3) On the next screen, check the block indicator for the data to be blocked. You can block at general level (all company codes) or at the specific company code level.
Step 4) Press Save to commit the block.
![]()
Delete a Customer
Step 1) Enter transaction code FD06 in the SAP command field.

Step 2) On the next screen, enter the following:
- The customer ID to be deleted.
- The company code of the customer for which the company code data is to be deleted.

Step 3) On the next screen, check the deletion flag for the data to be deleted. The record stays in the system until the archiving program runs.

Step 4) Press Save to mark the record for deletion.
![]()
Verify the Record Behaves Correctly
After saving, run a quick verification cycle: open FD03 to confirm general data and company code data are populated, post a test invoice in a sandbox client to validate the reconciliation account and payment terms, then run FD04 to confirm the change log captured the creation. For a blocked or deleted record, try posting an FB70 invoice and confirm SAP returns the expected block message.