How to Create Chart of Accounts in SAP
⚡ Smart Summary
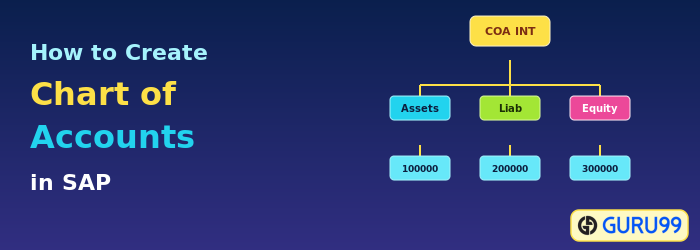
Chart of Accounts in SAP is a client-level list of all general ledger master records, assigned to each company code and organized into account groups, created with transaction code OB13 to structure financial reporting.
What is a Chart of Accounts in SAP?
In SAP, the Chart of Accounts (COA) is defined at the client level and assigned to each company code. It is a list of the General Ledger account master data that falls under the different account groups of a company code. This grouping mechanism helps to develop better financial reports.
Types of Chart of Accounts
There are three types of Chart of Accounts:
- Operating chart of accounts: Used to post daily expenses. The accounts could be either expense or revenue accounts, and the information is shared by the Finance and Controlling modules.
- Group chart of accounts: Accounts used by the entire corporate group. They help generate reports at the corporate level.
- Country-specific chart of accounts: Helps meet country-specific legal requirements.
How to Create Chart of Accounts
Step 1) Enter Transaction code SPRO in the command field.

Step 2) In the next screen, select SAP Reference IMG.

Step 3) In the next screen, “Display IMG”, navigate the following menu path: SAP Customizing Implementation Guide -> Financial Accounting -> General Ledger Accounting -> G/L Accounts -> Master Data -> Preparations -> Edit Chart of Accounts List.

Step 4) In the next screen, select New Entries.

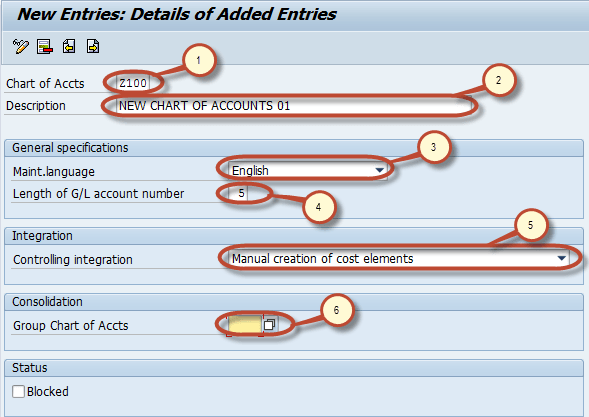
Step 5) In the next screen, enter the following data:
- Enter a unique Chart of Accounts code, maximum length four characters.
- Enter a description for the Chart of Accounts.
- Enter the language in which the Chart of Accounts is created. All accounts have a description in this language, and master data can only be displayed or maintained in this language.
- Enter the maximum length for G/L account numbers, up to ten digits. If a number is shorter, SAP prefixes zeros to reach the maximum length.
- Enter the type of integration between G/L accounts and cost elements.
- Enter the Chart of Accounts used in the corporate group.
Step 6) After entering this information, press Save ![]() . In the next screen, enter your Change Request number.
. In the next screen, enter your Change Request number.

You have successfully created a new Chart of Accounts.
How to Create Chart of Accounts (COA) Account Group
Step 1) Enter Transaction code SPRO in the command field.
Step 2) In the next screen, select SAP Reference IMG.
Step 3) In the next screen, “Display IMG”, navigate the following menu path: SAP Customizing Implementation Guide -> Financial Accounting -> General Ledger Accounting -> G/L Accounts -> Master Data -> Preparations -> Define Account Group.

Step 4) In the next screen, select New Entries.

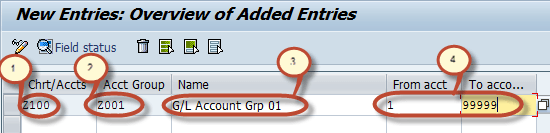
Step 5) In the next screen, enter the following information:
- Enter the Chart of Accounts key in which the account group is to be created.
- Enter a unique Account Group key.
- Enter a description for the account group.
- Enter the number range for the G/L account to be created in the account group.
Step 6) Select Field Status from the Application menu.
![]()
Step 7) In the next screen, you can change the field status for different sections of the G/L COA master data. For example, select Account Control.

Step 8) Now you can maintain the status of different fields belonging to the Account Control tab between Suppressed (Hidden), Required, Optional, and Display modes.

Note: The default status of fields is Optional.
Step 9) After maintaining the field status, press save ![]() and enter your change request number.
and enter your change request number.

You have successfully created a Chart of Accounts Account Group.