How to Download & Install Apache JMeter (Windows)
⚡ Smart Summary
Download and Install Apache JMeter in four steps — install a compatible Java runtime, download the JMeter binary, unzip it, and launch in GUI, server, or command-line mode. The same procedure works across Windows, macOS, and Linux because JMeter is a pure Java application.

Operating System Support for JMeter
JMeter is a pure Java application and runs correctly on any operating system that has a compatible Java runtime. Officially supported platforms include:
- Windows
- macOS
- Linux (including Ubuntu, Debian, CentOS, and others)
Steps to Install JMeter
Step 1) Install Java
Because JMeter is a pure Java desktop application, it needs a fully compliant Java 8 or higher JDK (older JMeter releases also supported Java 6). Download and install the latest Java SE Development Kit from the Oracle Java downloads page or use an OpenJDK distribution such as Adoptium, Microsoft Build of OpenJDK, or Amazon Corretto.

Once the install finishes, verify the JDK with the following check:
- Open a Terminal on Windows, macOS, or Linux.
- Run
java -version.
If the Java runtime is installed correctly, the version is printed to the terminal as shown below.
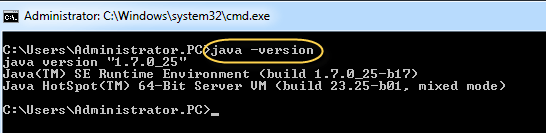
If nothing is printed, re-install the Java SE runtime. See this tutorial for the full instructions.
Step 2) Download JMeter
Download the latest binary from the Apache JMeter downloads page. The current stable line is the JMeter 5.x series, which requires Java 8 or higher. Older articles and screenshots may reference JMeter 4.x or 2.9 — the install process is the same.
Choose the Binaries file (zip or tgz) as shown below.

Step 3) Installation
JMeter installation is extremely simple — there is no installer wizard. Unzip the archive into the directory where you want JMeter to live, and the install is finished. The folder layout looks like this:

The directories inside the JMeter folder serve the following purposes:
- /bin — scripts that start JMeter (
jmeter.bat,jmeter.sh,jmeter-server). - /docs — JMeter documentation.
- /extras — Ant-related extras and sample scripts.
- /lib — third-party Java libraries used by JMeter.
- /lib/ext — core JMeter jar files and protocol implementations.
- /lib/junit — JUnit library used for JUnit samplers.
- /printable_docs — printable HTML documentation.
Step 4) Launch JMeter
JMeter can be started in three modes, each suited to a different use case:
- GUI mode for building and debugging test plans.
- Server mode for distributed testing across multiple machines.
- Command-line (non-GUI) mode for production-grade load runs.
Start JMeter in GUI Mode
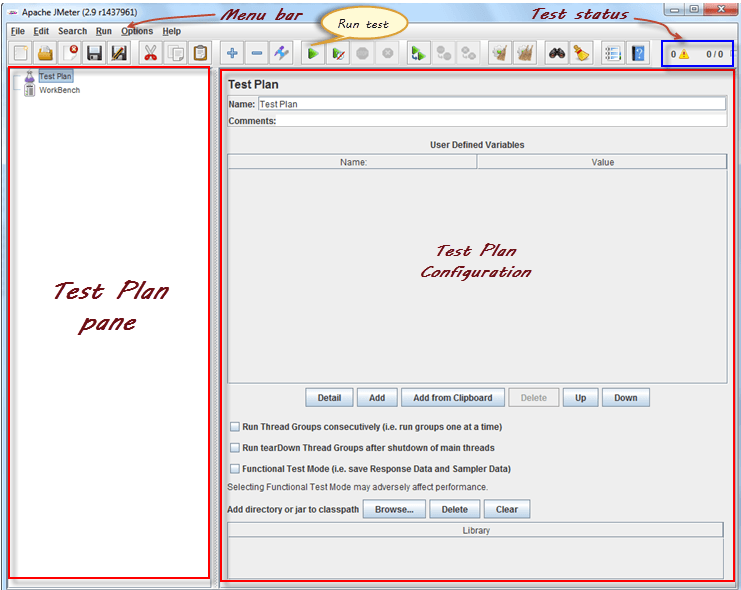
On Windows, run /bin/jmeter.bat. On macOS or Linux, run /bin/jmeter. The JMeter UI launches as shown below.

The annotated screenshot below highlights the main JMeter GUI components — Test Plan tree, Workbench, and the right-hand element editor.
How to Run JMeter in Non-GUI Mode
Start JMeter in Server Mode
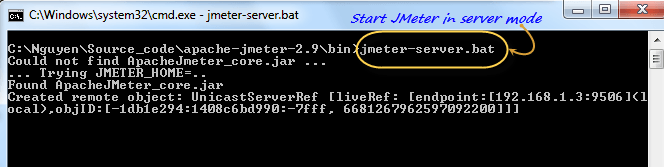
Server mode is used for distributed testing with a client-server topology. JMeter runs in server mode on each load-generator machine and in GUI mode (the controller) on the user’s workstation.
To start the server mode, run bin/jmeter-server.bat on Windows or bin/jmeter-server on macOS and Linux.
Start JMeter in Command-Line Mode
JMeter’s GUI consumes significant memory and CPU, so production load runs should always be executed in non-GUI mode to free those resources for actual load generation.

Example command line:
jmeter -n -t testPlan.jmx -l log.jtl -H 127.0.0.1 -P 8000Key switches:
-n— run in non-GUI mode.-t— path to the JMX test plan.-l— output log file (JTL).-H,-P— proxy host and port if a proxy is required.

Additional Packages
Depending on the protocols and reporting you need, install one or more of the optional packages below.
- Java Compiler — needed to build JMeter source or to compile custom plugins.
- SAX XML parser — the Simple API for XML is an alternative XML parser for very large XML payloads.
- Email support — JMeter ships with SMTP, POP3(S), and IMAP(S) samplers and can also send email when a test finishes.
- JDBC driver — install the appropriate driver jar to test database servers through the JDBC Sampler.
- Plugins Manager — JMeter Plugins Manager gives one-click access to community plugins such as PerfMon and Custom Thread Groups.
Use JMeter on Linux
Running JMeter on Linux is identical to running it on Windows — invoke a shell script from bin/:
jmeter— launches JMeter, GUI mode by default.jmeter-server— starts JMeter in server mode (calls the main script with the right arguments).jmeter.sh— basic launcher with no JVM options specified.mirror-server.sh— runs the JMeter Mirror Server in non-GUI mode.shutdown.sh— gracefully stops a non-GUI instance.stoptest.sh— abruptly stops a non-GUI instance.
Troubleshooting JMeter Installation
Common issues during a fresh install and how to fix them:
- “java is not recognised” on Windows: add the JDK
binfolder to PATH and reopen the terminal. - JMeter GUI does not start: confirm Java 8 or higher is on PATH with
java -version; older JREs no longer support recent JMeter releases. - HiDPI font issues: edit
bin/jmeter.propertiesand uncommentjmeter.hidpi.mode=truewith a suitable scale factor. - Heap out-of-memory in large tests: raise
HEAP="-Xms1g -Xmx4g"inbin/jmeter.batorbin/jmeter. - Server-mode RMI errors: set
server.rmi.ssl.disable=trueinjmeter.propertiesfor an isolated lab network.