How to use Selenium IDE with Scripts & Commands (Assert, Verify)
We will use the Mercury Tours website as our web application under test. It is an online flight reservation system that contains all the elements we need for this tutorial. Its URL is https://demo.guru99.com/test/newtours/, and this will be our Base URL.
Let us now create our first test script in Selenium IDE using the most common method – by recording. Afterward, we shall execute our script using the playback feature.
Create a Script by Recording
Step 1
- Launch Firefox and Selenium IDE.
- Type the value for our Base URL: https://demo.guru99.com/test/newtours/.
- Toggle the Record button on (if it is not yet toggled on by default).
.png)
| Step 2
In Firefox, navigate to https://demo.guru99.com/test/newtours/. Firefox should take you to the page similar to the one shown below.
|
|
Step 3
|
|
|
|
|
Step 4
|
|
|
|
 |
Step 5
|
|
| Step 6
Toggle the record button off to stop recording. Your script should now look like the one shown below.
|
|
| Step 7
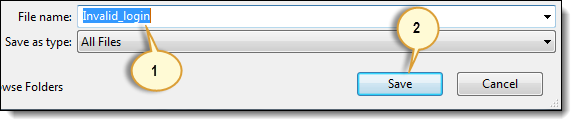
Now that we are done with our test script, we shall save it in a test case. In the File menu, select “Save Test Case”. Alternatively, you can simply press Ctrl+S.
|
|
Step 8
|
|
| Step 9
Notice that the file was saved as HTML.
|
|
.png)
.png)


Step 10) Go back to Selenium IDE and click the Playback button to execute the whole script. Selenium IDE should be able to replicate everything flawlessly.
Introduction to Selenium Commands – Selenese
- Selenese commands can have up to a maximum of two parameters: target and value.
- Parameters are not required all the time. It depends on how many the command will need.
Types of Commands
| Actions | These are commands that directly interact with page elements.
Example: the “click” command is an action because you directly interact with the element you are clicking at. The “type” command is also an action because you are putting values into a text box, and the text box shows them to you in return. There is a two-way interaction between you and the text box. |
|---|---|
| Accessors | They are commands that allow you to store values to a variable.
Example: the “storeTitle” command is an accessor because it only “reads” the page title and saves it in a variable. It does not interact with any element on the page. |
| Assertions | They are commands that verify if a certain condition is met.
3 Types of Assertions
|
Assert vs. Verify in Selenium

Common Commands
| Command | Number of Parameters | Description |
|---|---|---|
| open | 0 – 2 | Opens a page using a URL. |
| click/clickAndWait | 1 | Clicks on a specified element. |
| type/typeKeys | 2 | Types a sequence of characters. |
| verifyTitle/assertTitle | 1 | Compares the actual page title with an expected value. |
| verifyTextPresent | 1 | Checks if a certain text is found within the page. |
| verifyElementPresent | 1 | Checks the presence of a certain element. |
| verifyTable | 2 | Compares the contents of a table with expected values. |
| waitForPageToLoad | 1 | Pauses execution until the page is loaded completely. |
| waitForElementPresent | 1 | Pauses execution until the specified element becomes present. |
Create a Script Manually with Firebug
Now, we shall recreate the same test case manually, by typing in the commands. This time, we will need to use Firebug.
Step 1
|
| Step 2: Click on the topmost blank line in the Editor.
|
| Type “open” in the Command text box and press Enter.
|
Step 3
|
Step 4
|
Step 5
|
| Click on the User Name text box. Notice that Firebug automatically shows you the HTML code for that element.
|
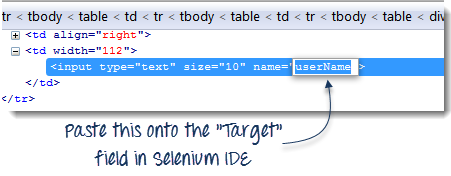
| Step 6 Notice that the User Name text box does not have an ID, but it has a NAME attribute. We shall, therefore, use its NAME as the locator. Copy the NAME value and paste it onto the Target field in Selenium IDE.
Still in the Target text box, prefix “userName” with “name=”, indicating that Selenium IDE should target an element whose NAME attribute is “userName.”
Type “invalidUN” in the Value text box of Selenium IDE. Your test script should now look like the image below. We are done with the third command. Note: Instead of invalidUN, you may enter any other text string. But Selenium IDE is case sensitive, and you type values/attributes exactly like in the application.
|
Step 7
|
Step 8
|


.png)


Step 9: Save the test case in the same way as we did in the previous section.
Using the Find Button
The Find button in Selenium IDE is used to verify if what we had put in the Target text box is indeed the correct UI element.
Let us use the Invalid_login test case that we created in the previous sections. Click on any command with a Target entry, say, the third command.
.png)
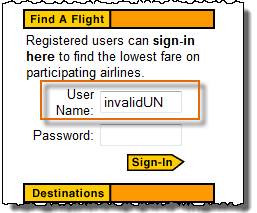
Click on the Find button. Notice that the User Name text box within the Mercury Tours page becomes highlighted for a second.
.png)
This indicates that Selenium IDE was able to detect and access the expected element correctly. If the Find button highlighted a different element or no element at all, then there must be something wrong with your script.
Execute Command
This allows you to execute any single command without running the whole test case. Just click on the line you wish to execute and then either click on “Actions > Execute this command” from the menu bar or simply press “X” on your keyboard.
Step 1) Make sure that your browser is on the Mercury Tours homepage. Click on the command you wish to execute. In this example, click on the “type | userName | invalidUN” line.
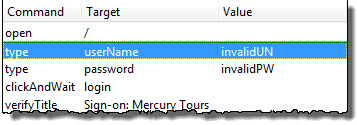
Step 2) Press “X” on your keyboard.
Step 3) Observe that the text box for username becomes populated with the text “invalidUN”
Executing commands this way is highly dependent on the page that Firefox is currently displaying. This means that if you try the example above with the Google homepage displayed instead of Mercury Tours’, then your step will fail because there is no text box with a “userName” attribute within Google’s homepage.
Start point
A start point is an indicator that tells Selenium IDE which lines the execution will start. Its shortcut key is “S”.

In the example above, playback will start on the third line (type | password | invalidPW). You can only have one start point in a single test script.
The start point is similar to Execute Command in such that they are dependent on the currently displayed page. The start point will fail if you are on the wrong page.
Breakpoints
Breakpoints are indicators that tell Selenium IDE where to automatically pause the test. The shortcut key is “B”.

The yellow highlight means that the current step is pending. This proves that Selenium IDE has paused execution on that step. You can have multiple breakpoints in one test case.
Step
It allows you to execute succeeding commands one at a time after pausing the test case. Let us use the scenario in the previous section “Breakpoints.”
|
|
Before clicking “Step.”
The test case pauses at the line “clickAndWait | login”. |
 |
After clicking “Step.”
The “clickAndWait | login” line is run and pauses to the next command (verifyTitle | Sign-on: Mercury Tours). Notice that the next line is paused even though there is no breakpoint there. This is the main purpose of the Step feature – it executes the succeeding commands one at a time to give you more time to inspect the outcome after each step. |

Important Things to Note When Using Other Formats in Source View
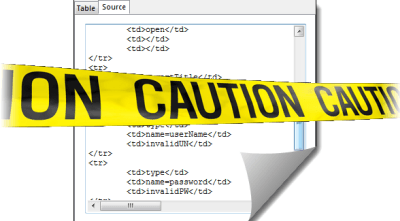
Selenium IDE works well only with HTML – other formats are still in experimental mode. It is NOT advisable to create or edit tests using other formats in Source View because there is still a lot of work needed to make it stable. Below are the known bugs as of version 1.9.1.
- You will not be able to perform playback nor switch back to Table View unless you revert to HTML.
- The only way to add commands safely on the source code is by recording them.
- When you modify the source code manually, all of it will be lost when you switch to another format.
- Though you can save your test case while in Source View, Selenium IDE will not be able to open it.
The recommended way to convert Selenese tests is to use the “Export Test Case As…” option under the File menu, and not through the Source View.
Summary
- Test scripts can be created either by recording or typing the commands and parameters manually.
- When creating scripts manually, Firebug is used to get the locator.
- The Find button is used to check that the command is able to access the correct element.
- Table View displays a test script in tabular form while Source View displays it in HTML format.
- Changing the Source View to a non-HTML format is still experimental.
- Do not use the Source View in creating tests in other formats. Use the Export features instead.
- Parameters are not required all the time. It depends upon the command.
- There are three types of commands:
- Actions – directly interacts with page elements
- Accessors – “reads” an element property and stores it in a variable
- Assertions – compares an actual value with an expected one
- Assertions have three types:
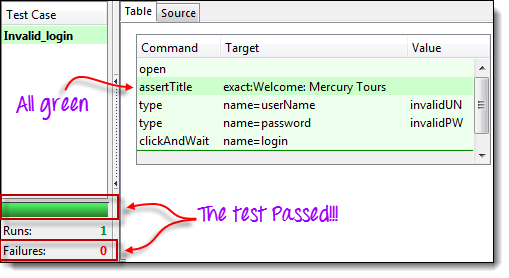
- Assert – upon failure, succeeding steps are no longer executed
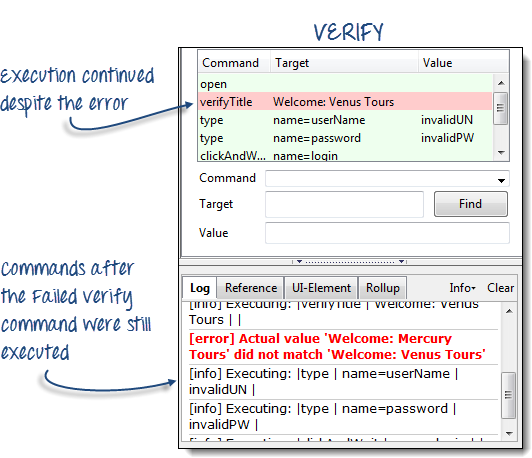
- Verify – upon failure, succeeding steps are still executed.
- WaitFor – passes if the specified condition becomes true within the timeout period; otherwise, it will fail
- The most common commands are:
- open
- click/clickAndWait
- type/typeKeys
- verifyTitle/assertTitle
- verifyTextPresent
- verifyElementPresent
- verifyTable
- waitForPageToLoad
- waitForElementPresent