DataStage Tutorial for Beginners: IBM DataStage (ETL Tool) Training
What is DataStage?
DataStage is an ETL tool used to extract, transform, and load data from the source to the target destination. The source of these data might include sequential files, indexed files, relational databases, external data sources, archives, enterprise applications, etc. DataStage is used to facilitate business analysis by providing quality data to help in gaining business intelligence.
DataStage ETL tool is used in a large organization as an interface between different systems. It takes care of extraction, translation, and loading of data from source to the target destination. It was first launched by VMark in mid-90’s. With IBM acquiring DataStage in 2005, it was renamed to IBM WebSphere DataStage and later to IBM InfoSphere.
Various version of Datastage available in the market so far was Enterprise Edition (PX), Server Edition, MVS Edition, DataStage for PeopleSoft and so on. The latest edition is IBM InfoSphere DataStage
IBM Information server includes following products,
- IBM InfoSphere DataStage
- IBM InfoSphere QualityStage
- IBM InfoSphere Information Services Director
- IBM InfoSphere Information Analyzer
- IBM Information Server FastTrack
- IBM InfoSphere Business Glossary
DataStage Overview
Datastage has following Capabilities.
- It can integrate data from the widest range of enterprise and external data sources
- Implements data validation rules
- It is useful in processing and transforming large amounts of data
- It uses scalable parallel processing approach
- It can handle complex transformations and manage multiple integration processes
- Leverage direct connectivity to enterprise applications as sources or targets
- Leverage metadata for analysis and maintenance
- Operates in batch, real time, or as a Web service
In the following sections of this DataStage tutorial, we briefly describe the following aspects of IBM InfoSphere DataStage:
- Data transformation
- Jobs
- Parallel processing
InfoSphere DataStage and QualityStage can access data in enterprise applications and data sources such as:
- Relational databases
- Mainframe databases
- Business and analytic applications
- Enterprise resource planning (ERP) or customer relationship management (CRM) databases
- Online analytical processing (OLAP) or performance management databases
Processing Stage Types
IBM infosphere job consists of individual stages that are linked together. It describes the flow of data from a data source to a data target. Usually, a stage has minimum of one data input and/or one data output. However, some stages can accept more than one data input and output to more than one stage.
In Job design various stages you can use are:
- Transform stage
- Filter stage
- Aggregator stage
- Remove duplicates stage
- Join stage
- Lookup stage
- Copy stage
- Sort stage
- Containers
DataStage Components and Architecture
DataStage has four main components namely,
- Administrator: It is used for administration tasks. This includes setting up DataStage users, setting up purging criteria and creating & moving projects.
- Manager: It is the main interface of the Repository of ETL DataStage. It is used for the storage and management of reusable Metadata. Through DataStage manager, one can view and edit the contents of the Repository.
- Designer: A design interface used to create DataStage applications OR jobs. It specifies the data source, required transformation, and destination of data. Jobs are compiled to create an executable that are scheduled by the Director and run by the Server
- Director: It is used to validate, schedule, execute and monitor DataStage server jobs and parallel jobs.

The above image explains how IBM Infosphere DataStage interacts with other elements of the IBM Information Server platform. DataStage is divided into two section, Shared Components, and Runtime Architecture.
|
Shared |
Unified user interface |
|
|
Common Services |
|
|
|
Common Parallel Processing |
|
|
|
Runtime Architecture |
OSH Script |
|
Pre-requisite for Datastage Tool
For DataStage, you will require the following setup.
- Infosphere
- DataStage Server 9.1.2 or above
- Microsoft Visual Studio .NET 2010 Express Edition C++
- Oracle client (full client, not an instant client) if connecting to an Oracle database
- DB2 client if connecting to a DB2 database
Now in this DataStage tutorials for Beginners series, we will learn how to download and install InfoSphere information server.
Download and Installation InfoSphere Information Server
To access DataStage, download and install the latest version of IBM InfoSphere Server. The server supports AIX, Linux, and Windows operating system. You can choose as per requirement.
To migrate your data from an older version of infosphere to new version uses the asset interchange tool.
Installation Files
For installing and configuring Infosphere Datastage, you must have following files in your setup.
For Windows,
- EtlDeploymentPackage-windows-oracle.pkg
- EtlDeploymentPackage-windows-db2.pkg
For Linux,
- EtlDeploymentPackage-linux-db2.pkg
- EtlDeploymentPackage-linux-oracle.pkg
Process flow of Change Data in a CDC Transaction Stage Job

- The ‘InfoSphere CDC’ service for the database monitors and captures the change from a source database
- According to the replication definition “InfoSphere CDC” transfers the change data to “InfoSphere CDC for InfoSphere DataStage.”
- The “InfoSphere CDC for InfoSphere DataStage” server sends data to the “CDC Transaction stage” through a TCP/IP session. The “InfoSphere CDC for InfoSphere DataStage” server also sends a COMMIT message (along with bookmark information) to mark the transaction boundary in the captured log.
- For each COMMIT message sent by the “InfoSphere CDC for InfoSphere DataStage” server, the “CDC Transaction stage” creates end-of-wave (EOW) markers. These markers are sent on all output links to the target database connector stage.
- When the “target database connector stage” receives an end-of-wave marker on all input links, it writes bookmark information to a bookmark table and then commits the transaction to the target database.
- The “InfoSphere CDC for InfoSphere DataStage” server requests bookmark information from a bookmark table on the “target database.”
- The “InfoSphere CDC for InfoSphere DataStage” server receives the Bookmark information.
This information is used to,
- Determine the starting point in the transaction log where changes are read when replication begins.
- To determine if the existing transaction log can be cleaned up
Setting Up SQL Replication
Before you begin with Datastage, you need to setup database. You will create two DB2 databases.
- One to serve as replication source and
- One as the target.
You will also create two tables (Product and Inventory) and populate them with sample data. Then you can test your integration between SQL Replication and Datastage.
Moving forward you will set up SQL replication by creating control tables, subscription sets, registrations and subscription set members. We will learn more about this in details in next section.
Here we will take an example of Retail sales item as our database and create two tables Inventory and Product. These tables will load data from source to target through these sets. (control tables, subscription sets, registrations, and subscription set members.)
Step 1) Create a source database referred to as SALES. Under this database, create two tables product and Inventory.
Step 2) Run the following command to create SALES database.
db2 create database SALES
Step 3) Turn on archival logging for the SALES database. Also, back up the database by using the following commands
db2 update db cfg for SALES using LOGARCHMETH3 LOGRETAIN
db2 backup db SALES
Step 4) In the same command prompt, change to the setupDB subdirectory in the sqlrepl-datastage-tutorial directory that you extracted from the downloaded compressed file.

Step 5) Use the following command to create Inventory table and import data into the table by running the following command.
db2 import from inventory.ixf of ixf create into inventory
Step 6) Create a target table. Name the target database as STAGEDB.
Since now you have created both databases source and target, the next step in this DataStage tutorial, we will see how to replicate it.
The following information can be helpful in setting up ODBC data source.
Creating the SQL Replication Objects
The image below shows how the flow of change data is delivered from source to target database. You create a source-to-target mapping between tables known as subscription set members and group the members into a subscription.

The unit of replication within InfoSphere CDC (Change Data Capture) is referred to as a subscription.
- The changes done in the source is captured in the “Capture control table” which is sent to the CD table and then to target table. While the apply program will have the details about the row from where changes need to be done. It will also join CD table in subscription set.
- A subscription contains mapping details that specify how data in a source data store is applied to a target data store. Note, CDC is now referred as Infosphere data replication.
- When a subscription is executed, InfoSphere CDC captures changes on the source database. InfoSphere CDC delivers the change data to the target, and stores sync point information in a bookmark table in the target database.
- InfoSphere CDC uses the bookmark information to monitor the progress of the InfoSphere DataStage job.
- In the case of failure, the bookmark information is used as restart point. In our example, the ASN.IBMSNAP_FEEDETL table stores DataStage related synchpoint information that is used to track DataStage progress.
In this section of IBM DataStage training tutorial, you have to do following things,
- Create CAPTURE CONTROL tables and APPLY CONTROL tables to store replication options
- Register the PRODUCT and INVENTORY tables as replication sources
- Create a subscription set with two members
- Create subscription set members and target CCD tables
Use ASNCLP command line program to setup SQL replication
Step 1) Locate the crtCtlTablesCaptureServer.asnclp script file in the sqlrepl-datastage-tutorial/setupSQLRep directory.
Step 2) In the file replace <db2-connect-ID> and “<password>” with your user ID and password for connecting to the SALES database.
Step 3) Change directories to the sqlrepl-datastage-tutorial/setupSQLRep directory and run the script. Use the following command. The command will connect to the SALES database, generate an SQL script for creating the Capture control tables.
asnclp –f crtCtlTablesCaptureServer.asnclp
Step 4) Locate the crtCtlTablesApplyCtlServer.asnclp script file in the same directory. Now replace two instances of <db2-connect-ID> and “<password>” with the user ID and password for connecting to the STAGEDB database.
Step 5) Now in the same command prompt use the following command to create apply control tables.
asnclp –f crtCtlTablesApplyCtlServer.asnclp
Step 6) Locate the crtRegistration.asnclp script files and replace all instances of <db2-connect-ID> with the user ID for connecting to the SALES database. Also, change “<password>” to the connection password.
Step 7) To register the source tables, use following script. As part of creating the registration, the ASNCLP program will create two CD tables. CDPRODUCT AND CDINVENTORY.
asnclp –f crtRegistration.asnclp
The CREATE REGISTRATION command uses the following options:
- Differential Refresh: It prompt Apply program to update the target table only when rows in the source table change
- Image both: This option is used to register the value in source column before the change occurred, and one for the value after the change occurred.
Step 8) For connecting to the target database (STAGEDB), use following steps.
- Find the crtTableSpaceApply.bat file, open it in a text editor
- Replace <stagedb-connect-ID> and <stagedb-password> with the user ID and password
- In the DB2 command window, enter crtTableSpaceApply.bat and run the file.
- This batch file creates a new tablespace on the target database ( STAGEDB)
Step 9) Locate the crtSubscriptionSetAndAddMembers.asnclp script files and do the following changes.
- Replace all instances of <sales-connect-ID> and <sales-password> with the user ID and password for connecting to the SALES database (source).
- Replace all instances of <stagedb-connect-ID> and <stagedb-password> with the user ID for connecting to the STAGEDB database (target).
After changes run the script to create subscription set (ST00) that groups the source and target tables. The script also creates two subscription set members, and CCD (consistent change data) in the target database that will store the modified data. This data will be consumed by Infosphere DataStage.
Step 10) Run the script to create the subscription set, subscription-set members, and CCD tables.
asnclp –f crtSubscriptionSetAndAddMembers.asnclp
Various options used for creating subscription set and two members include
- Complete on condensed off
- External
- Load type import export
- Timing continuous
Step 11) Due to the defect in the replication administration tools. You have to execute another batch file to set the TARGET_CAPTURE_SCHEMA column in the IBMSNAP_SUBS_SET control table to null.
- Locate the updateTgtCapSchema.bat file. Open it in a text editor. Replace <stagedb-connect-ID> and <stagedb-password> with the user ID for connecting to the STAGEDB database.
- In the DB2 command window, enter command updateTgtCapSchema.bat and execute the file.
Creating the Definition Files to Map CCD Tables to DataStage
Before we do replication in next step, we need to connect CCD table with DataStage. In this section, we will see how to connect SQL with DataStage.
For connecting CCD table with DataStage, you need to create Datastage definition (.dxs) files. The .dsx file format is used by DataStage to import and export job definitions. You will use ASNCLP script to create two .dsx files. For example, here we have created two .dsx files.
- stagedb_AQ00_SET00_sJobs.dsx: Creates a job sequence that directs the workflow of the four parallel jobs.
- stagedb_AQ00_SET00_pJobs.dsx : Creates the four parallel jobs
ASNCLP program automatically maps the CCD column to the Datastage Column format. It is only supported when the ASNCLP runs on Windows, Linux, or Unix Procedure.

Datastage jobs pull rows from CCD table.
- One job sets a synchpoint where DataStage left off in extracting data from the two tables. The job gets this information by selecting the SYNCHPOINT value for the ST00 subscription set from the IBMSNAP_SUBS_SET table and inserting it into the MAX_SYNCHPOINT column of the IBMSNAP_FEEDETL table.
- Two jobs that extract data from the PRODUCT_CCD and INVENTORY_CCD tables. The jobs know which rows to start extracting by selecting the MIN_SYNCHPOINT and MAX_SYNCHPOINT values from the IBMSNAP_FEEDETL table for the subscription set.
Starting Replication
To start replication, you will use below steps. When CCD tables are populated with data, it indicates the replication setup is validated. To view the replicated data in the target CCD tables use the DB2 Control Center graphical user interface.
Step 1) Make sure that DB2 is running if not then use db2 start command.
Step 2) Then use asncap command from an operating system prompt to start capturing program. For example.
asncap capture_server=SALES
The above command specifies the SALES database as the Capture server. Keep the command window open while the capture is running.
Step 3) Now open a new command prompt. Then start the APPLY program by using the asnapply command.
asnapply control_server=STAGEDB apply_qual=AQ00

- The command specifies the STAGEDB database as the Apply control server (the database that contains the Apply control tables)
- AQ00 as the Apply qualifier (the identifier for this set of control tables)
Leave command window open with Apply is running.
Step 4) Now open another command prompt and issue the db2cc command to launch the DB2 Control Center. Accept the default Control Center.
Step 5) Now in the left navigation tree, open All Databases > STAGEDB and then click Tables. Double click on table name ( Product CCD) to open the table. It will look something like this.

Likewise, you can also open CCD table for INVENTORY.

How to Create Projects in Datastage Tool
First of all, you will create a Project in DataStage. For that, you must be an InfoSphere DataStage administrator.
Once the Installation and replication are done, you need to create a project. In DataStage, projects are a method for organizing your data. It includes defining data files, stages and build jobs in a specific project.
To create a project in DataStage, follow the below steps:
Step 1) Launch DataStage software
Launch the DataStage and QualityStage Administrator. Then click Start > All programs > IBM Information Server > IBM WebSphere DataStage and QualityStage Administrator.
Step 2) Connect DataStage server and client
For connecting to the DataStage server from your DataStage client, enter details like Domain name, user ID, password, and server information.
Step 3) Add a New Project
In the WebSphere DataStage Administration window. Click the Projects tab and then click Add.
Step 4) Enter the project details
In the WebSphere DataStage Administration window, enter details like
- Name
- Location of file
- Click ‘OK’

Each project contains:
- DataStage jobs
- Built-in components. These are predefined components used in a job.
- User-defined components. These are customized components created using the DataStage Manager or DataStage Designer.
We will see how to import replication jobs in Datastage Infosphere.
How to Import Replication Jobs in Datastage and QualityStage Designer
You will import jobs in the IBM InfoSphere DataStage and QualityStage Designer client. And you execute them in the IBM InfoSphere DataStage and QualityStage Director client.
The designer-client is like a blank canvas for building jobs. It extracts, transform, load, and check the quality of data. It provides tools that form the basic building blocks of a Job. It includes
- Stages: It connects to data sources to read or write files and to process data.
- Links: It connects the stages along which your data flows
The stages in the InfoSphere DataStage and QualityStage Designer client are stored in the Designer tool palette.
The following stages are included in InfoSphere QualityStage:
- Investigate stage
- Standardize stage
- Match Frequency stage
- One-source Match stage
- Two-source Match stage
- Survive stage
- Standardization Quality Assessment (SQA) stage
You can create 4 types of Jobs in DataStage infosphere.
- Parallel Job
- Sequence Job
- Mainframe Job
- Server Job
Let’s see step by step on how to import replication job files.
Step 1) Start the DataStage and QualityStage Designer. Click Start > All programs > IBM Information Server > IBM WebSphere DataStage and QualityStage Designer
Step 2) In the Attach to Project window, enter following details.
- Domain
- User Name
- Password
- Project Name
- OK

Step 3) Now from File menu click import -> DataStage Components.
A new DataStage Repository Import window will open.
- In this window browse STAGEDB_AQ00_ST00_sJobs.dsx file that we had created earlier
- Select option “Import all.”
- Mark checkbox “Perform Impact Analysis.”
- Click ‘OK.’

Once the job is imported, DataStage will create STAGEDB_AQ00_ST00_sequence job.
Step 4) Follow the same steps to import the STAGEDB_AQ00_ST00_pJobs.dsx file. This import creates the four parallel jobs.
Step 5) Under Designer Repository pane -> Open SQLREP folder. Inside the folder, you will see, Sequence Job and four parallel jobs.
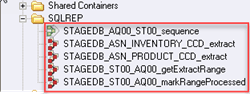
Step 6) To see the sequence job. Go to repository tree, right-click the STAGEDB_AQ00_ST00_sequence job and click Edit. It will show the workflow of the four parallel jobs that the job sequence controls.

Each icon is a stage,
- getExtractRange stage: It updates the IBMSNAP_FEEDETL table. It will set the starting point for data extraction to the point where DataStage last extracted rows and set the ending point to the last transaction that was processed for the subscription set.
- getExtractRangeSuccess: This stage feeds the starting points to the extractFromINVENTORY_CCD stage and extractFromPRODUCT_CCD stage
- AllExtractsSuccess: This stage ensures that both extractFromINVENTORY_CCD and extractFromPRODUCT_CCD completed successfully. Then passes sync points for the last rows that were fetched to the setRangeProcessed stage.
- setRangeProcessed stage: It updates IBMSNAP_FEEDETL table. So, the DataStage knows from where to begin the next round of data extraction
Step 7) To see the parallel jobs. Right-click the STAGEDB_ASN_INVENTORY_CCD and select edit under repository. It will open window as shown below.

Here in above image, you can see that the data from Inventory CCD table and Synch point details from FEEDETL table is rendered to Lookup_6 stage.
Creating a data connection from DataStage to the STAGEDB database
Now next step is to build a data connection between InfoSphere DataStage and the SQL Replication target database. It contains the CCD tables.
In DataStage, you use data connection objects with related connector stages to quickly define a connection to a data source in a job design.
Step 1) STAGEDB contains both the Apply control tables that DataStage uses to synchronize its data extraction and the CCD tables from which the data is extracted. Use following commands
db2 catalog tcpip node SQLREP remote ip_address server 50000
db2 catalog database STAGEDB as STAGEDB2 at node SQLREP
Note: IP address of the system where STAGEDB was created
Step 2) Click File > New > Other > Data Connection.
Step 3) You will have a window with two tabs, Parameters, and General.

Step 4) In this step,
- In general, tab, name the data connection sqlreplConnect
- In the Parameters tab, as shown below
- Click the browse button next to the ‘Connect using Stage Type field’, and in the
- Open window navigate the repository tree to Stage Types –> Parallel– > Database —-> DB2 Connector.
- Click Open.

Step 5) In Connection parameters table, enter details like
- ConnectionString: STAGEDB2
- Username: User ID for connecting to STAGEDB database
- Password: Password for connecting to STAGEDB database
- Instance: Name of DB2 instance that contains STAGEDB database
Step 6) In the next window save data connection. Click on ‘save’ button.
Importing Table Definitions from STAGEDB into DataStage
In the previous step, we saw that InfoSphere DataStage and the STAGEDB database are connected. Now, import column definition and other metadata for the PRODUCT_CCD and INVENTORY_CCD tables into the Information Server repository.
In the designer window, follow below steps.
Step 1) Select Import > Table Definitions > Start Connector Import Wizard
Step 2) From connector selection page of the wizard, select the DB2 Connector and click Next.

Step 3) Click load on connection detail page. This will populate the wizard fields with connection information from the data connection that you created in the previous chapter.

Step 4) Click Test connection on the same page. This will prompt DataStage to attempt a connection to the STAGEDB database. You can see the message “connection is successful”. Click Next.

Step 5) Make sure on the Data source location page the Hostname and Database name fields are correctly populated. Then click next.
Step 6) On Schema page. Enter the schema of the Apply control tables (ASN) or check that the ASN schema is pre-populated into the schema field. Then click next. The selection page will show the list of tables that are defined in the ASN Schema.

Step 7) The first table from which we need to import metadata is IBMSNAP_FEEDETL, an Apply control table. It has the detail about the synchronization points that allows DataStage to keep track of which rows it has fetched from the CCD tables. Choose IBMSNAP_FEEDETL and click Next.
Step 8) To complete the import of the IBMSNAP_FEEDETL table definition. Click import and then in the open window click open.
Step 9) Repeat steps 1-8 two more times to import the definitions for the PRODUCT_CCD table and then the INVENTORY_CCD table.
NOTE: While importing definitions for the inventory and product, make sure you change the schemas from ASN to the schema under which PRODUCT_CCD and INVENTORY_CCD were created.
Now DataStage has all the details that it requires to connect to the SQL Replication target database.
Setting Properties for the DataStage Jobs
For each of the four DataStage parallel jobs that we have, it contains one or more stages that connect with the STAGEDB database. You need to modify the stages to add connection information and link to dataset files that DataStage populates.
Stages have predefined properties that are editable. Here we will change some of these properties for the STAGEDB_ASN_PRODUCT_CCD_extract parallel job.
Step 1) Browse the Designer repository tree. Under SQLREP folder select the STAGEDB_ASN_PRODUCT_CCD_extract parallel job. To edit, right-click the job. The design window of the parallel job opens in the Designer Palette.
Step 2) Locate the green icon. This icon signifies the DB2 connector stage. It is used for extracting data from the CCD table. Double-click the icon. A stage editor window opens.


Step 3) In the editor click Load to populate the fields with connection information. To close the stage editor and save your changes click OK.
Step 4) Now return to the design window for the STAGEDB_ASN_PRODUCT_CCD_extract parallel job. Locate the icon for the getSynchPoints DB2 connector stage. Then double-click the icon.
Step 5) Now click load button to populate the fields with connection information.
NOTE: If you are using a database other than STAGEDB as your Apply control server. Then select the option to load the connection information for the getSynchPoints stage, which interacts with the control tables rather than the CCD table.
Step 6) In this step,
- Make an empty text file on the system where InfoSphere DataStage runs.
- Name this file as productdataset.ds and make note of where you saved it.
- DataStage will write changes to this file after it fetches changes from the CCD table.
- Data sets or file that are used to move data between linked jobs are known as persistent data sets. It is represented by a DataSet stage.
Step 7) Now open the stage editor in the design window, and double click on icon insert_into_a_dataset. It will open another window.

Step 8) In this window,

- Under the properties tab makes sure the Target folder is open and the File = DATASETNAME property is highlighted.
- On the right, you will have a file field
- Enter the full path to the productdataset.ds file
- Click ‘OK’.
You have now updated all necessary properties for the product CCD table. Close the design window and save all changes.
Step 9) Now locate and open the STAGEDB_ASN_INVENTORY_CCD_extract parallel job from repository pane of the Designer and repeat Steps 3-8.
NOTE:
- You have to load the connection information for the control server database into the stage editor for the getSynchPoints stage. If your control server is not STAGEDB.
- For the STAGEDB_ST00_AQ00_getExtractRange and STAGEDB_ST00_AQ00_markRangeProcessed parallel jobs, open all the DB2 connector stages. Then use the load function to add connection information for the STAGEDB database
Compiling and Running the DataStage Jobs
When DataStage job is ready to compile the Designer validates the design of the job by looking at inputs, transformations, expressions, and other details.
When the job compilation is done successfully, it is ready to run. We will compile all five jobs, but will only run the “job sequence”. This is because this job controls all the four parallel jobs.
Step 1) Under SQLREP folder. Select each of the five jobs by (Cntrl+Shift). Then right click and choose Multiple job compile option.

Step 2) You will see five jobs is selected in the DataStage Compilation Wizard. Click Next.

Step 3) Compilation begins and display a message “Compiled successfully” once done.

Step 4) Now start the DataStage and QualityStage Director. Select Start > All programs > IBM Information Server > IBM WebSphere DataStage and QualityStage Director.
Step 5) In the project navigation pane on the left. Click the SQLREP folder. This brings all five jobs into the director status table.
Step 6) Select the STAGEDB_AQ00_S00_sequence job. From the menu bar click Job > Run Now.

Once compilation is done, you will see the finished status.

Now check whether changed rows that are stored in the PRODUCT_CCD and INVENTORY_CCD tables were extracted by DataStage and inserted into the two data set files.
Step 7) Go back to the Designer and open the STAGEDB_ASN_PRODUCT_CCD_extract job. To open the stage editor Double-click the insert_into_a_dataset icon. Then click view data.
Step 8) Accept the defaults in the rows to be displayed window. Then click OK. A data browser window will open to show the contents of the data set file.

Testing Integration Between SQL Replication and DataStage
In the previous step, we compiled and executed the job. In this section, we will check the integration of SQL replication and DataStage. For that, we will make changes to the source table and see if the same change is updated into the DataStage.
Step 1) Navigate to the sqlrepl-datastage-scripts folder for your operating system.
Step 2) Start SQL Replication by following steps:
- Run the startSQLCapture.bat (Windows) file to start the Capture program at the SALES database.
- Run the startSQLApply.bat (Windows) file to start the Apply program at the STAGEDB database.
Step 3) Now open the updateSourceTables.sql file. For connecting to the SALES database replace <sales-connect-ID> and <sales-password> with the user ID and password.
Step 4) Open a DB2 command window. Change directory to sqlrepl-datastage-tutorial\scripts, and run issue by the given command:
db2 -tvf updateSourceTables.sql
The SQL script will do various operations like Update, Insert and delete on both tables (PRODUCT, INVENTORY) in the Sales database.
Step 5) On the system where DataStage is running. Open the DataStage Director and execute the STAGEDB_AQ00_S00_sequence job. Click Job > Run Now.

When you run the job following activities will be carried out.
- The Capture program reads the six-row changes in the SALES database log and inserts them into the CD tables.
- The Apply program fetches the change rows from the CD tables at SALES and inserts them into the CCD tables at STAGEDB.
- The two DataStage extract jobs pick up the changes from the CCD tables and write them to the productdataset.ds and inventory dataset.ds files.
You can check that the above steps took place by looking at the data sets.
Step 6) Follow the below steps,
- Start the Designer.Open the STAGEDB_ASN_PRODUCT_CCD_extract job.
- Then Double-click the insert_into_a_dataset icon. In the stage editor. Click View Data.
- Accept the defaults in the rows to be displayed window and click OK.
The dataset contains three new rows. The easiest way to check the changes are implemented is to scroll down far right of the Data Browser. Now look at the last three rows (see image below)

The letter I, U and D specifies INSERT, UPDATE and DELETE operation that resulted in each new row.
You can do the same check for Inventory table.
Summary
- Datastage is an ETL tool which extracts data, transform and load data from source to the target.
- It facilitates business analysis by providing quality data to help in gaining business intelligence.
- DataStage is divided into two section, Shared Components, and Runtime Architecture.
- DataStage has four main components,
- Administrator
- Manager
- Designer
- Director
- Following are the key aspects of IBM InfoSphere DataStage
- Data transformation
- Jobs
- Parallel processing
- In Job design various stages involved are
- Transform stage
- Filter stage
- Aggregator stage
- Remove duplicates stage
- Join stage
- Lookup stage