Sanity Testing vs. Smoke Testing: Key Differences, Examples & When to Use Each
⚡ Quick Summary
Sanity Testing vs. Smoke Testing are two essential software testing methods focused on validating system stability and rationality post-build. Both aim to prevent wasted QA effort by identifying unstable or flawed builds early in the testing cycle.

Smoke Testing vs. Sanity Testing: Comparison Table
| Aspect | Smoke Testing | Sanity Testing |
|---|---|---|
| Primary Goal | Verify build stability | Verify functionality of changes |
| Scope | Broad (entire application) | Narrow (specific modules) |
| Depth | Shallow testing | Deep testing (targeted) |
| Performed By | Developers or Testers | Testers only |
| Build State | Initial/unstable builds | Relatively stable builds |
| Documentation | Scripted and documented | Usually unscripted |
| Testing Subset | Acceptance Testing | Regression Testing |
| Automation | Highly recommended | Can be manual or automated |
What is a Software Build?
If you are developing a simple computer program that consists of only one source code file, you merely need to compile and link this one file to produce an executable file. This process is straightforward. Usually, this is not the case. A typical Software Project consists of hundreds or even thousands of source code files. Creating an executable program from these source files is a complicated and time-consuming task. You need to use “build” software to create an executable program, and the process is called “Software Build.”
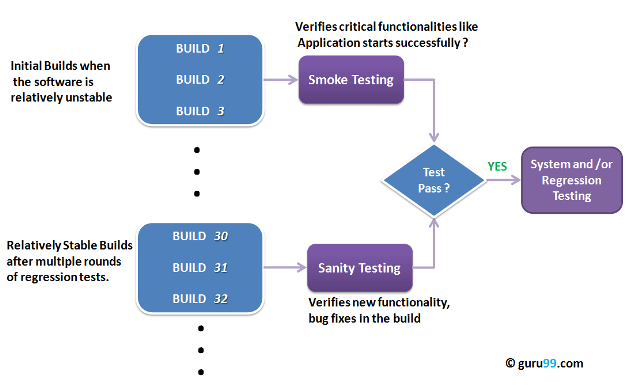
What is Smoke Testing?
Smoke Testing is a software testing technique performed post software build to verify that the critical functionalities of the software are working fine. It is executed before any detailed functional or regression tests are executed. The primary purpose of smoke testing is to reject a software application with defects so that the QA team does not waste time testing a broken software application.
In Smoke Testing, the test cases chosen cover the most critical functionality or component of the system. The objective is not exhaustive testing but ensuring that key functionalities of the software application operate correctly. For example, a typical smoke test would verify that the application launches successfully, the GUI is responsive, etc.
What is Sanity Testing?
Sanity testingis a kind of Software Testing performed after receiving a software build, with minor changes in code or functionality, to ascertain that the bugs have been fixed and no further issues are introduced due to these changes. The goal is to determine that the proposed functionality works roughly as expected. If a sanity test fails, the build is rejected to avoid wasting time and resources on deeper testing.
The objective is “not” to verify thorough functionality but to determine that the developer has applied some rationality (sanity) while producing the software. For instance, if your scientific calculator gives the result of 2 + 2 = 5! Then, there is no point in testing the advanced functionalities like sin 30 + cos 50.
History and Origin of the Terms
The term “smoke testing” originates from the hardware and electronics industry. When engineers powered up a new circuit board for the first time, they would watch to see if it started smoking—an immediate indicator of a fundamental flaw. If no smoke appeared, basic testing could proceed. This concept was adopted by software testers in the 1980s to describe initial build verification.
“Sanity testing,” on the other hand, refers to checking the “sanity” or rationality of specific changes. The term emphasizes verifying that the software behaves in a sensible, logical manner after modifications—essentially asking, “Does this make sense?”
Smoke Testing vs. Sanity Testing vs. Regression Testing
Understanding how these three testing types work together is crucial for an effective QA strategy:
- Smoke Testing comes first—it verifies that the build is stable enough to test at all.
- Sanity Testing follows (when applicable)—it confirms that specific changes or fixes work correctly.
- Regression Testing is the most comprehensive—it ensures that new changes haven’t broken any existing functionality.
Think of it as a funnel: Smoke testing is the wide opening that quickly filters out unstable builds, sanity testing narrows the focus to specific changes, and regression testing provides thorough coverage of the entire system.
Real-World Scenario: E-Commerce Application
Consider an e-commerce website that receives a new build with a shopping cart bug fix:
Smoke Test: QA first verifies that the website loads, users can log in, products display correctly, search works, and the checkout process initiates. This takes about 15-30 minutes.
Sanity Test: After smoke testing passes, testers focus specifically on the shopping cart functionality—adding items, updating quantities, removing items, and verifying calculations. This targeted test takes about 30-60 minutes.
If both pass, the team proceeds to full regression testing, which may take several hours or days depending on the application’s complexity.
When to Use Smoke vs. Sanity Testing
Use Smoke Testing When:
- A new software build is deployed to the testing environment
- You need to quickly verify critical functionalities like login, navigation, and data flow
- Determining if the build is stable enough for further detailed testing
- Integrating into CI/CD pipelines for automated build verification
Use Sanity Testing When:
- Minor code changes, bug fixes, or feature enhancements are implemented
- Verifying that specific changes work as intended
- The build is already relatively stable from previous smoke tests
Advantages and Limitations
Advantages
- Quick identification of critical issues: Both methods rapidly identify problems that would halt testing.
- Resource efficiency: Teams don’t waste time on detailed testing of fundamentally broken builds.
- Early defect detection: Finding issues early in the cycle reduces overall fixing costs.
- Faster release cycles: Efficient gatekeeping enables faster iteration and deployment.
Limitations
- Limited coverage: Neither test type provides comprehensive coverage of the entire application.
- May miss hidden bugs: Integration issues or edge cases may remain undetected.
- Not a replacement for full testing: They serve as quick filters, not substitutes for regression testing.
Best Practices for Implementation
For Smoke Testing:
- Automate smoke tests and integrate them into your CI/CD pipeline for every build.
- Keep the smoke test suite focused on critical functionalities only—don’t let it grow too large.
- Update smoke tests whenever critical features are added or modified.
For Sanity Testing:
- Always review change documentation before creating sanity test scenarios.
- Focus testing efforts on the changed areas and immediately adjacent functionalities.
- Use exploratory testing techniques to uncover unexpected issues.
Common Mistakes to Avoid
- Confusing the two test types: Smoke testing is broad and shallow; sanity testing is narrow and deep.
- Skipping smoke testing to save time: This often leads to wasted effort on unstable builds.
- Making smoke tests too comprehensive: This defeats the purpose of quick verification.
- Proceeding after failures: If either test type fails, stop and address the issues before continuing.
Recommended Tools for Smoke and Sanity Testing
- Selenium WebDriver: Industry-standard for web application test automation
- TestNG/JUnit: Test frameworks for organizing and executing automated tests
- Jenkins/GitHub Actions: CI/CD tools for automated build and test execution
- Cypress: Modern, developer-friendly end-to-end testing framework
- Postman/REST Assured: API testing tools for backend smoke tests