
API Testing USING QTP/UFT: Complete Tutorial
 Thomas Hamilton
⚡ Smart Summary
API testing in QTP/UFT One validates a service directly, with no user interface involved. An API test is built as a flow of activities on a canvas, and checkpoints decide whether each response passes.
Before testing an API, we need to know what an API is. An API (Application Programming Interface) is a collection of software functions and procedures that can be executed by other software applications.
What is API Testing?
API Testing is a software testing method for validating Application Programming Interfaces (APIs). The goal of API testing is to test the API in terms of functionality, reliability, security and performance. In API testing, software is used to send inputs to the API, and the output is recorded in order to test the API.
So API Testing is:
- Testing without GUI
- Programmatically simulating data or control-flow scenarios.
- Focus on functionality, not on behavior or customer experience.
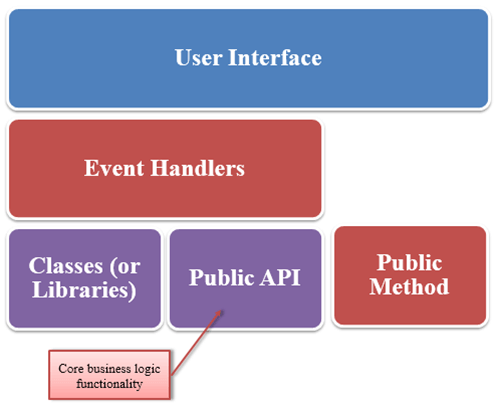
The diagram below places API testing between the client that calls the service and the data it reaches.
Why is API Testing important?
API Testing has four significant advantages
1. API testing is the trend
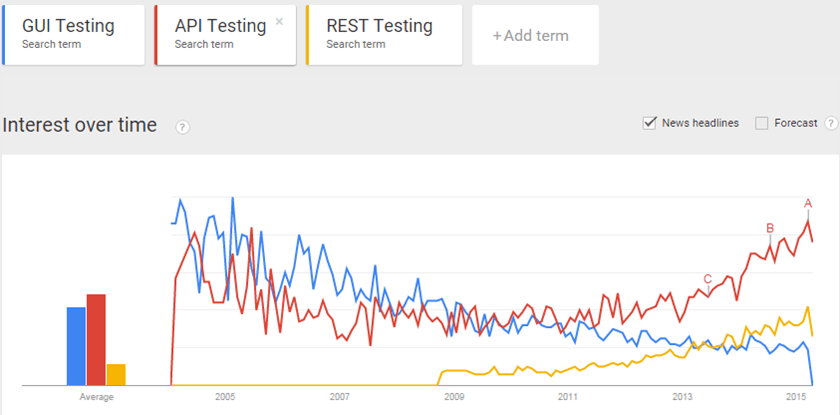
As the following figure shows, API testing has grown very fast over the last ten years. It has become far more popular than other testing types.
2. Time efficient
With API Testing we can use parallel execution to reduce test execution time. You can save up to 5 times compared to other testing types.
3. Language independent
In API Testing, data is exchanged via XML or JSON, so any language can be used to test the response. For example, if you have a service whose response is in JSON format, you can easily parse the data with Java, C# or any other language.
4. Easy GUI integration
Because UFT One holds GUI tests and API tests in the same solution, an API call can set up data for a user interface test and both kinds of test report into the same run results. That keeps a service check and the screen that consumes it in one project instead of two toolchains.
API Testing with UFT (Unified Functional Testing)
There are many tools available, both open-source and commercial. UFT is a strong choice for executing API tests, because the flow is built visually and the configuration is kept in one properties pane.
The last version of QTP, called HP Unified Functional Testing (UFT), is a combination of HP QTP (a GUI testing tool) and HP Service Test (an API testing tool). UFT supports Web, Java, .NET, Oracle, Siebel, web services and many other major languages and platforms that older versions did not support.
⚠️ Product naming: the tool described here as HP UFT is now sold as OpenText Functional Testing (UFT One), having passed from HP to Micro Focus and then to OpenText. The screens below come from the HP-era release, so menu wording differs from current builds, but the API test flow, activities and checkpoints work the same way.
Type of API test support by HP UFT
- Web service
- REST
- Object-Oriented Language
- Database
- Proprietary API
Start your first API testing with QTP
In this API testing in UFT tutorial, we will cover UFT API testing examples. We are going to test the Graph API of Facebook. We will test the API as the Test Case below
- Get a profile of the specified user on Facebook.
- Verify that the profile is as per expectation
Here is a step to build a test flow for this API.
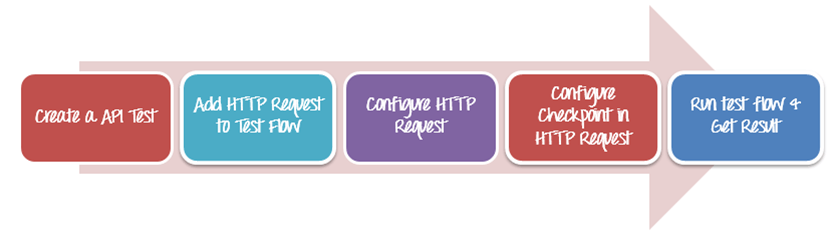
⚠️ About this example: Facebook retired Graph API v2.3 years ago and the access token shown below has long since expired, so the exact call no longer returns data. The original request is kept unchanged as the worked example; point the same steps at any current REST endpoint to follow along.
Step 1) Open HP UFT and create new project API Testing
- Choose Start > (All) Programs > HP Software > HP Unified Functional Testing > Unified Functional Testing. In current releases this is simply the UFT One shortcut.

- Click File > New > Test. Select the API Test type

- When a dialog box opens, input the name of the API test: API_Facebook, and select a location to save this project. Click Create to create the API test project.


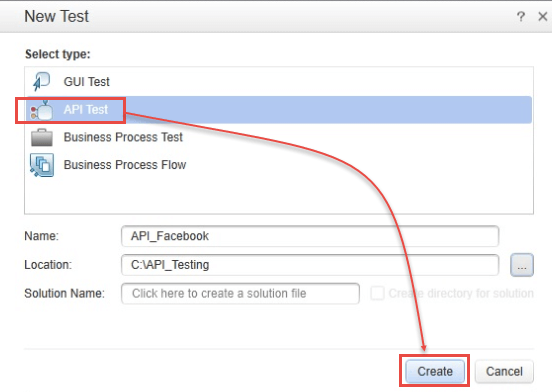
Step 2) Adding HTTP Request to Test Flow
We will use the HTTP Request to make a request to the Facebook API.
- Select Toolbox > Network

- Drag element HTTP Request to Test Flow.


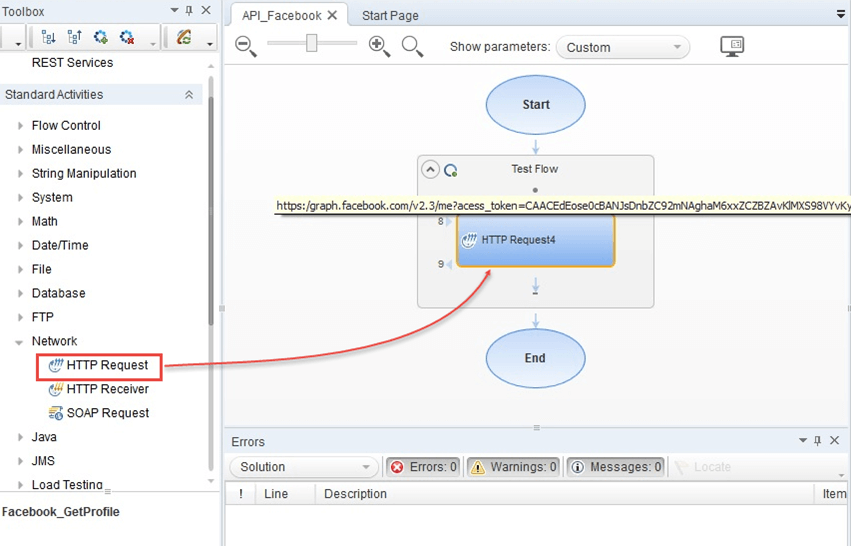
Step 3) Configure and pass parameters into an HTTP request
- Right-click on the HTTP Request object to edit it.

- In the Properties part, enter the URL

https://graph.facebook.com/v2.3/me?access_token=CAACEdEose0cBANJsDnbZC92mNAghaM6xxZCZBZAvKlMXS98VYvKy%20OlrfAdsUWR8x5aw9Kqc0grscs9zb9IYED4VC3FwapIZBj%20dsuxy%20HdLcff38gYUBFNeRQlH%20fN7eXKoVZBNl0bR233ZAZCw8fLF1QLh98ry2ZBeYBhXLabtTDkFPZA1IqhaMG0mQp30zO1%20QxQ19nVCxZArJA6XRoB1o5FMepII5cn3DgbBmTgZD
- You can also pass a parameter into the API by setting values in the Request Header grid.

Use the Graph API Explorer of Facebook to obtain the value of access_token.
- Set the HTTP method to GET.

- Configure Checkpoints of the HTTP Request. Set the Status code to 200 in the Checkpoints part. Checkpoints let you see whether the action was successful without having to check the result manually, and the pass or fail verdict of the test is determined by them. A status code of 200 means the test case has passed.


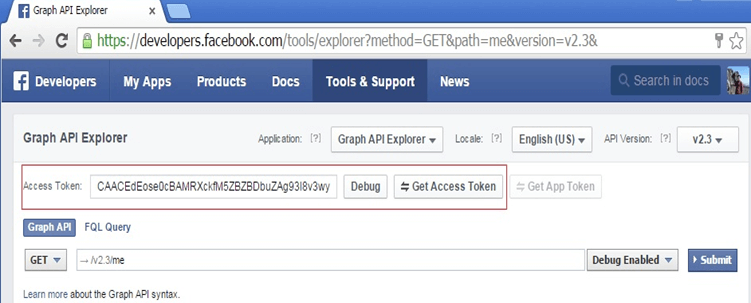


Step 4) Run the test
Click the Run button, or press F5, to open the Run Test dialog box. Click Run to compile and run the test.

Step 5) View the result
The Run Results Viewer opens. In this API testing using UFT example, a failed test case is reported like the following figure.

When the test case passes, the result is reported as below.

Your first API test in UFT is now complete.
Where to go from here
Now that you have learned to create a test with an API test in UFT, you can create your own test for your GUI-less application. Adding a checkpoint per response and grouping calls into transactions are the usual next steps.
