How to Build a Mining Rig (6 GPU Crypto Mining Rig Setup)
The following tutorial will help you build a 6 GPU mining rig for mining cryptocurrencies. It is meant for individuals who do not have any experience in building computers on their own.
What is a Mining Rig?
A Mining rig is a hardware which is responsible for adding new coins into the existing circulating supply of any cryptocurrency. It is a key process that allows cryptocurrencies to work as a P2P network. Cryptocurrency mining removes the need for a governing, third-party, centralized entity.
ECOS is one of the most beginner-friendly platforms to start your crypto mining journey. From cloud mining to full mining rig management, ECOS simplifies the process of building and managing a 6 GPU crypto mining rig.
Overview of Mining Rig to Be Built
We will build an Nvidia-based mining rig running on Windows 10 OS. However, this tutorial can be used with any operating system and or an AMD graphics card as well.
When comparing Nvidia and AMD graphics cards, the main difference is in the chips at the core. Each is compatible with a host of different cryptocurrency algorithms. It is recommended to use an Nvidia GPU because one requires high expertise for AMD cards to be installed correctly.
You will need several computer components, peripherals, an operating system, mining software, and a wallet to collect the mined cryptocurrency. We will be using an Nvidia GTX 1070 for this bitcoin miner tutorial. A list of alternative GPUs is also included. The whole process can be completed within 3 hours if everything goes correctly.
List of Mining Rig Parts
You need to acquire all the following hardware parts describe below.
GPU
GPUs are the most crucial part of the whole mining rig setup as it’s the component that generates the profits. It’s recommended you purchase six GTX 1070 GPUs. Also check here Best Mining GPU.
You will only need one to start the process. You have the following options:
| Product Name | Description | Link |
|---|---|---|
 MSI Gaming GeForce GTX 1070 |
• Graphics Coprocessor: Nvidia GeForce • Graphics Processor Manufacturer: NVIDIA • GPU Clock Speed: 1607 MHz • Graphics Card Ram Size: 8192 MB |
Learn More |
 ASUS Dual GEFORCE GTX 1070 |
• Graphics Coprocessor: Nvidia GeForce • Video Output Interface: DisplayPort, DVI, HDMI • GPU Clock Speed: 1582 MHz • Graphics Ram Size: 8 GB |
Learn More |
 Gigabyte GeForce GTX 1070 G1 |
• Graphics Coprocessor: Nvidia GeForce • Video Output Interface: DVI, HDMI • GPU Clock Speed: 1822 MHz • Graphics Ram Size: 8 GB |
Learn More |
 EVGA GeForce 08G-P4-5173-KR, GTX 1070 |
• Graphics Coprocessor: Nvidia GeForce • Video Output Interface: HDMI • GPU Clock Speed: 1784 MHz • Graphics Ram Size: 8182 GB |
Learn More |
List of other Components
Here is a list of a few other components that you will need to build your mining rig. They have been mentioned below category-wise.
| Product Name | Component | Specifications | Link |
|---|---|---|---|
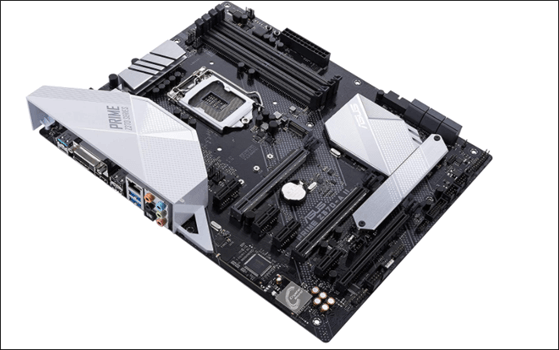
 ASUS Prime Z370-A |
Motherboard: When choosing motherboards, there are a couple of things you have to look out for:
|
• RAM: DDR4 • Chipset Type: Intel Z390 • Memory Storage: 32 GB • Memory Clock Speed: 2400 MHz |
Learn More |
 ASUS Prime Z390-A |
Motherboard | • RAM: DDR4 • Chipset Type: Intel Z390 • Memory Clock Speed: 2400 MHz • Memory Storage: 32 GB |
Learn More |
 Intel Core i5-9400 Desktop Processor |
CPU: If you want to mine with a CPU alone, you will need to select a high-end one. However, in this case, we will be using a GPU for our mining. So you can pick a moderate or low-end CPU for our bitcoin miner. It is better that you pick up an Intel 8th or 9th Generation 1151 Socket CPU. | • RAM: DDR4 • CPU Model: Core i5 • CPU Speed: 2.9 GHz • Memory Clock Speed: 2900 MHz |
Learn More |
 Patriot Memory Viper Elite Series DDR4 8GB 2400MHz (PC4-19200) Single Module |
RAM: The RAM is comparatively a less important component for our mining setup but a required part nonetheless. | • RAM: DRAM • Item Weight: 1.44 ounces • Memory Storage: 16 GB • Memory Clock Speed: 2133 MHz |
Learn More |
 Bewinner Memory RAM DDR2 4GB |
RAM | • RAM: DDR2 • Item Weight: 1.06 ounces • Memory Storage: 4 GB • Memory Clock Speed: 800 MHz |
Learn More |
 Corsair HXi Series, HX1200i, 1200 Watt, 80+ Platinum Certified |
PSU: Any PSU with a 1200 W Platinum rating will do | • Connector Type: connector:16 • Item Weight: 1 Pounds • Output Wattage: 1200 • Form Factor: ATX12V |
Learn More |
 Straight Power 11 Platinum 1200W |
PSU | • Connector Type: PCI Express • Item Weight: 8.1 pounds • Output Wattage: 1200 • Fan Count : 1 |
Learn More |
 MintCell 6-Pack PCIe 6-Pin 16x to 1x Powered Riser Adapter Card |
Risers: PCI-e risers allow the GPU to be elevated from the Motherboard for better cooling and increasing airflow. | • Style: Simple • Hardware Platform: PC • Item Weight: 1.01 pounds |
Learn More |
 Samsung SSD 860 EVO 250GB 2.5 Inch SATA III Internal SSD |
SSD: Any 240 GB or larger SATA SSD will do. | • Digital Storage Capacity: 250 GB • Special Feature: Data Recovery Service • Connectivity Technology: SATA • Hard Disk Form Factor: 2.5 Inches |
Learn More |
 Crucial BX500 240GB 3D NAND SATA 2.5-Inch Internal SSD |
SSD | • Hard Disk Interface: Serial ATA • Special Feature: Data Portable • Connectivity Technology: SATA • Hard Disk Size: 240 GB |
Learn More |
 Monoprice Cat6 Ethernet Patch Cable |
Internet connection:High-performance Cat6 Ethernet Cable for reliable mining rig connectivity. | • Cable Category: Cat6 • Bandwidth: 550MHz • Data Transfer Rate: 10 Gigabits Per Second • Length Options: Multiple lengths available • Connector Type: RJ45 |
Learn More |
 TP-Link AC600 USB WiFi Adapter for PC |
Internet connection: Any Wi-Fi Adapter | • Compatible Devices: Laptop, Desktop • Hardware Interface: USB • Compatible Devices: Laptop, Desktop • Item Weight: 18.14 Grams |
Learn More |
 RXFSP 6/8 GPU Aluminum Stackable Open Air Mining Computer Frame Rig |
Mining Rig: You can make your own 6 GPU Mining rig frame. Alternatively, you can buy one. | • Fan Size: 120 Millimeters • Motherboard Compatability: Micro ATX • Cooling Method: Air • Fan Count: 2 |
Learn More |
 Samsung USB3.0 64 GB Flash Drive (Titan Grey) |
Flash Drive: Any USB Flash Drive with a 5GB capacity or more | • Special Feature: Waterproof, Shockproof, Temperature Proof • Hardware Interface: USB 3.0 • Memory Storage: 64 GB • Write Speed: 200 MB |
Learn More |
 Dxg 100 Pack 6 Inch 2.5150mm Self-Locking Nylon Cable Ties Zip Ties |
Zip Ties: You will need 20+ Nylon Cable Ties also known as Zip ties. | • Material: Plastic • Style: Heavy Duty • Number of Pieces: 500 |
Learn More |
 JacobsParts PCI Express Power Splitter Cable 8-pin to 2x 6+2-pin |
PCI-e Y-Splitter: You may need a PCI-e Y-Splitter if you are not using the PSU unit mentioned above. | • Connector Gender: Male • Connector Type: 8 Pin PCIe • Shape: Round |
Learn More |
Cryptocurrencies That Can be Mined Using the Rig
Your Nvidia GPUs are capable of handling many algorithms for mining. These includes Lyra2REv3, MTP, X16RT, X25X, Ethash, CryptoNightGPU, Cuckaroo29s and Zhash, just to name a few.
Full List of Cryptocurrencies that can be mined
| Name of Cryptocurrency | Name of Algorithm |
|---|---|
| Aion (AION) | Equihash (10,9) |
| BitcoinZ (BTCZ) | Zhash |
| Bitcoin Gold (BTG) | Equihash |
| Beam (BEAM) | BeamHashII |
| Beam II Nicehash | BeamHashII |
| Conflux (CFX) | Octopus |
| Ethash Nicehash | Ethash |
| Ethereum (ETH) | Ethash |
| Ethereum Classic (ETC) | Ethash |
| Sinovate (SIN) | X25X |
| SnowGem (XSG) | Zhash |
| Swap (XWP) | Cuckaroo29s |
| Ubiq (UBQ) | Ubqhash |
| Veil (VEIL) | X16RT |
| Zcoin (XZC) | MTP |
| Zel (ZEL) | ZelHash |
Secure Your Crypto with Zengo!
✔️ Web3 Firewall
✔️ Secure, encrypted WiFi
✔️ Crypto Keyless Wallet Security
Rating 5.0![]()
Digital assets, investments & Wallet
✔️ Easy to learn
✔️ Open free account
✔️ Smart Backup
Rating 5.0![]()
All-in-one cBitcoin Mining Ecosystem
✔️ Cloud mining contracts
✔️ Maximum Profit
✔️ Real-time stats on hashrate
Rating 5.0![]()
How to Build a Mining Rig
After you’ve successfully gathered all the components needed, you will have to start assembling the rig. It may seem like a daunting task initially, but it’s like building a Lego set if you follow the instructions accurately.
Step 1) Attaching the Motherboard
Your 6 GPU+ capable motherboard should be placed outside the mining frame. Experts suggest putting the package box with foam or an anti-static bag beneath it. Before going for the next step, make sure that the lever holding down the CPU socket protection has been released.
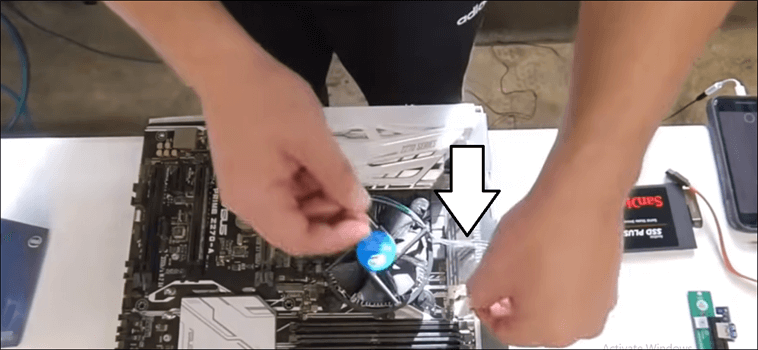
Step 2) Attaching the processor
Next, you have to attach your processor to the Motherboard. Insert your selected CPU into the motherboard socket. Be careful while removing as there will be some thermal paste stuck to the CPU fan. Make a mark on both the motherboard socket as well as the side of the CPU.
These markings need to be done on the same side while attaching them, or the CPU will not fit into the socket. However, you need to be extra careful with the CPU pins while placing your processor into the motherboard socket. They can easily bend, which will damage the whole CPU.

You should have the manual handy with you at all times. Refer to it when you install the heat sink on top of the CPU.
You need to take the thermal paste and apply it to the heat sink’s surface before you attach the processor. The heat sink’s power cable should be connected to the pins titled “CPU_FAN1”. You should check your motherboard manual to locate it if you don’t spot it easily.
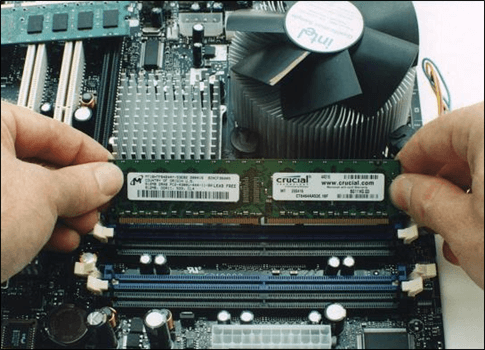
Step 3) Installing RAM
The next step involves installing the RAM or system memory. It is pretty simple to insert the RAM module into the RAM socket in the Motherboard. After opening the motherboard slot’s side brackets, carefully start to push the RAM module into the RAM socket.
You have to be extra careful in this step as the RAM can only lock into the socket in one way. Sometimes you need a harder push to place the RAM in the correct slot but be careful not to damage it. The side brackets are designed to lock in automatically when the RAM has been fitted correctly.
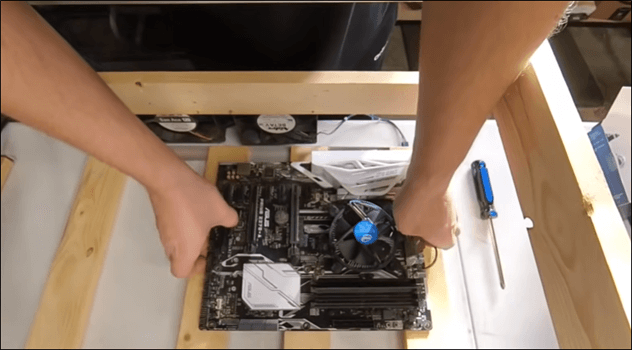
Step 4) Fixing Motherboard to frame
Depending on your mining frame or whatever you are using as a substitute, you have to carefully place the Motherboard onto the frame.
You should take extra care when handling the Motherboard as you do not want to scratch the bottom. In case you have a mining rig with a metal frame, the Motherboard should only touch the frame at the point where the holes for screws are present. Tightly fix the screws to attach the Motherboard firmly.
Step 5) Attaching the Power Supply Unit
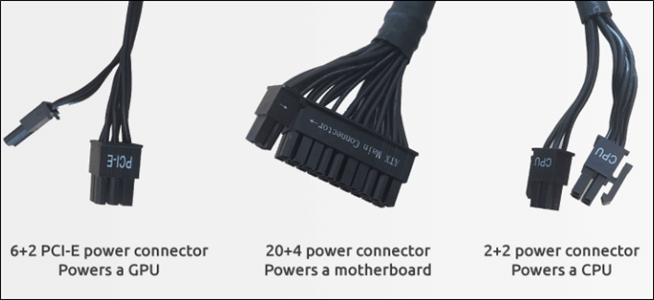
Your Power Supply Unit should be placed somewhere near the Motherboard. Make sure you have enough space in the mining rig to include the PSU in it. Search for the 24-pin power connector present in motherboards. They normally have a single 24 pin connector.
They should be attached to the Motherboard firmly, or the mining rig will not boot. The CPU’s 8-pin power connector should be connected to the Motherboard located closest to the processor. You should always be careful not to mix up PCI-e 6+2 power conductor and the CPU connector as they are both 8 pin connectors. CPU cables are thicker in comparison to the PCI-e cable.
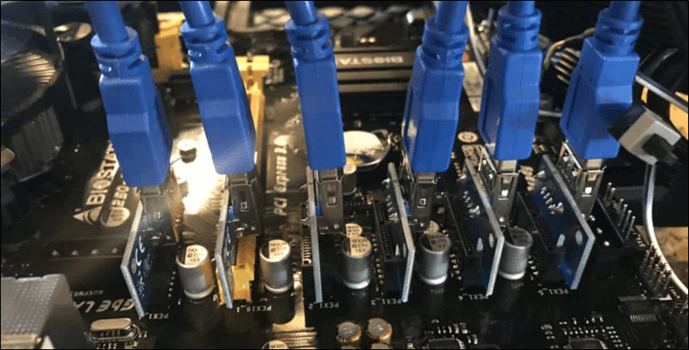
Step 6) Attaching USB risers
The x16 USB riser has to be assembled with the PCI-e x1, which is the shorter PCI-e x1 connector. This needs to be connected to the Motherboard. To power the risers, you need an electric connection. This depends on your riser model as you might need either a PCI- e six-pin connectors, a SATA cable, or a Molex connector to connect it.
Be careful while connecting all the corresponding power cables to each of the USB risers. Use up to 2 Molex or SATA connectors for each PSU cable. Do not connect 3 or 4 power connectors to 3 or 4 risers as it can damage them.
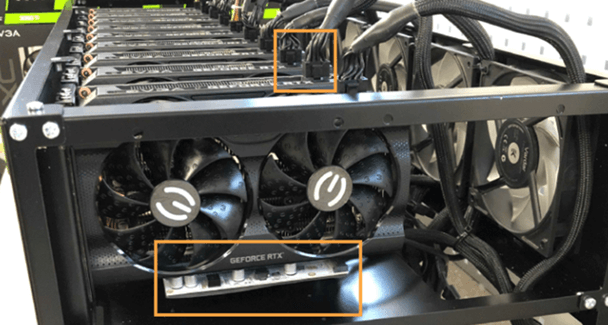
Step 7) Attaching GPUs
The graphics cards should be placed firmly on the frame using the USB riser. Plug the PCI-e 6+2 power connectors into your GPU. You have to attach all these connectors to the remaining 5 GPUs later.
Step 8) Final Steps Lastly, you need to make sure if the cables are correctly connected. The graphics card, which is connected to the main PCI-E slot should be connected to your monitor.
After connecting the mouse and keyboard, proceed to turn your rig on. Do this by connecting the power switch to power pins on the Motherboard. If you’re not sure where to find it, you can check the motherboard manual.
If it boots, it’s a sign that the rig is working fine. When everything is correctly installed, you will see the BIOS message show up on your screen.
Starting the Cryptocurrency Mining Rig to Mine Bitcoin, Ethereum and more
Now that all the components have been attached, it’s time to turn on and configure the bitcoin miner. The first thing you have to do is configure the BIOS settings.
Step 1) BIOS configuration for mining:
Each motherboard model will have a different BIOS appearance. Pressing on F2 or DELETE will allow you to access the BIOS while booting.
After entering the BIOS setup press F7 to enter Advanced Mode. In the advanced tab, change the following settings to the ones given below:
- Go to System Agent (SA) Configuration followed by DMI/OPI Configuration and set DMI Max Link Speed to Gen1
- Go to System Agent (SA) Configuration and enter PEG Port Configuration. Change All PCIEX16_x to: Gen1
- Go to PCH Storage Configuration and change the settings for All SATA devices that do NOT have an SSD to “Disabled”
- Go to PCH Configuration and then to PCI Express Configuration. Change PCIe Speed to Gen1
- Go to On-board devices Configuration. Change HD Audio Controller settings to “Disabled”
- Go to APM Configuration settings and set the Restore AC Power Loss option to Power On. (this step is optional)
Next, go to the BIOS Boot settings and make the following changes:
- Fast Boot: Disabled
- Above 4G Decoding: Enabled
After these steps have been completed, plug your bootable USB Windows USB stick into the Motherboard.
Step 2) Windows 10 installation:
- After switching the CPU on, the screen will display (copying files… getting files ready). Be sure not to enable Cortana or OneDrive.
- You need to turn off location, relevant ads, speech recognition, diagnostics, and other tailored experiences. After that, the system will automatically reboot once everything is completed. Log in to Windows 10 and open Device Manager.
- You should see the NVIDIA GeForce GTX 1070 and Intel Onboard Graphics. Install any updates that are due.
Step 3) Nvidia Driver Installation:
Windows automatically recognizes the driver for the GTX 1070. But it’s always preferred that you download the latest drivers from Nvidia’s website.
After downloading the relevant file, right-click on the installer and run as administrator. Select custom installation and uncheck everything except the graphics driver. You will be asked to restart once the process is finished.
Step 4) Tuning Windows 10:
Select the System option on the lower left-hand corner. Turn off everything in the Notification and actions option. Change the sleep settings to “never”. Click on the settings button in the performance section and click on the “Adjust for best performance”. Uncheck the automatically manage paging file size and set both the initial size and maximum size to 16384 MB. After this has been completed, close all the windows until you reach the “About” screen. You can make changes to the update and security section as you wish. Turning on the windows update will provide your computer with frequent updates. But it can also halt the entire mining process when updating takes place.
Installing other 5 GPUs
You should approach this next step with caution as it can get quite tricky.
The following steps will guide you through the entire process to set the remaining 5 GPUs.
- Before beginning, make sure that the mining rig is powered off, including the master power on the PSU.
- Go ahead and connect the Riser card and GPU for the open slot that is closest to the processor. Connect the Motherboard with the riser card.
- Power up the PSU to turn the mining rig on.
- Next, login and go to Display adapters under Device Manager. You should see the NVIDIA GeForce GTX 1070 card listed. If not, refresh the page a couple of times till it appears.
- Repeat the above steps till you get all the cards on the Device Manager without any “alert” icon present.
Always be sure to power a maximum of two 1070s per power cable and a maximum of 2 Riser Cards per power cable from the PSU. Also, you should connect and power the GPUs one by one so that you can quickly isolate any issues that may arise when turning them on.
Troubleshooting:
While installing the remaining 5 GPUs, a common issue is having them incorrectly identified by the Windows Device Manager. They may appear with a different name or with an alert icon beside their name. In either case, there are some things you can do to remedy the situation.
- First, right-click to disable and then re-enable the device to check if it is recognized correctly.
- Then, select the device and update its driver. Instead of searching for a driver, enter the path: C: /Nvidia/. This lets Windows search for the drivers in child directories and updates it automatically.
- If the above steps don’t have any effect, uninstall the device by right-clicking on it. Go to Action and select scan for hardware changes.
- Lastly, re-run the NVIDIA driver installer. A lot of times, it identifies the hardware correctly and installs the appropriate drivers.
If it still does not appear, check the following hardware parts:
- Ensure that the riser card is properly fitted on the GPU and its power connections snug back to the PSU.
- Check whether the 8-pin power to the GPU is properly connected.
- Ensure that your riser card is functioning properly and the computer recognizes the slot to the Motherboard.
- To check for your new riser card issues, try it with different GPUs to verify if they are working. If the riser card is fine, the problem can either be the GPU, or the Windows installation.
Summary
The above tutorial will help you build your very own 6 GPU mining rig. All the parts can be substituted with other components. However, if you follow the above tutorial accurately, you can become a successful cryptocurrency miner in no time. The whole process is simplified, keeping in mind first-time mining rig builders.
We are reader supported and may earn a commission when you buy through links on our site
ECOS is one of the most beginner-friendly platforms to start your crypto mining journey. From cloud mining to full mining rig management, ECOS simplifies the process of building and managing a 6 GPU crypto mining rig.