Selenium 带有 NUnit 示例的 C# 教程
Selenium 概述
Selenium 是一个开源的网络 自动化测试 支持多种浏览器和多种操作系统的工具。它允许测试人员使用多种编程语言,例如 Java,C#, Python、.Net、Ruby、PHP 和 Perl 用于编写自动化测试。
C# 概述
C# 是一种面向对象的编程语言,源自 C++ 和 Java. C# 允许开发人员在 .Net 平台上使用 Visual Studio 构建应用程序。以下是 C# 的主要功能 C#.
- 它是一种面向对象的编程语言
- 支持控制台、Windows 和基于 Web 的应用程序开发
- 它提供了封装、继承、多态等特性。
C# 的基本语法
C# 程序需要包含以下部分
- 命名空间声明
- 精品团课
- 类属性和方法
- 主要方法
- 程序语句
例-
下面是一个示例 Selenium C# 示例程序,用于打印文本“Guru系统控制台显示 99。
using System;
namespace FirstProgram {
class DemoPrint {
static void main(){
    Console.WriteLine("Guru99");
	}
  }
}
说明:
- 上面的命名空间 Selenium C# 示例是多个类的集合。每个命名空间都必须使用关键字“using”进行声明。
- 代码的第一条语句将命名空间“System”包含到我们的程序中。System 命名空间定义了 C# 中使用的基本类和事件。要使用的命名空间取决于程序要求。
- 第二条语句为类“DemoPrint”声明一个命名空间“FirstProgram”。C# 文件可以在同一个命名空间内包含多个类。
- 第三条语句包含类声明。一个类可能包含多个属性和多个方法。
- 第四条语句包含 Main 方法的声明。main 方法是每个类的执行入口点。
- 最后一条语句是用于将语句打印到控制台的 C# 语法。WriteLine 是“Console”类的一种方法。
Selenium 使用 C# 设置
如何使用 Selenium WebDriver:
现在在这个 Selenium C# 教程,让我们一步步学习如何设置 Visual Studio Selenium WebDriver:
Visual Studio 是一个集成开发环境 (IDE),开发人员可以使用它来构建跨多个平台的应用程序,例如 Windows, Android、iOS 和基于云的应用程序。
步骤1) 导航到 URL
https://visualstudio.microsoft.com/downloads/ 并点击 “免费下载” Visual Studio 社区选项卡上显示的按钮

步骤2) 打开下载的 exe 文件。如果要求管理员权限,请单击“是”。

步骤3) 会出现以下弹出窗口。点击“继续”按钮。

文件将被下载,如下面的弹出窗口所示。

步骤4) 在下一个屏幕中,
选中复选框
- 普遍 Windows 平台开发
- .Net 桌面开发
点击“安装”。
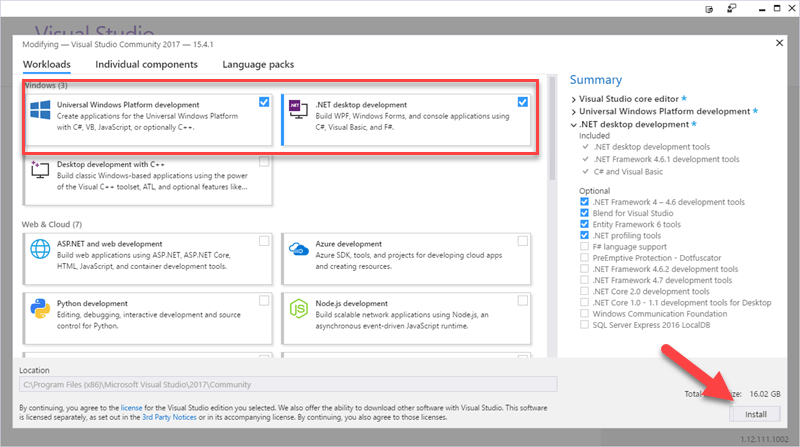
等待每个组件的安装完成。文件大小为 16GB,需要一些时间。

步骤5) 将显示以下弹出窗口。单击“重新启动”按钮。

步骤6) 重启机器后,在开始菜单上搜索“Visual Studio”,点击搜索结果,出现如下弹窗,如果没有账号,点击“现在不注册,以后再注册”链接。

步骤7) 在下一个屏幕中,
- 选择你喜欢的颜色主题
- 点击按钮“启动 Visual Studio”

步骤8) Visual Studio“开始”屏幕将会出现。

在 Visual Studio 中创建一个新项目:
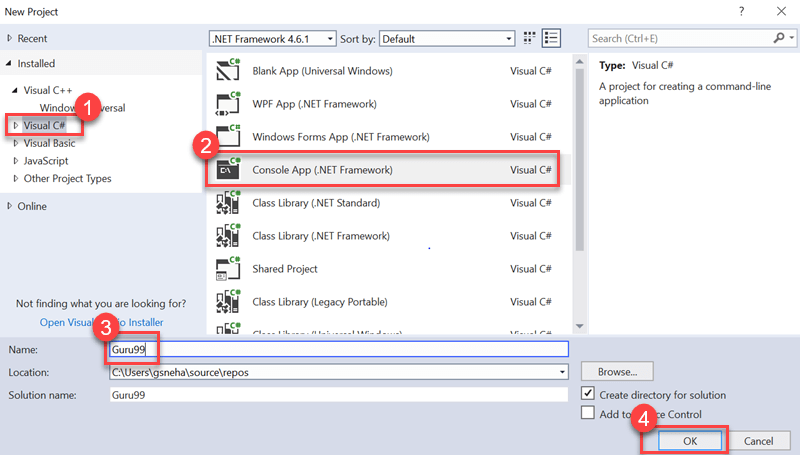
步骤1) 在文件菜单中,单击新建>项目

步骤2) 在下一个屏幕中,
- 选择选项“Visual C#”
- 单击控制台应用程序(.Net Framework)
- 输入姓名“Guru99“
- 单击确定
步骤3) 项目成功创建后将显示以下屏幕。

使用以下方式设置 Visual Studio Selenium WebDriver:
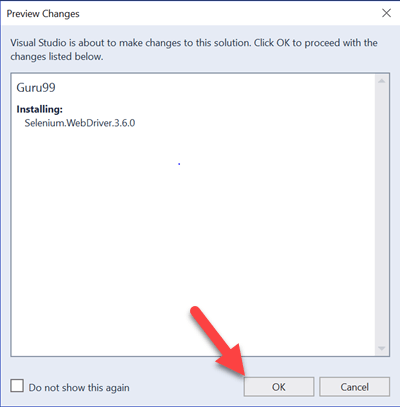
步骤1) 导航至工具 -> NuGet 包管理器 -> 管理 NuGet 解决方案包

步骤2) 在下一个屏幕中
- 寻找 Selenium 在结果屏幕上
- 选择第一个搜索结果
- 勾选项目复选框
- 点击“安装”

步骤3) 在弹出的屏幕中点击“确定”按钮
步骤4) 一旦包成功安装,将显示以下消息。

NUnit 框架:概述
NUnit 是 单元测试 Visual Studio 支持的框架和 Selenium WebDriver。NUnit 是 .Net 应用程序最广泛使用的单元测试框架。NUnit 以可读格式呈现测试结果,并允许测试人员调试自动化测试。
我们需要在 Visual Studio 上安装 NUnit Framework 和 NUnit Test Adapter 才能使用它。
安装 NUnit 框架的步骤
现在在这个 Selenium 通过 C# 教程,让我们了解安装 NUnit 框架的过程:
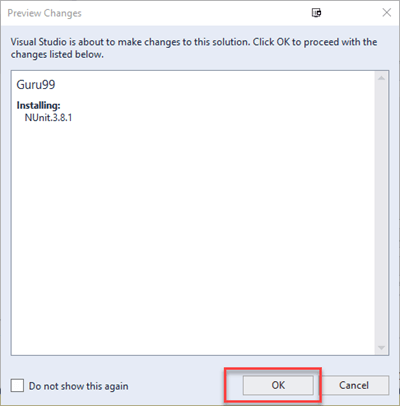
步骤1) 导航至工具 -> NuGet 包管理器 -> 管理 NuGet 解决方案包

步骤2) 在下一个窗口中
- 搜索 NUnit
- 选择搜索结果
- 选择项目
- 单击安装

步骤3) 会出现下面的弹出窗口。单击“确定”按钮。
步骤4) 安装完成后将出现以下消息。

下载 NUnit 测试适配器的步骤
现在,在本 NUnit 教程中,我们将介绍下载 NUnit 测试适配器的步骤:
请注意,以下步骤仅适用于 32 位机器。对于 64 位机器,您需要按照下面提到的相同过程下载“NUnit3 测试适配器”。
步骤1) 导航至工具 ->NuGet 包管理器 -> 管理 NuGet 解决方案包。在该屏幕中,
- 搜索 NUnitTestAdapter
- 点击搜索结果
- 选择项目
- 单击安装

步骤2) 在确认弹出窗口中单击“确定”。安装完成后,您将看到以下消息:

Selenium 和 NUnit 框架
Selenium 与 NUnit 框架的集成允许测试人员区分不同的测试类。NUnit 还允许测试人员使用 SetUp、Test 和 TearDown 等注释在运行测试之前和之后执行操作。
NUnit 框架可以与 Selenium 通过创建 NUnit 测试类并使用 NUnit 框架运行该测试类。
以下步骤 Selenium 需要 C# 框架教程来使用 NUnit 框架创建和运行测试类。
创建 NUnit 测试类的步骤 Selenium:
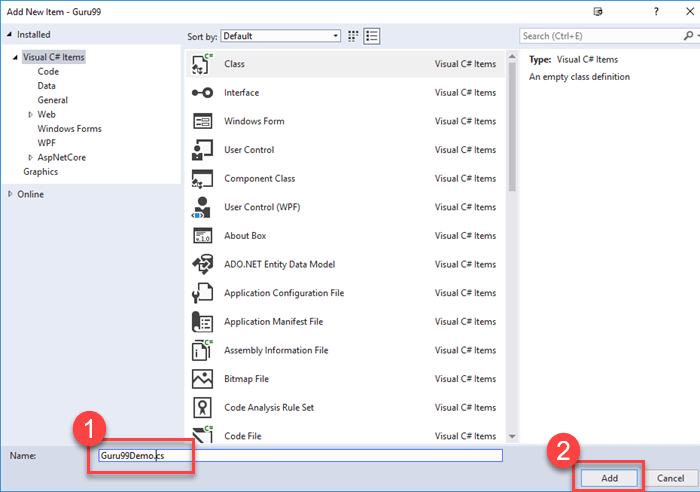
步骤1) 在解决方案资源管理器中,右键单击项目>添加>类
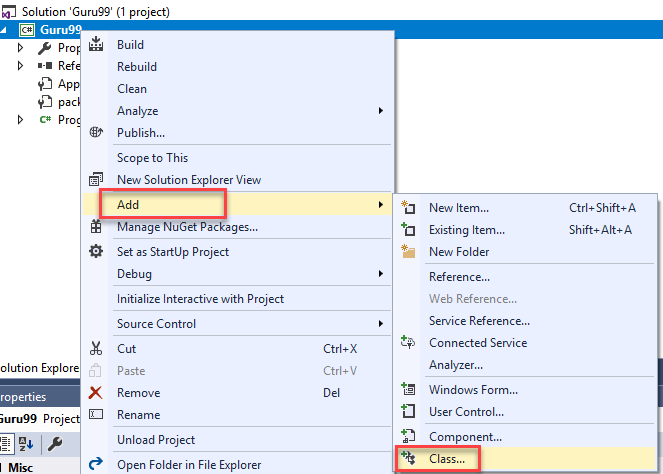
步骤2) 将出现班级创建窗口。
- 为班级提供名称
- 点击添加按钮
步骤3) 将出现以下屏幕。

步骤4) 在创建的类中添加以下代码。请注意,您需要在 chrome 驱动程序初始化期间指定“chromdriver.exe”文件的位置。
using NUnit.Framework;
using OpenQA.Selenium;
using OpenQA.Selenium.Chrome;
using OpenQA.Selenium.Firefox;
using System;
using System.Collections.Generic;
using System.Linq;
using System.Text;
using System.Threading.Tasks;

namespace Guru99Demo
{
	class Guru99Demo
    {
        IWebDriver driver;

        [SetUp]
		public void startBrowser()
        {
            driver = new ChromeDriver("D:\\3rdparty\\chrome");
        }

        [Test]
		public void test()
        {
            driver.Url = "http://www.google.co.in";
        }

        [TearDown]
		public void closeBrowser()
        {
            driver.Close();
        }

    }
}
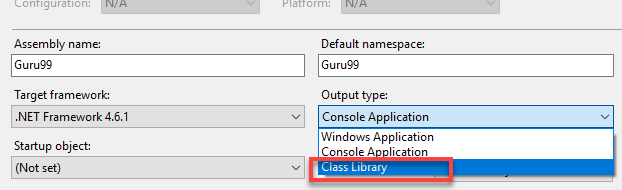
步骤4) 点击“构建”->“构建解决方案”

注意: 构建时,你可能会收到类似“不包含适合入口点的静态‘main’方法”的错误

要解决此问题,请转到项目 > 属性,然后将输出类型更改为“类库”。默认值为“控制台应用程序”。
步骤5) 构建成功后,我们需要打开测试资源管理器窗口。单击测试 -> Windows -> 测试资源管理器

步骤6) 测试资源管理器窗口打开,其中列出了可用的测试。右键单击测试资源管理器并选择运行选定的测试

步骤7) Selenium 必须使用指定方式打开浏览器。 URL 然后关闭浏览器。测试用例状态将在测试资源管理器窗口中更改为“通过”。

Selenium C# 中的 WebDriver 命令
C# 使用接口“IWebDriver”与浏览器交互。以下是可用的命令类别 Selenium 在 C# 中。
- 浏览器命令
- Web 元素命令
- 下拉命令
现在在 Selenium C Sharp 教程,让我们学习 Selenium WebDriver 命令
浏览器命令:
以下是 C# 中可用的浏览器命令列表 Selenium.
| 命令名称 | 描述 | 句法 |
|---|---|---|
| Url 命令 | 此命令用于打开指定的文件。 URL 在浏览器中。 |
driver.Url = "https://www.guru99.com" |
| 标题命令 | 此命令用于检索当前打开的网页的页面标题 |
String title = driver.Title |
| PageSource 命令 | 该命令用于检索当前打开的网页的源代码。 |
String pageSource = driver.PageSource |
| 关闭命令 | 该命令用于关闭最近打开的浏览器实例。 |
driver.Close(); |
| 退出命令 | 此命令用于关闭所有打开的浏览器实例 |
driver.Quit(); |
| 返回命令 | 该命令用于导航到浏览器历史记录的上一页。 |
driver.Navigate().Back(); |
| 前进命令 | 此命令用于导航到浏览器历史记录的下一页。 |
driver.Navigate().Forward() |
| 刷新命令 | 该命令用于执行浏览器刷新。 |
driver.Navigate().Refresh() |
Webelement 命令
Webelement 代表网页上的所有元素。它们由 HTML 标签表示。每个按钮、文本框、链接、图像、表格和框架都属于 Webelement。 Opera可以使用 IWebelement 接口触发对 Web 元素的操作。要与 Webelement 交互,我们需要在网页上找到该元素,然后对其执行操作。可以使用 Firebug 和 Firepath 等工具来识别 Xpath的 的 Webelement。
以下是 C# 中可用的 Webelement 命令列表。
| 命令名称 | 描述 | 句法 |
|---|---|---|
| 单击命令 | 此命令用于单击 Web 元素。要使元素可单击,元素必须在网页上可见。此命令也用于复选框和单选按钮操作。 |
IWebelement element = driver.FindElement(By.xpath("xpath of Webelement")); element.Click();
|
| 清除命令 | 此命令专门用于清除文本框现有的内容。 |
IWebelement element = driver.FindElement(By.xpath("xpath of Webelement"));
element.Clear();
|
| SendKeys 命令 | 此命令用于在文本框中输入值。要输入的值必须作为参数传递给 |
IWebelement element = driver.FindElement(By.xpath("xpath of Webelement"));
element.SendKeys("guru99");
|
| 显示的命令 | 此命令用于识别特定元素是否显示在网页上。此命令返回布尔值;true 或 false 取决于 Web 元素的可见性。 |
IWebelement element = driver.FindElement(By.xpath("xpath of Webelement"));
Boolean status = element.Displayed;
|
| 已启用命令 | 此命令用于识别网页上是否启用了特定 Web 元素。此命令返回布尔值;结果为 true 或 false。 |
IWebelement element = driver.FindElement(By.xpath("xpath of Webelement"));
Boolean status = element.Enabled;
|
| 选定命令 | 此命令用于识别是否选择了特定 Web 元素。此命令用于复选框、单选按钮和选择操作。 |
IWebelement element = driver.FindElement(By.xpath("xpath of Webelement"));
Boolean status = element.Selected;
|
| 提交命令: | 此命令类似于 click 命令,不同之处在于 HTML 表单中是否有带有 Submit 类型的按钮。click 命令可单击任意按钮,而 submit 命令仅可单击带有 submit 类型的按钮。 |
IWebelement element = driver.FindElement(By.xpath("xpath of Webelement")); element.submit();
|
| 文本命令 | 此命令返回 Web 元素的内部文本。此命令返回字符串值作为结果。 |
IWebelement element = driver.FindElement(By.xpath("xpath of Webelement"));
String text=element.Text;
|
| TagName 命令 | 此命令返回 Web 元素的 HTML 标签。它返回一个字符串值作为结果。 |
IWebelement element = driver.FindElement(By.xpath("xpath of Webelement")); String tagName = element.TagName;
|
| GetCSSValue 命令: | 此方法用于以 rgba 字符串(红色、绿色、蓝色和 Alpha)的形式返回 Web 元素的颜色。 |
IWebelement element = driver.FindElement(By.xpath("xpath of Webelement"));
String color = element.getCSSValue;
输出– 如果元素的颜色是红色,则输出为 rgba(255,0,0,1) |
下拉命令:
可以使用 SelectElement 类实现 C# 中的下拉操作。
以下是 C# 中可用的各种下拉操作。
| 命令名称 | 描述 | 句法 |
|---|---|---|
| SelectByText 命令 | 此命令根据选项的文本选择下拉菜单中的选项。 |
IWebelement element = driver.FindElement(By.xpath("xpath of Webelement"));
SelectElement select = new SelectElement(element);
select.SelectByText("Guru99");
|
| SelectByIndex 命令 | 此命令用于根据索引选择一个选项。下拉列表的索引从 0 开始。 |
IWebelement element = driver.FindElement(By.xpath("xpath of Webelement"));
SelectElement select = new SelectElement(element);
select.SelectByIndex("4");
|
| SelectByValue 命令 | 此命令用于根据选项值选择一个选项。 |
IWebelement element = driver.FindElement(By.xpath("xpath of Webelement"));
SelectElement select = new SelectElement(element);
select.SelectByValue("Guru99");
|
| 选项命令 | 此命令用于检索下拉菜单中显示的选项列表。 |
IWebelement element = driver.FindElement(By.xpath("xpath of Webelement"));
SelectElement select = new SelectElement(element);
List<IWebelement> options = select. Options;
int size = options.Count;
for(int i=0;i<options.size();i++)
{
String value = size.elementAt(i).Text;
Console.writeLine(value);
}
上述代码将所有选项在下拉菜单中打印到控制台上。 |
| IsMultiple 命令 | 此命令用于识别下拉菜单是否为多选下拉菜单;多选下拉菜单允许用户一次在下拉菜单中选择多个选项。此命令返回布尔值。 |
IWebelement element = driver.FindElement(By.xpath("xpath of Webelement"));
SelectElement select = new SelectElement(element);
Boolean status = select.IsMultiple();
|
| DeSelectAll 命令 | 此命令用于多选下拉菜单。它清除已选择的选项。 |
IWebelement element = driver.FindElement(By.xpath("xpath of Webelement"));
SelectElement select = new SelectElement(element);
select.DeSelectAll();
|
| DeSelectByIndex 命令 | 此命令使用其索引取消选择已选择的值。 |
IWebelement element = driver.FindElement(By.xpath("xpath of Webelement"));
SelectElement select = new SelectElement(element);
select.DeSelectByIndex("4");
|
| DeSelectByValue 命令 | 此命令使用其值取消选择已选择的值。 |
IWebelement element = driver.FindElement(By.xpath("xpath of Webelement"));
SelectElement select = new SelectElement(element);
select.DeSelectByValue("Guru99");
|
| DeSelectByText 命令 | 此命令使用其文本取消选择已选择的值。 |
IWebelement element = driver.FindElement(By.xpath("xpath of Webelement"));
SelectElement select = new SelectElement(element);
select.DeSelectByText("Guru99");
|
Code 关于样品
示例 1:使用 XPATH 定位器单击链接:
测试场景:
- 导航至演示 Guru99 网页 – https://demo.guru99.com/test/guru99home/
- 最大化窗口
- 点击“测试”菜单
- 关闭浏览器
using NUnit.Framework;
using OpenQA.Selenium;
using OpenQA.Selenium.Chrome;
using System;
using System.Collections.Generic;
using System.Linq;
using System.Text;
using System.Threading.Tasks;

namespace Guru99Demo
{
	class CSS
    {
        IWebDriver m_driver;

        [Test]
		public void cssDemo()
        {
            m_driver = new ChromeDriver("D:\\3rdparty\\chrome");
            m_driver.Url = "https://demo.guru99.com/test/guru99home/";
            m_driver.Manage().Window.Maximize();
            IWebelement link = m_driver.FindElement(By.XPath(".//*[@id='rt-header']//div[2]/div/ul/li[2]/a"));
            link.Click();
            m_driver.Close();
        }
    }
}
示例 2:在文本中输入数据Box 并使用 XPATH 定位器单击按钮:
测试场景:
- 导航 Guru 99 演示页面 – https://demo.guru99.com/test/guru99home/
- 在电子邮件文本框中输入数据
- 点击注册按钮
using NUnit.Framework;
using OpenQA.Selenium;
using OpenQA.Selenium.Chrome;
using System;
using System.Collections.Generic;
using System.Linq;
using System.Text;
using System.Threading.Tasks;

namespace Guru99Demo
{
	class CSS
    {
        IWebDriver m_driver;

        [Test]
		public void cssDemo()
        {
            m_driver = new ChromeDriver("G:\\");
            m_driver.Url = "https://demo.guru99.com/test/guru99home/";
            m_driver.Manage().Window.Maximize();


			// Store locator values of email text box and sign up button
            IWebElement emailTextBox = m_driver.FindElement(By.XPath(".//*[@id='philadelphia-field-email']"));
            IWebElement signUpButton = m_driver.FindElement(By.XPath(".//*[@id='philadelphia-field-submit']"));

            emailTextBox.SendKeys("test123@gmail.com");
            signUpButton.Click();

        }
    }
}
示例 3:在文本中输入数据Box 并使用 CSS 定位器单击按钮:
测试场景:
- 导航 Guru 99 演示页面 – https://demo.guru99.com/test/guru99home/
- 在电子邮件文本框中输入数据
- 点击注册按钮
using NUnit.Framework;
using OpenQA.Selenium;
using OpenQA.Selenium.Chrome;
using System;
using System.Collections.Generic;
using System.Linq;
using System.Text;
using System.Threading.Tasks;

namespace Guru99Demo
{
	class CSS
    {
        IWebDriver m_driver;

        [Test]
		public void cssDemo()
        {
            m_driver = new ChromeDriver("G:\\");
            m_driver.Url = "https://demo.guru99.com/test/guru99home/";
            m_driver.Manage().Window.Maximize();


			// Store locator values of email text box and sign up button
            IWebElement emailTextBox = m_driver.FindElement(By.CssSelector("input[id=philadelphia-field-email]"));
            IWebElement signUpButton = m_driver.FindElement(By.CssSelector("input[id=philadelphia-field-submit]"));

            emailTextBox.SendKeys("test123@gmail.com");
            signUpButton.Click();


        }
    }
}
示例 4:在下拉列表中选择一个值:
测试场景:
- 导航 Guru 99 演示页面 – https://demo.guru99.com/test/guru99home/
- 点击 SAP 链接
- 在姓名和电子邮件文本框中输入数据
- 从课程下拉菜单中选择一个值
- 关闭浏览器
using NUnit.Framework;
using OpenQA.Selenium;
using OpenQA.Selenium.Chrome;
using OpenQA.Selenium.Support.UI;


namespace Guru99Demo
{
	class TestSelect
    {
        IWebDriver m_driver;

        [Test]
		public void selectDemo()
        {
            m_driver = new ChromeDriver("G:\\");
            m_driver.Url = "https://demo.guru99.com/test/guru99home/";
            m_driver.Manage().Window.Maximize();

            IWebElement course = m_driver.FindElement(By.XPath(".//*[@id='awf_field-91977689']"));

			var selectTest = new SelectElement(course);
			// Select a value from the dropdown
            selectTest.SelectByValue("sap-abap");

        }
    }
}
结语
- 为了使用 Selenium 使用 C# 的 WebDriver,需要安装 Visual Studio。
- NUnit 是 Visual Studio 支持的单元测试框架, Selenium 网络驱动
- 我们需要在 Visual Studio 上安装 NUnit Framework 和 NUnit Test Adapter 才能使用它。
- NUnit 框架可以与 Selenium 通过创建 NUnit 测试类并使用 NUnit 框架运行该测试类。
- NUnit 还允许测试人员使用 SetUp、Test 和 TearDown 等注释在运行测试之前和之后执行操作。
- Selenium WebDriver 命令可以分为浏览器命令、Webelement 命令和下拉命令。