Robotium 教程: Android 测试框架示例

⚡ 智能摘要

Robotium 是开源的 Android test automation framework that drives native and hybrid apps through their user interface, letting a tester script functional, system and acceptance scenarios that span several Android 活动。

  • 🔘 Core class: Solo exposes the click, search, drag and assertion methods that every Robotium test case calls.
  • ☑️ Black-box friendly: Tests bind to UI components at run time, so minimal knowledge of the application source is required.
  • Four-step procedure: Design the test specification, write the test program, execute it on a device, then collect the result.
  • 🧪 示例: A complete HelloAndroidTest class checks the visible text, the current activity and the Start button.
  • 🛠️ Two run modes: Launch tests from the IDE or from a terminal with the adb shell am instrument command.
  • ⚙️ 当前状态: Robotium 5.6.3 remains the last release, so new Android projects usually pair or replace it with Espresso.

Robotium 教程

什么是 Robotium?

Robotium 是一个 Android testing framework that automates test cases for native and hybrid applications. Using Robotium, a developer can create robust automated GUI test cases for Android applications. A developer can also write functional, system and acceptance test scenarios that span several Android 活动。

Robotium 测试框架

标准 Android testing framework carries the limitations listed below.

  • 无法处理多项活动
  • 测试执行性能缓慢
  • Test cases are complex and hard to implement

此 Robotium framework is the better choice for conducting testing on an Android 应用程序。

Robotium is an open-source framework and is considered an extension of the Android 测试框架。使用 Robotium, a developer can create robust automated GUI test cases for Android applications. Moreover, a developer can write functional, system and acceptance test scenarios that span multiple Android 活动。

The table below summarises the advanced features that separate Robotium from the plain instrumentation framework.

的高级功能 Robotium compared with the standard Android 仪表框架

的高级功能 Robotium

Robotium 测试用例类

Robotium ships a small set of classes for testing, and the article's example imports the legacy com.jayway.android.robotium.solo package. These classes support test cases that span multiple activities, and Solo 与...整合 ActivityInstrumentationTestCase2.

注意: 当前 Robotium releases expose the same class under the shorter com.robotium.solo package, while the Maven coordinate stayed com.jayway.android.robotium:robotium-solo. Adjust the import to match the JAR version you actually add to the project.

The diagram below shows how the Solo class sits on top of the instrumentation test case.

Solo class integrated with ActivityInstrumentationTestCase2 in a Robotium 测试用例

整合 Robotium 和 ActivityInstrumentationTestCase2

A tester can write test cases without knowledge of the application design, which makes the approach a form of 黑盒测试. That is an outstanding advantage compared with the plain Android 测试用例类。

使用方法 Robotium

使用 Robotium 在您的 Android test project, you need to follow the steps below.

Steps required to add and use Robotium 里面 Android 测试项目

使用方法 Robotium

To guarantee the quality of your Android application, follow the four-stage procedure below.

  • Design the test specification
  • Develop the test program
  • Execute the test case on the target device
  • Collect the test result

The flow chart below places those four stages in order.

Flow chart of the four-stage Android application testing procedure

Android application testing procedure

STEP 1) Design Test Specification

This is the first step in testing your application. In this step you define the target to be tested. An Android application has many targets that need to be tested, such as the UI, activities, components and services. Clearly defining the target helps you achieve wide test coverage.

  • Plan the test types that should be conducted (unit test, functional test, system test).
  • Design each 测试用例 for maximum coverage while keeping the number of test cases small. The more code you test, the higher the chance of early bug detection.

STEP 2) Write Test Program

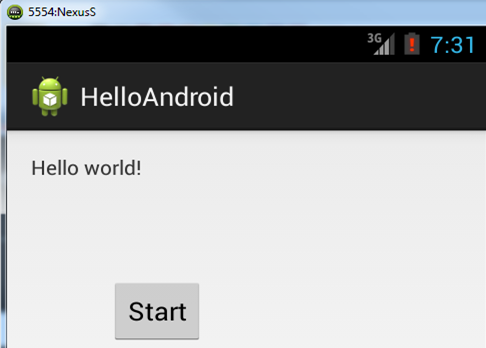
This section guides you through writing an Android 测试程序使用 Android JUnit 测试和 Robotium. Assume you have already developed an Android program named HelloAndroid. This program has the functions described below.

  • Display the text “Hello world!” on screen.
  • Display a HelloAndroid message when the user presses the “Start” button.

The screenshot below shows the application under test running on a device.

您好Android application under test showing the Hello world text and the Start button

您好Android 应用

系统要求

  • 此 Android platform ships with a pre-integrated JUnit 3 framework, which is what ActivityInstrumentationTestCase2 建立在.
  • 创建一个 Android test project from Eclipse, your machine needs a working Android SDK installation.
  • Install the current Android platform SDK rather than a pinned older release.

The screenshots in this walkthrough use Eclipse with the ADT plugin, which was the standard toolchain when the example was written. Eclipse ADT is no longer supported, so on a modern machine you would download Android Studio instead and reuse the same test code inside a Gradle 模块。

如报名参加 Robotium testing framework, download the Robotium library from the Robotium 项目页.

创建 Android 测试项目

  • 单击文件 -> 新建 -> 其他
  • 选择 Android -> Android Test Project as shown in the figure below, then choose Next

Eclipse New Project wizard with Android Test Project selected

创建一个新的 Android 测试项目

Write the name of your test project. By naming convention, the test project should be named “HelloAndroidTest”.

Eclipse dialog with the test project named HelloAndroidTest following the naming convention

Add the test project name based on the naming convention

Choose the target application under test. In this case it is HelloAndroid,然后单击完成。

Eclipse wizard step selecting HelloAndroid as the target application under test

Choose the target application under test

创建测试套件

Based on your test specification, you now create test suites for your test program. You can choose from various 软件测试 frameworks. This tutorial uses the standard Android 测试框架 ActivityInstrumentationTestCase2. To test with Robotium,添加 Robotium library file to a libs directory inside your project folder.

A test case defines the fixture used to run multiple tests. To define a test case, follow the program structure below.

  • Implement a subclass of TestCase.
  • Define instance variables that store the state of the fixture.
  • Initialize the fixture state by overriding setUp().
  • Clean up after a test by overriding tearDown().

The diagram below maps that structure onto the test program you are about to write.

一个结构 Robotium test program showing setUp, test methods and tearDown

Test program structure

package com.example.helloandroid.test;

import com.example.helloandroid.HelloAndroid;
import com.jayway.android.robotium.solo.Solo;
import android.test.ActivityInstrumentationTestCase2;
import android.widget.TextView;

public class HelloAndroidTest extends ActivityInstrumentationTestCase2 <HelloAndroid> {
    
	private HelloAndroid mActivity;
	private TextView mView;
	private String resourceString;
	private Solo solo;
	
	public HelloAndroidTest () {
		// TODO Auto-generated constructor stub
		super("com.example.helloandroid",HelloAndroid.class);	
	}
	
	 @Override
	protected void setUp() throws Exception {
		// TODO Auto-generated method stub
	//	super.setUp();
		 
	 	mActivity = this.getActivity();
		solo = new Solo(getInstrumentation(),getActivity());
		mView = (TextView) mActivity.findViewById(com.example.helloandroid.R.id.textview2);
		resourceString = mActivity.getString(com.example.helloandroid.R.string.hello_world);
		
	}
	 
	 @Override
	protected void tearDown() throws Exception {
		// TODO Auto-generated method stub
		//super.tearDown();
		solo.finishOpenedActivities();
	}
	
	public void testPrecondition() {
		assertNotNull(mView);
	}
	
	/* test Target application contains a text display "Hello World!"*/
	public void testSearchText() {
		assertEquals(resourceString,(String) mView.getText());
	}
	
	/* test HelloAndroid Activity on target application is exist*/
	public void testCurrentActivity() throws Exception  {
    	solo.assertCurrentActivity("wrong activity", HelloAndroid.class);
    }
    
	/* test Application UI contains "Start" button */
	/* send event click button to target application */
    public void testSearchButton() throws Exception {
    	boolean found = solo.searchButton("Start");
    	solo.clickOnButton("Start");
    	assertTrue(found);
    }


}

添加测试用例

  • In the same package as the test suite, create the TestCase classes.
  • To test a certain activity, for example HelloAndroid, create a test case extending ActivityInstrumentationTestCase2<HelloAndroid>.
  • Inside that class, the tester obtains the activity under test through the getActivity() method.
  • Create a test for the activity freely by adding a method named “test + original method name”.
  • Inside the test method, the tester can use Android JUnit functions to compare the actual value with the expected value. These methods are shown below.

The table below lists the assertion and interaction methods most often used in the two frameworks.

Example methods of the Robotium Solo class and the Android 测试框架

示例方法 Robotium 和 Android 测试框架

The test suite above verifies that the application GUI displays the text “Hello World!” and contains a button named “Start”.

步骤 3) 运行测试

After you finish writing your test program, run the test using the steps below.

  • 连接一个 Android device to your PC, or start an emulator if no real device is available.
  • In your IDE, right-click the test project and choose Run As → Android Unit Test.

The screenshot below shows the test run being launched from the IDE.

启动 Robotium test program as an Android Unit Test from the IDE

Running the test program

Besides running the test from the IDE, you can run it from the command line. In this test program the test package is com.example.helloandroid.test. In a Linux terminal, use the following command to run every test in that package.

$ adb shell am instrument -w -e package com.example.helloandroid.test

STEP 4) Get Test Result

After the test executes, you collect the test results.

In this test program four test methods are executed. In the run below, all test cases passed.

Test result output showing all four Robotium test cases passing

Test result output when all test cases pass

If a test case fails, the output is displayed and shows you which test cases failed.

Test result output listing the Robotium test cases that failed

Test result output when a test case fails

来源 Code 例子

This article includes source code examples that help you follow the tutorial more clearly and pick up the technical detail quickly.

如果你想比较 Robotium with the other options in this space, see the 移动应用测试 指导, Appium 教程 以及综述 移动应用测试工具.

常见问题

Robotium 5.6.3 remains the last published release and active development stopped years ago. The framework still runs, and the artifact is still on Maven Central, but new Android projects normally choose Espresso,这 Google 保持。

Robotium is a black-box framework that binds to widgets at run time and needs little knowledge of the source. Espresso is Google’s white-box tool that synchronises with the UI thread and expects access to application code.

Robotium drives one application at a time, cannot handle Flash or web content outside a WebView reliably, offers no built-in recording in the open-source JAR, and its reliance on deprecated instrumentation classes complicates modern Gradle 建立。

声明 androidTestImplementation 'com.jayway.android.robotium:robotium-solo:5.6.3' in the module build file, or drop the robotium-solo JARlibs and reference it as a file dependency.

是的。 Robotium tests are ordinary instrumentation tests, so the same APK runs on an emulator or a physical handset. Real hardware is preferred for gesture, sensor and performance checks, where emulator timing can differ.

Robotium suits functional, system and user acceptance scenarios at the UI level. It is not a substitute for unit tests, which run faster on the JVM, nor for the wider 软件测试类型 a release still needs.

Machine learning is used for self-healing locators that survive layout changes, visual comparison that flags rendering regressions, and flaky-test detection that ranks reruns. The tooling reduces maintenance, but a human still decides what behaviour matters.

GitHub 副驾驶 can scaffold a Solo setup, tearDown and assertion methods from an activity class. Review the suggestion carefully, because it may emit the legacy package import or assertions the app never satisfies.

总结一下这篇文章: