Apache ANT-zelfstudie
⚡ Slimme samenvatting
Apache Ant is een open-source, JavaEen op -gebaseerde buildtool die het compileren, testen, verpakken en implementeren automatiseert via één enkel build.xml-bestand. Geïntegreerd met Selenium en TestNGHet maakt de testuitvoering herhaalbaar, georganiseerd en gemakkelijk overal uit te voeren.
Wat is Apache Ant?
Bij het maken van een compleet softwareproduct moet men zorgen voor verschillende API's van derden, hun klassenpad, het opschonen van eerdere uitvoerbare binaire bestanden, het compileren van onze broncode, het uitvoeren van de broncode, het maken van rapporten en de implementatiecodebasis enz. Als deze taken handmatig één voor één worden uitgevoerd, zal dit enorm veel tijd in beslag nemen en zal het proces gevoelig zijn voor fouten.
Hier komt het belang van een bouwtool als Ant. Het slaat alle processen op, voert ze uit en automatiseert ze in een opeenvolgende volgorde die wordt vermeld in het configuratiebestand van Ant (meestal build.xml).

Voordeel van Ant-build
- Ant creëert de levenscyclus van de applicatie, dwz opschonen, compileren, afhankelijkheid instellen, uitvoeren, rapporteren, enz.
- De API-afhankelijkheid van derden kan worden ingesteld door Ant, dat wil zeggen dat het klassenpad van een ander Jar-bestand wordt ingesteld door het Ant-buildbestand.
- Er wordt een complete applicatie gemaakt voor end-to-end levering en implementatie.
- Het is een eenvoudige bouwtool waarmee alle configuraties kunnen worden uitgevoerd met behulp van een XML-bestand en die vanaf de opdrachtregel kan worden uitgevoerd.
- Het maakt uw code schoon omdat de configuratie gescheiden is van de daadwerkelijke applicatielogica.
Ant. installeren
Stappen om Ant te installeren Windows is als volgt
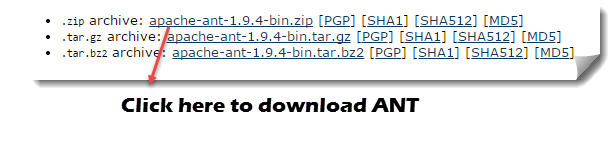
Stap 1) Ga naar https://ant.apache.org/bindownload.cgi Of download het .zip-bestand van apache-ant-1.9.4-bin.zip
Stap 2) Pak de map uit, ga naar en kopieer het pad naar de hoofdmap van de uitgepakte map

Stap 3) Ga naar Start -> Computer -> klik met de rechtermuisknop hier en selecteer 'Eigenschappen' en klik vervolgens op Geavanceerde systeeminstellingen

Stap 4) Er wordt een nieuw venster geopend. Klik op de knop 'Omgevingsvariabele…'.

Stap 5) Klik op de knop 'Nieuw…' en stel de variabelenaam in als 'ANT_HOME' en de variabelewaarde als het hoofdpad naar de uitgepakte map en klik op OK.

Stap 6) selecteer nu de variabele 'Pad' uit de lijst en klik op 'Bewerken' en voeg toe; %ANT_HOME%\bin.

Start het systeem één keer opnieuw op en u bent nu klaar om de Ant-buildtool te gebruiken.
Stap 7) Om de versie van uw Ant te controleren via de opdrachtregel:
Ant-versie

Build.xml begrijpen
Build.xml is het belangrijkste onderdeel van de Ant-buildtool. Voor een Java project worden alle opschoon-, installatie-, compilatie- en implementatiegerelateerde taken in dit bestand vermeld in XML-indeling. Wanneer we dit XML-bestand uitvoeren via de opdrachtregel of een IDE-plug-in, worden alle instructies die in dit bestand zijn geschreven opeenvolgend uitgevoerd.
Laten we de code in een voorbeeldbuild.XML begrijpen
-
De projecttag wordt gebruikt om een projectnaam en een basedir-attribuut te vermelden. De basedir is de hoofdmap van een applicatie
<project name="YTMonetize" basedir=".">
- Eigenschapstags worden gebruikt als variabelen in het build.XML-bestand en kunnen in verdere stappen worden gebruikt
<property name="build.dir" value="${basedir}/build"/>
		<property name="external.jars" value=".\resources"/>
	<property name="ytoperation.dir" value="${external.jars}/YTOperation"/>
<property name="src.dir"value="${basedir}/src"/>
- Target tags die worden gebruikt als stappen die in sequentiële volgorde worden uitgevoerd. Naamattribuut is de naam van het doel. U kunt meerdere doelen in één build.xml hebben
<target name="setClassPath"> - path-tag wordt gebruikt om alle bestanden die zich op de gemeenschappelijke locatie bevinden, logisch te bundelen
<path id="classpath_jars"> - pathelement-tag stelt het pad in naar de hoofdmap van de gemeenschappelijke locatie waar alle bestanden zijn opgeslagen
<pathelement path="${basedir}/"/> - pathconvert-tag die wordt gebruikt om paden van alle algemene bestanden binnen de path-tag te converteren naar het klassenpad-formaat van het systeem
<pathconvert pathsep=";" property="test.classpath" refid="classpath_jars"/>
- fileset-tag die wordt gebruikt om het klassenpad in te stellen voor verschillende jars van derden in ons project
<fileset dir="${ytoperation.dir}" includes="*.jar"/>
- Echotag wordt gebruikt om tekst op de console af te drukken
<echo message="deleting existing build directory"/>
- Door de tag te verwijderen worden de gegevens uit een bepaalde map opgeschoond
<delete dir="${build.dir}"/>
- mkdir-tag zal een nieuwe map maken
<mkdir dir="${build.dir}"/>
- javac-tag die wordt gebruikt om Java-broncode te compileren en .class-bestanden naar een nieuwe map te verplaatsen
        <javac destdir="${build.dir}" srcdir="${src.dir}">
	<classpath refid="classpath_jars"/>
</javac>
- jar-tag maakt een jar-bestand van .class-bestanden
<jar destfile="${ytoperation.dir}/YTOperation.jar" basedir="${build.dir}">
- manifest tag zal uw hoofdklasse instellen voor uitvoering
<manifest>
		<attribute name="Main-Class" value="test.Main"/>
</manifest>
- 'depends' attribuut dat wordt gebruikt om het ene doel afhankelijk te maken van een ander doel
<target name="run" depends="compile">
- java-tag voert de hoofdfunctie uit vanuit de jar die is gemaakt in de compileerdoelsectie
<java jar="${ytoperation.dir}/YTOperation.jar" fork="true"/>
Voer Ant uit met behulp van Eclipse inpluggen
Om Ant vanuit Eclipse uit te voeren, gaat u naar het bestand build.xml -> klik met de rechtermuisknop op het bestand -> Uitvoeren als… -> klik op Bestand bouwen

Voorbeeld
We zullen een klein voorbeeldprogramma nemen dat de Ant-functionaliteit heel duidelijk zal uitleggen. Onze projectstructuur zal er als volgt uitzien:

In dit voorbeeld hebben we 4 doelen
- Stel het klassenpad in voor externe potten,
- Reinig eerder nageleefde code
- Compileer bestaande Java-code
- Voer de code uit
Guru99AntClass.class
package testAnt;
import java.util.Date;

public class Guru99AntClass {
   public static void main(String...s){
		System.out.println("HELLO GURU99 ANT PROGRAM");
		System.out.println("TODAY's DATE IS->"+ currentDate() );
}
public static String currentDate(){
	return new Date().toString();
	}
}
Bouw.xml
<?xml version="1.0" encoding="UTF-8"	standalone="no"?>
<!--Project tag used to mention the project name, and basedir attribute will be the root directory of the application-->

<project name="YTMonetize" basedir=".">
     <!--Property tags will be used as variables in build.xml file to use in further steps-->

	<property name="build.dir" value="${basedir}/build"/>
    <property name="external.jars" value=".\resources"/>
		<property name="ytoperation.dir" value="${external.jars}/YTOperation"/>
<property name="src.dir"value="${basedir}/src"/>
<!--Target tags used as steps that will execute in sequential order. name attribute will be the name  of the target and < a name=OLE_LINK1 >'depends' attribute used to make one target to depend on another target -->
	       <target name="setClassPath">
			<path id="classpath_jars">
				<pathelement	path="${basedir}/"/>
			</path>
<pathconvert	pathsep=";"property="test.classpath" refid="classpath_jars"/>
</target>
	<target name="clean">
		<!--echo tag will use to print text on console-->
		<echo message="deleting existing build directory"/>
		<!--delete tag will clean data from given folder-->
		<delete dir="${build.dir}"/>
	</target>
<target name="compile" depends="clean,setClassPath">
	<echo message="classpath:${test.classpath}"/>
			<echo message="compiling.........."/>
	<!--mkdir tag will create new director-->
	<mkdir dir="${build.dir}"/>
		<echo message="classpath:${test.classpath}"/>
		<echo message="compiling.........."/>
	<!--javac tag used to compile java source code and move .class files to a new folder-->
	<javac destdir="${build.dir}" srcdir="${src.dir}">
			<classpath refid="classpath_jars"/>
	</javac>
	<!--jar tag will create jar file from .class files-->
	<jar	destfile="${ytoperation.dir}/YTOperation.jar"basedir="${build.dir}">
	            <!--manifest tag will set your main class for execution-->
						<manifest>
							<attribute name="Main-Class" value="testAnt.Guru99AntClass"/>
</manifest>
</jar>
    </target>
	<target name="run" depends="compile">
		<!--java tag will execute main function from the jar created in compile target section-->
<java jar="${ytoperation.dir}/YTOperation.jar"fork="true"/>
</target>
	</project>
Hoe uit te voeren TestNG coderen met Ant

Hier zullen we een klasse maken met Testen methoden en stel het klassenpad in Testen in build.xml.
Om de testng-methode uit te voeren, maken we een nieuw testng.xml-bestand en roepen dit bestand aan vanuit het build.xml-bestand.
Stap 1) We creëren een "Guru99AntClass.class” in pakket testAnt
Guru99AntClass.class
package testAnt;
import java.util.Date;
import org.testng.annotations.Test;
public class Guru99AntClass {
    @Test
	public void Guru99AntTestNGMethod(){
		System.out.println("HELLO GURU99 ANT PROGRAM");
		System.out.println("TODAY's DATE IS->"+ currentDate() );
	}
	public static String currentDate(){
		return new Date().toString();
	}
}
Stap 2) Maak een doel om deze klasse in Build.xml te laden
<!-- Load testNG and add to the class path of application -->
	<target name="loadTestNG" depends="setClassPath">
<!—using taskdef  tag we can add a task to run on the current project. In below line, we are adding testing task in this project. Using testing task here now we can run testing code using the ant script -->
		<taskdef resource="testngtasks" classpath="${test.classpath}"/>
</target>
Stap 3) Maak testng.xml
testenng.xml
<?xml version="1.0"encoding="UTF-8"?>
<!DOCTYPE suite SYSTEM "http://testng.org/testng-1.0.dtd">
<suite name="YT"thread-count="1">
			<test name="GURU99TestNGAnt">
			<classes>
			   <class name="testAnt.Guru99AntClass">
	</class>
</classes>
</test>
</suite>
Stap 4) creëren Target in Build.xml om dit uit te voeren TestNG code
<target name="runGuru99TestNGAnt" depends="compile">
<!-- testng tag will be used to execute testng code using corresponding testng.xml file. Here classpath attribute is setting classpath for testng's jar to the project-->
	<testng classpath="${test.classpath};${build.dir}">
<!—xmlfileset tag is used here to run testng's code using testing.xml file. Using includes tag we are mentioning path to testing.xml file-->
	 <xmlfileset dir="${basedir}" includes="testng.xml"/>
</testng>
Stap 5) De volledige Build.xml
<?xml version="1.0"encoding="UTF-8"standalone="no"?>
<!--Project tag used to mention the project name, and basedir attribute will be the root directory of the application-->
			<project name="YTMonetize" basedir=".">
		       <!--Property tags will be used as variables in build.xml file to use in further steps-->
			<property name="build.dir"value="${basedir}/build"/>
<!-- put  testng related jar in the resource  folder -->
	      <property name="external.jars" value=".\resource"/>
				<property name="src.dir" value="${basedir}/src"/>
<!--Target tags used as steps that will execute in  sequential order. name attribute will be the name
    of the target and 'depends' attribute used to make one target to depend on another target-->
<!-- Load testNG and add to the class path of application -->
         <target name="loadTestNG"depends="setClassPath">
				<taskdef resource="testngtasks"classpath="${test.classpath}"/>
		</target>
		<target name="setClassPath">
		       <path id="classpath_jars">
					<pathelement path="${basedir}/"/>
					<fileset dir="${external.jars}" includes="*.jar"/>
         </path>
        <pathconvert pathsep=";"property="test.classpath"refid="classpath_jars"/>
	</target>
	<target name="clean">
              <!--echo tag will use to print text on console-->
	               <echo message="deleting existing build directory"/>
               <!--delete tag will clean data from given folder-->
	               <delete				dir="${build.dir}"/>
			</target>
<target name="compile"depends="clean,setClassPath,loadTestNG">
	         <echo message="classpath:${test.classpath}"/>
	               <echo	message="compiling.........."/>
		       <!--mkdir tag will create new director-->
		        <mkdir dir="${build.dir}"/>
					<echo message="classpath:${test.classpath}"/>
			<echo message="compiling.........."/>
	<!--javac tag used to compile java source code and move .class files to a new folder-->
	        <javac destdir="${build.dir}"srcdir="${src.dir}">
	             <classpath refid="classpath_jars"/>
		</javac>
  </target>
<target name="runGuru99TestNGAnt"depends="compile">
		<!-- testng tag will be used to execute testng code using corresponding testng.xml file -->
			<testng classpath="${test.classpath};${build.dir}">
               <xmlfileset dir="${basedir}"includes="testng.xml"/>
	</testng>
</target>
</project>
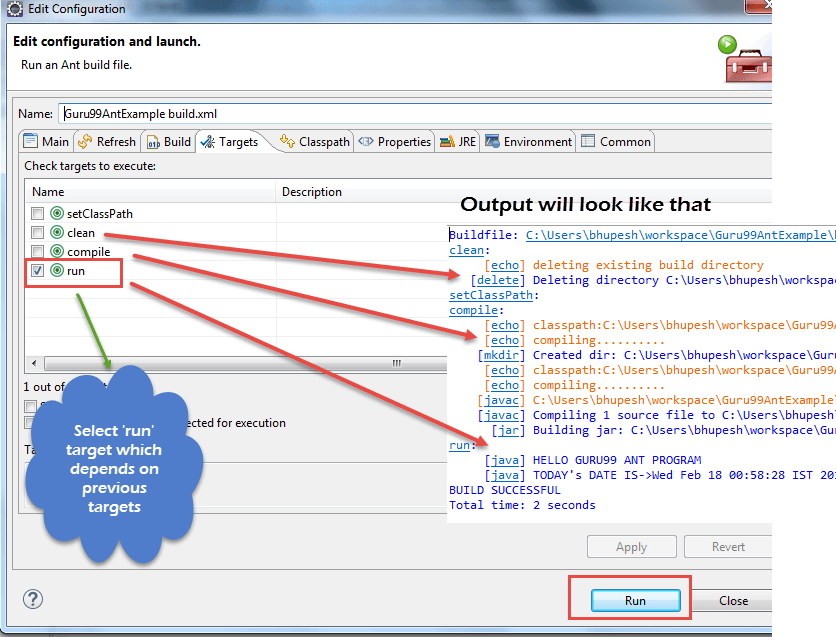
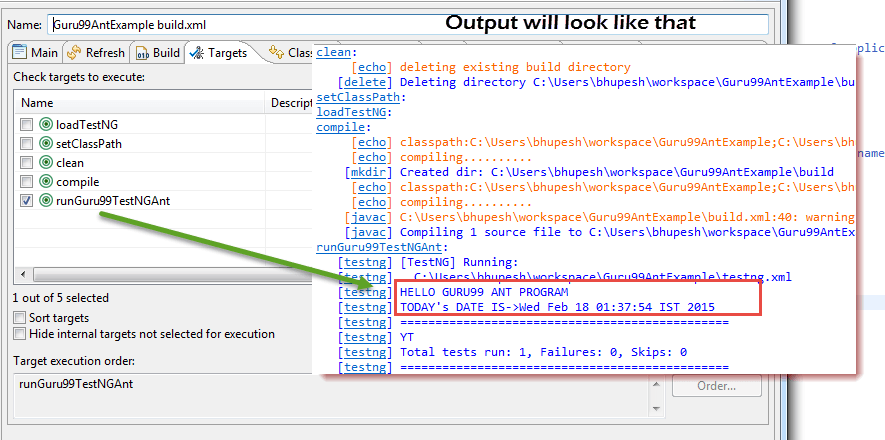
Stap 6) uitgang
Download het bovenstaande bestand
Ant beheert de build en TestNG Na de bedrading verbindt de volgende stap Ant rechtstreeks met Selenium Webstuurprogramma.
Mier met Selenium Webstuurprogramma
Tot nu toe hebben we geleerd dat we met Ant alle JAR-bestanden van derden op een specifieke locatie in het systeem kunnen plaatsen en het pad ernaartoe voor ons project kunnen instellen. Met deze methode plaatsen we alle afhankelijkheden van ons project op één plek, waardoor het betrouwbaarder wordt voor compilatie, uitvoering en implementatie.
Voor onze testprojecten met selenium kunnen we de selenium-afhankelijkheid eenvoudig vermelden in build.xml en hoeven we niet handmatig een class path toe te voegen aan onze applicatie.
Dus nu kunt u de onderstaande traditionele manier negeren om klassenpaden voor projecten in te stellen.

Voorbeeld:
We gaan het vorige voorbeeld aanpassen
Stap 1) Stel de eigenschap selenium.jars in op selenium-gerelateerde jar in de resourcemap
<property name="selenium.jars" value=".\selenium"/>
Stap 2) Voeg in de doelsetClassPath de seleniumbestanden toe
<target name="setClassPath">
	        <path id="classpath_jars">
				<pathelement path="${basedir}/"/>
				<fileset dir="${external.jars}" includes="*.jar"/>
	            <!-- selenium jar added here -->
  		            <fileset dir="${selenium.jars}" includes="*.jar"/>
         </path>
Stap 3) Volledige Build.xml:
<?xml version="1.0" encoding="UTF-8" standalone="no"?>

<!--Project tag used to mention the project name, and basedir attribute will be the root directory of the application-->
			<project name="YTMonetize" basedir=".">
                  <!--Property tags will be used as variables in build.xml file to use in further steps-->
				<property name="build.dir" value="${basedir}/build"/>
      <!-- put  testng related jar in the resource  folder -->
	       <property name="external.jars" value=".\resource"/>
<!-- put  selenium related jar in resource  folder -->
     <property name="selenium.jars" value=".\selenium"/>
			<property name="src.dir" value="${basedir}/src"/>
				<!--Target tags used as steps that will execute in  sequential order. name attribute will be the name
of the target and 'depends' attribute used to make one target to depend on another target-->
      <!-- Load testNG and add to the class path of application -->
       <target name="loadTestNG" depends="setClassPath">
				<taskdef resource="testngtasks" classpath="${test.classpath}"/>
		</target>
<target name="setClassPath">
	        <path id="classpath_jars">
				<pathelement path="${basedir}/"/>
					<fileset dir="${external.jars}" includes="*.jar"/>
			<!-- selenium jar added here -->
	            <fileset dir="${selenium.jars}"includes="*.jar"/>
        </path>
   <pathconvert pathsep=";" property="test.classpath" refid="classpath_jars"/>
</target>
<target name="clean">
<!--echo tag will use to print text on console-->
               <echo message="deleting existing build directory"/>
	                <!--delete tag will clean data from given folder-->
		               <delete dir="${build.dir}"/>
				</target>
<target name="compile" depends="clean,setClassPath,loadTestNG">
         <echo message="classpath:${test.classpath}"/>
                <echo message="compiling.........."/>
        <!--mkdir tag will create new director-->
	        <mkdir dir="${build.dir}"/>
          			<echo message="classpath:${test.classpath}"/>
			<echo message="compiling.........."/>
	<!--javac tag used to compile java source code and move .class files to new folder-->
     <javac destdir="${build.dir}"srcdir="${src.dir}">
             <classpath refid="classpath_jars"/>
	</javac>
</target>
<target name="runGuru99TestNGAnt" depends="compile">
		<!-- testng tag will be used to execute testng code using corresponding testng.xml file -->
			<testng classpath="${test.classpath};${build.dir}">
               <xmlfileset dir="${basedir}" includes="testng.xml"/>
		</testng>
	</target>
</project>
Stap 4) Wijzig nu de eerder gemaakte klasse. Guru99AntClass.java met nieuwe code.
Hier in dit voorbeeld onze stappen met behulp van Selenium zijn:
- Ga naar https://demo.guru99.com/test/guru99home/
- Lees alle cursuslinks één voor één
- Druk de hyperlink van alle cursussen af op de console.
Guru99AntClass.java:
package testAnt;
import java.util.List;
import org.openqa.selenium.By;
import org.openqa.selenium.WebDriver;
import org.openqa.selenium.WebElement;
import org.openqa.selenium.firefox.FirefoxDriver;
import org.testng.annotations.Test;

public class Guru99AntClass {

	@Test
		public void Guru99AntTestNGMethod(){
	      WebDriver driver = new FirefoxDriver();
		  driver.get("https://demo.guru99.com/test/guru99home/");
		  List<WebElement> listAllCourseLinks = driver.findElements(By.xpath("//div[@class='canvas-middle']//a"));
          for(WebElement webElement : listAllCourseLinks) {
			System.out.println(webElement.getAttribute("href"));
      	  }
		}
}
Stap 5) Na een succesvolle uitvoering ziet de uitvoer er als volgt uit:

Download het bovenstaande voorbeeldbestand