PyTest チュートリアル: とは、インストール方法、フレームワーク、アサーション
PyTestとは何ですか?
パイテスト は、ユーザーがテストコードを書くことができるテストフレームワークです。 Python プログラミング言語。データベース、API、または UI のシンプルでスケーラブルなテスト ケースを作成するのに役立ちます。PyTest は主に API のテストを作成するために使用されます。シンプルな単体テストから複雑な機能テストまで、さまざまなテストを作成するのに役立ちます。
PyTest を使用する理由
pytest の利点のいくつかは次のとおりです。
- シンプルで簡単な構文のため、非常に簡単に始めることができます。
- テストを並行して実行できます。
- 特定のテストまたはテストのサブセットを実行できます
- テストを自動的に検出する
- テストをスキップする
- オープンソース
PyTestのインストール方法
PyTest をインストールする手順は次のとおりです。
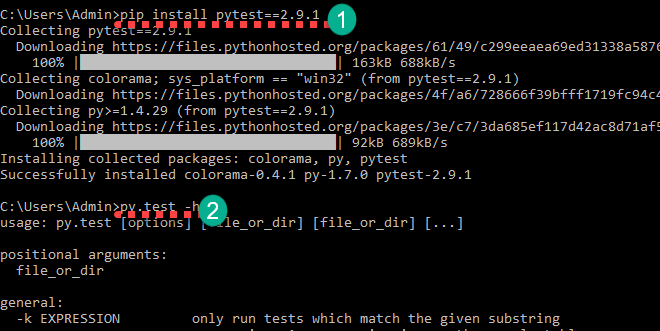
ステップ1) pytest をインストールするには、
pip install pytest==2.9.1
インストールが完了したら、次のようにして確認できます
py.test -h
これによりヘルプが表示されます
最初の基本的な PyTest
ここで、基本的な PyTest の例を使用して Pytest の使用方法を学びます。
Study_pytest フォルダーを作成します。 このフォルダー内にテスト ファイルを作成します。
コマンドラインでそのフォルダーに移動してください。
フォルダー内に test_sample1.py という名前のファイルを作成します
以下のコードを追加して保存します
import pytest
def test_file1_method1():
	x=5
	y=6
	assert x+1 == y,"test failed"
	assert x == y,"test failed"
def test_file1_method2():
	x=5
	y=6
	assert x+1 == y,"test failed"
コマンドを使用してテストを実行します
py.test
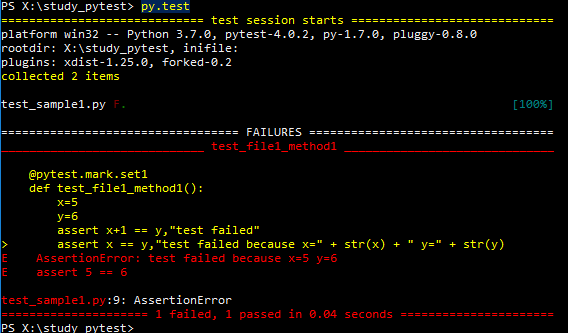
次のような出力が得られます
test_sample1.py F.
============================================== FAILURES ========================================
____________________________________________ test_sample1 ______________________________________
    def test_file1_method1():
    	x=5
    	y=6
       	assert x+1 == y,"test failed"
>      	assert x == y,"test failed"
E       AssertionError: test failed
E       assert 5 == 6
test_sample1.py:6: AssertionError
ここの test_sample1.py F.
Fさんは失敗と言っています
ドット(.)は成功を示します。
失敗セクションでは、失敗したメソッドと失敗の行を確認できます。 ここで、x==y は 5==6 を意味し、これは false です。
この PyTest チュートリアルの次は、PyTest のアサーションについて学びます。
PyTest のアサーション
Pytestアサーションは、TrueまたはFalseステータスを返すチェックです。 Python Pytest では、テスト メソッドでアサーションが失敗すると、そのメソッドの実行はそこで停止します。そのテスト メソッドの残りのコードは実行されず、Pytest アサーションは次のテスト メソッドで続行されます。
Pytest アサートの例:
assert "hello" == "Hai" is an assertion failure.
assert 4==4 is a successful assertion
assert True is a successful assertion
assert False is an assertion failure.
検討
assert x == y,"test failed because x=" + str(x) + " y=" + str(y)
このコードをアサーションの代わりに test_file1_method1() に配置します。
assert x == y,"test failed"
テストを実行すると次のように失敗します。 AssertionError: テストが失敗しました x=5 y=6
PyTest がテスト ファイルとテスト メソッドを識別する方法
デフォルトでは、pytest は次で始まるファイル名のみを識別します。 テスト_ またはで終わる _テスト テストファイルとして。ただし、他のファイル名を明示的に指定することもできます(後述)。Pytestでは、テストメソッド名は "テスト」 他のすべてのメソッド名は、それらのメソッドの実行を明示的に要求した場合でも無視されます。
有効な pytest ファイル名と無効な pytest ファイル名の例をいくつか参照してください。
test_login.py - valid
login_test.py - valid
testlogin.py -invalid
logintest.py -invalid
注: はい、pytest に testlogin.py とlogintest.py を選択するように明示的に要求できます。
有効な pytest テスト メソッドと無効な pytest テスト メソッドの例をいくつか参照してください。
def test_file1_method1(): - valid
def testfile1_method1(): - valid
def file1_method1(): - invalid
注: file1_method1() を明示的に指定しても、pytest はこのメソッドを実行しません。
特定のファイルおよび複数のファイルから複数のテストを実行する
現在、フォルダー Study_pytest 内に、ファイル test_sample1.py があります。 test_sample2.py、test_sample3.py などの複数のファイルがあるとします。 フォルダーとサブフォルダー内のすべてのファイルからすべてのテストを実行するには、pytest コマンドを実行するだけです。
py.test
これにより、そのフォルダーとそのフォルダーの下のサブフォルダー内の test_ で始まるすべてのファイル名と _test で終わるファイル名が実行されます。
特定のファイルからのみテストを実行するには、py.test を使用できます。
py.test test_sample1.py
PyTest を使用してテスト全体のサブセットを実行する
場合によっては、テスト スイート全体を実行したくない場合があります。 Pytest を使用すると、特定のテストを実行できます。 2つの方法で実現できます
- 部分文字列一致によるテスト名のグループ化
- マーカーによるテストのグループ化
test_sample1.py はすでにあります。 ファイル test_sample2.py を作成し、以下のコードをそこに追加します
def test_file2_method1():
	x=5
	y=6
	assert x+1 == y,"test failed"
	assert x == y,"test failed because x=" + str(x) + " y=" + str(y)
def test_file2_method2():
	x=5
	y=6
	assert x+1 == y,"test failed"
したがって、現在は
• test_sample1.py
• test_file1_method1()
• test_file1_method2()
• test_sample2.py
• test_file2_method1()
• test_file2_method2()
オプション 1) 部分文字列一致によるテストの実行
ここで、名前にmethod1が含まれるすべてのテストを実行する必要があります
py.test -k method1 -v
-k <expression> is used to represent the substring to match
-v increases the verbosity
py.test -k method1 -vを実行すると、次の結果が得られます。
test_sample2.py::test_file2_method1 FAILED
test_sample1.py::test_file1_method1 FAILED

============================================== FAILURES ==============================================
_________________________________________ test_file2_method1 _________________________________________
    def test_file2_method1():
    	x=5
    	y=6
       	assert x+1 == y,"test failed"
>      	assert x == y,"test failed because x=" + str(x) + " y=" + str(y)
E       AssertionError: test failed because x=5 y=6
E       assert 5 == 6
test_sample2.py:5: AssertionError

_________________________________________ test_file1_method1 _________________________________________
    @pytest.mark.only
    def test_file1_method1():
    	x=5
    	y=6
       	assert x+1 == y,"test failed"
>      	assert x == y,"test failed because x=" + str(x) + " y=" + str(y)
E       AssertionError: test failed because x=5 y=6
E       assert 5 == 6
test_sample1.py:8: AssertionError

================================= 2 tests deselected by '-kmethod1' ==================================
=============================== 2 failed, 2 deselected in 0.02 seconds ===============================
ここで最後まで見れます 2 つのテストが「-kmethod1」によって選択解除されました これは、test_file1_method2 と test_file2_method2 です。
次のようなさまざまな組み合わせで実行してみてください。
py.test -k method -v - will run all the four methods
py.test -k methods -v – will not run any test as there is no test name matches the substring 'methods'
オプション 2) マーカーによるテストの実行
Pytest では、pytest マーカー @pytest.mark を使用してテスト メソッドにさまざまな属性を設定できます。 テスト ファイルでマーカーを使用するには、テスト ファイルに pytest をインポートする必要があります。
ここでは、テスト メソッドにさまざまなマーカー名を適用し、マーカー名に基づいて特定のテストを実行します。 次を使用して、各テスト名のマーカーを定義できます。
@pytest.mark.<name>.
テストメソッドにマーカーset1とset2を定義し、マーカー名を使用してテストを実行します。次のコードでテストファイルを更新します。
テストサンプル1.py
import pytest
@pytest.mark.set1
def test_file1_method1():
	x=5
	y=6
	assert x+1 == y,"test failed"
	assert x == y,"test failed because x=" + str(x) + " y=" + str(y)

@pytest.mark.set2
def test_file1_method2():
	x=5
	y=6
	assert x+1 == y,"test failed"
テストサンプル2.py
import pytest
@pytest.mark.set1
def test_file2_method1():
	x=5
	y=6
	assert x+1 == y,"test failed"
	assert x == y,"test failed because x=" + str(x) + " y=" + str(y)

@pytest.mark.set1
def test_file2_method2():
	x=5
	y=6
	assert x+1 == y,"test failed"
マークされたテストを実行するには、
py.test -m <name>
-m <name> mentions the marker name
py.test -m set1 を実行します。これにより、メソッド test_file1_method1、test_file2_method1、test_file2_method2 が実行されます。
py.test -m set2 を実行すると、test_file1_method2 が実行されます。
Pytest と並行してテストを実行する
通常、テスト スイートには複数のテスト ファイルと数百のテスト メソッドがあり、実行にはかなりの時間がかかります。 Pytest を使用すると、テストを並行して実行できます。
そのためには、まず pytest-xdist を実行してインストールする必要があります。
pip install pytest-xdist
今すぐテストを実行できます。
py.test -n 4
-n 複数のワーカーを使用してテストを実行します。 上記のコマンドでは、テストを実行するワーカーが 4 人になります。
Pytest フィクスチャ
フィクスチャは、すべてのテスト メソッドの前にコードを実行する場合に使用されます。 したがって、すべてのテストで同じコードを繰り返す代わりに、フィクスチャを定義します。 通常、フィクスチャはデータベース接続の初期化、base の受け渡しなどに使用されます。
メソッドは、次のようにマークすることで Pytest フィクスチャとしてマークされます。
@pytest.fixture
テスト メソッドでは、フィクスチャを入力パラメータとして指定することで、Pytest フィクスチャを使用できます。
次のコードで新しいファイル test_basic_fixture.py を作成します。
import pytest
@pytest.fixture
def supply_AA_BB_CC():
	aa=25
	bb =35
	cc=45
	return [aa,bb,cc]

def test_comparewithAA(supply_AA_BB_CC):
	zz=35
	assert supply_AA_BB_CC[0]==zz,"aa and zz comparison failed"

def test_comparewithBB(supply_AA_BB_CC):
	zz=35
	assert supply_AA_BB_CC[1]==zz,"bb and zz comparison failed"

def test_comparewithCC(supply_AA_BB_CC):
	zz=35
	assert supply_AA_BB_CC[2]==zz,"cc and zz comparison failed"
ここに
- Supply_AA_BB_CC という名前のフィクスチャがあります。 このメソッドは 3 つの値のリストを返します。
- それぞれの値と比較する 3 つのテスト方法があります。
各テスト関数には、使用可能なフィクスチャと名前が一致する入力引数があります。 次に、Pytest は対応するフィクスチャ メソッドを呼び出し、返された値は入力引数 (ここではリスト [25,35,45]) に格納されます。 現在、リスト項目は比較のためのテスト メソッドで使用されています。
テストを実行して結果を確認します
py.test test_basic_fixture
test_basic_fixture.py::test_comparewithAA FAILED
test_basic_fixture.py::test_comparewithBB PASSED
test_basic_fixture.py::test_comparewithCC FAILED

============================================== FAILURES ==============================================
_________________________________________ test_comparewithAA _________________________________________
supply_AA_BB_CC = [25, 35, 45]
    def test_comparewithAA(supply_AA_BB_CC):
    	zz=35
>   	assert supply_AA_BB_CC[0]==zz,"aa and zz comparison failed"
E    AssertionError: aa and zz comparison failed
E    assert 25 == 35
test_basic_fixture.py:10: AssertionError

_________________________________________ test_comparewithCC _________________________________________
supply_AA_BB_CC = [25, 35, 45]
    def test_comparewithCC(supply_AA_BB_CC):
    	zz=35
>   	assert supply_AA_BB_CC[2]==zz,"cc and zz comparison failed"
E    AssertionError: cc and zz comparison failed
E    assert 45 == 35
test_basic_fixture.py:16: AssertionError
================================= 2 failed, 1 passed in 0.05 seconds =================================
zz=BB=35 であるため、テスト test_comparewithBB は合格し、残りの 2 つのテストは失敗します。
フィクスチャ メソッドのスコープは、それが定義されているテスト ファイル内のみです。 他のテスト ファイル内のフィクスチャにアクセスしようとすると、「フィクスチャ」というエラーが表示されます。 「supply_AA_BB_CC」が見つかりません 他のファイルのテストメソッドの場合。
複数のテスト ファイルに対して同じフィクスチャを使用するには、conftest.py というファイルにフィクスチャ メソッドを作成します。
以下のPyTestの例で確認してみましょう。次のコードでconftest.py、test_basic_fixture.py、test_basic_fixture3.pyの2つのファイルを作成します。
conftest.py
import pytest
@pytest.fixture
def supply_AA_BB_CC():
	aa=25
	bb =35
	cc=45
	return [aa,bb,cc]
test_basic_fixture.py
import pytest
def test_comparewithAA(supply_AA_BB_CC):
	zz=35
	assert supply_AA_BB_CC[0]==zz,"aa and zz comparison failed"

def test_comparewithBB(supply_AA_BB_CC):
	zz=35
	assert supply_AA_BB_CC[1]==zz,"bb and zz comparison failed"

def test_comparewithCC(supply_AA_BB_CC):
	zz=35
	assert supply_AA_BB_CC[2]==zz,"cc and zz comparison failed"
test_basic_fixture2.py
import pytest
def test_comparewithAA_file2(supply_AA_BB_CC):
	zz=25
	assert supply_AA_BB_CC[0]==zz,"aa and zz comparison failed"

def test_comparewithBB_file2(supply_AA_BB_CC):
	zz=25
	assert supply_AA_BB_CC[1]==zz,"bb and zz comparison failed"

def test_comparewithCC_file2(supply_AA_BB_CC):
	zz=25
	assert supply_AA_BB_CC[2]==zz,"cc and zz comparison failed"
pytest は最初にテスト ファイル内でフィクスチャを探し、見つからない場合は conftest.py 内を探します。
py.test -k test_comparewith -v でテストを実行すると、以下のような結果が得られます。
test_basic_fixture.py::test_comparewithAA FAILED
test_basic_fixture.py::test_comparewithBB PASSED
test_basic_fixture.py::test_comparewithCC FAILED
test_basic_fixture2.py::test_comparewithAA_file2 PASSED
test_basic_fixture2.py::test_comparewithBB_file2 FAILED
test_basic_fixture2.py::test_comparewithCC_file2 FAILED
Pytest パラメータ化テスト
テストをパラメータ化する目的は、複数の引数セットに対してテストを実行することです。 これは @pytest.mark.parametrize によって行うことができます。
以下の PyTest の例でこれを見てみましょう。 ここでは、テスト メソッドに 3 つの引数を渡します。 このテスト メソッドは、最初の 2 つの引数を追加し、3 番目の引数と比較します。
以下のコードでテスト ファイル test_addition.py を作成します。
import pytest
@pytest.mark.parametrize("input1, input2, output",[(5,5,10),(3,5,12)])
def test_add(input1, input2, output):
	assert input1+input2 == output,"failed"
ここで、テスト メソッドは 3 つの引数 (input1、input2、output) を受け入れます。input1 と input2 を追加し、出力と比較します。
py.test -k test_add -v でテストを実行して結果を見てみましょう
test_addition.py::test_add[5-5-10] PASSED
test_addition.py::test_add[3-5-12] FAILED
============================================== FAILURES ==============================================
__________________________________________ test_add[3-5-12] __________________________________________
input1 = 3, input2 = 5, output = 12
    @pytest.mark.parametrize("input1, input2, output",[(5,5,10),(3,5,12)])
    def test_add(input1, input2, output):
>   	assert input1+input2 == output,"failed"
E    AssertionError: failed
E    assert (3 + 5) == 12
test_addition.py:5: AssertionError
テストが 2 回実行されたことがわかります。5 つは 5+10 ==3 をチェックし、もう 5 つは 12+XNUMX ==XNUMX をチェックしています。
test_addition.py::test_add[5-5-10] 合格
test_addition.py::test_add[3-5-12] 失敗しました
Pytest Xfail / テストのスキップ
テストを実行したくない状況もあるでしょう。 テストケース 特定の時期とは関係ありません。 そのような状況では、テストを X 失敗するか、テストをスキップするかを選択できます。
xfailされたテストは実行されますが、失敗したテストや成功したテストの一部にはカウントされません。そのテストが失敗した場合、トレースバックは表示されません。xfailテストは次のように実行できます。
@pytest.mark.xfail。
テストをスキップすると、テストは実行されません。 を使用してテストをスキップできます
@pytest.mark.skip。
以下のコードで test_addition.py を編集します
import pytest
@pytest.mark.skip
def test_add_1():
	assert 100+200 == 400,"failed"

@pytest.mark.skip
def test_add_2():
	assert 100+200 == 300,"failed"

@pytest.mark.xfail
def test_add_3():
	assert 15+13 == 28,"failed"

@pytest.mark.xfail
def test_add_4():
	assert 15+13 == 100,"failed"

def test_add_5():
	assert 3+2 == 5,"failed"

def test_add_6():
	assert 3+2 == 6,"failed"
ここに
- test_add_1 と test_add_2 はスキップされ、実行されません。
- test_add_3 と test_add_4 は xfailed です。 これらのテストは実行され、xfailed (テスト失敗時) または xpassed (テスト合格時) テストの一部になります。 失敗に対するトレースバックはありません。
- test_add_5 と test_add_6 が実行され、test_add_6 が成功する間、test_add_5 はトレースバックで失敗を報告します。
py.test test_addition.py -v でテストを実行し、結果を確認します。
test_addition.py::test_add_1 SKIPPED
test_addition.py::test_add_2 SKIPPED
test_addition.py::test_add_3 XPASS
test_addition.py::test_add_4 xfail
test_addition.py::test_add_5 PASSED
test_addition.py::test_add_6 FAILED

============================================== FAILURES ==============================================
_____________________________________________ test_add_6 _____________________________________________
    def test_add_6():
>   	assert 3+2 == 6,"failed"
E    AssertionError: failed
E    assert (3 + 2) == 6
test_addition.py:24: AssertionError

================ 1 failed, 1 passed, 2 skipped, 1 xfailed, 1 xpassed in 0.07 seconds =================
結果XML
テスト結果を XML 形式で作成し、継続的インテグレーション サーバーにフィードしてさらなる処理などを行うことができます。 これは次の方法で行うことができます
py.test test_sample1.py -v –junitxml=”result.xml”
result.xml にはテストの実行結果が記録されます。 以下のサンプル result.xml を見つけてください。
<?xml version="1.0" encoding="UTF-8"?>
<testsuite errors="0" failures="1" name="pytest" skips="0" tests="2" time="0.046">
   <testcase classname="test_sample1" file="test_sample1.py" line="3" name="test_file1_method1" time="0.001384973526">
     <failure message="AssertionError:test failed because x=5 y=6 assert 5 ==6">
    @pytest.mark.set1
    def test_file1_method1():
    	x=5
    	y=6
       	assert x+1 == y,"test failed"
>      	assert x == y,"test failed because x=" + str(x) + " y=" + str(y)
E       AssertionError: test failed because x=5 y=6
E       assert 5 == 6
         test_sample1.py:9: AssertionError
    </failure>
   </testcase>
   <testcase classname="test_sample1" file="test_sample1.py" line="10" name="test_file1_method2" time="0.000830173492432" />
</testsuite>
から合計0つのテストがあり、そのうち1つは失敗しています。その下には実行された各テストの詳細が表示されます。タグ。
Pytest フレームワーク API のテスト
次に、API をテストするための小さな pytest フレームワークを作成します。 ここで使用する API は、無料のものです。 https://reqres.in/。 このウェブサイトはテスト可能な API を提供することだけを目的としています。 このウェブサイトには当社のデータは保存されません。
ここでいくつかのテストを書きます
- 一部のユーザーをリストアップする
- ユーザーでログインする
指定されたコードで以下のファイルを作成します
conftest.py – すべてのテストメソッドのベース URL を提供するフィクスチャがあります
import pytest
@pytest.fixture
def supply_url():
	return "https://reqres.in/api"
test_list_user.py – 有効なユーザーと無効なユーザーをリストするためのテスト メソッドが含まれています
- test_list_valid_user は有効なユーザーの取得をテストし、応答を検証します
- test_list_invaliduser は、無効なユーザーのフェッチをテストし、応答を検証します。
import pytest
import requests
import json
@pytest.mark.parametrize("userid, firstname",[(1,"George"),(2,"Janet")])
def test_list_valid_user(supply_url,userid,firstname):
	url = supply_url + "/users/" + str(userid)
	resp = requests.get(url)
	j = json.loads(resp.text)
	assert resp.status_code == 200, resp.text
	assert j['data']['id'] == userid, resp.text
	assert j['data']['first_name'] == firstname, resp.text

def test_list_invaliduser(supply_url):
	url = supply_url + "/users/50"
	resp = requests.get(url)
	assert resp.status_code == 404, resp.text
test_login_user.py – ログイン機能をテストするためのテスト メソッドが含まれています。
- test_login_valid は、メールとパスワードによる有効なログイン試行をテストします。
- test_login_no_password は、パスワードを渡さない無効なログイン試行をテストします。
- test_login_no_email は、電子メールを渡さずに無効なログイン試行をテストします。
import pytest
import requests
import json
def test_login_valid(supply_url):
	url = supply_url + "/login/"
	data = {'email':'test@test.com','password':'something'}
	resp = requests.post(url, data=data)
	j = json.loads(resp.text)
	assert resp.status_code == 200, resp.text
	assert j['token'] == "QpwL5tke4Pnpja7X", resp.text

def test_login_no_password(supply_url):
	url = supply_url + "/login/"
	data = {'email':'test@test.com'}
	resp = requests.post(url, data=data)
	j = json.loads(resp.text)
	assert resp.status_code == 400, resp.text
	assert j['error'] == "Missing password", resp.text

def test_login_no_email(supply_url):
	url = supply_url + "/login/"
	data = {}
	resp = requests.post(url, data=data)
	j = json.loads(resp.text)
	assert resp.status_code == 400, resp.text
	assert j['error'] == "Missing email or username", resp.text
py.test -v を使用してテストを実行します。
結果を次のように参照してください
test_list_user.py::test_list_valid_user[1-George] PASSED
test_list_user.py::test_list_valid_user[2-Janet] PASSED
test_list_user.py::test_list_invaliduser PASSED
test_login_user.py::test_login_valid PASSED
test_login_user.py::test_login_no_password PASSED
test_login_user.py::test_login_no_email PASSED
テストを更新してさまざまな出力を試してください
製品概要
この PyTest チュートリアルでは、次のことを取り上げました
- 次を使用して pytest をインストールします ピップインストール pytest=2.9.1
- 単純な pytest プログラムを作成し、py.test コマンドで実行します。
- アサーション ステートメント、assert x==y は、True または False を返します。
- pytest がテスト ファイルとメソッドを識別する方法。
- で始まるテストファイル テスト_ またはで終わる _テスト
- で始まるテストメソッド test
- py.test コマンドは、そのフォルダーとサブフォルダー内のすべてのテスト ファイルを実行します。 特定のファイルを実行するには、py.test コマンドを使用します。
- テストメソッドのサブセットを実行する
- 部分文字列によるテスト名のグループ化matching.py.test -k -v は、次のすべてのテストを実行します。 その名前で。
- マーカーでテストを実行します。@pytest.mark を使用してテストにマークを付けます。 pytest -m を使用してテストを実行しますとしてマークされたテストを実行するには。
- テストを並行して実行する
- pip install pytest-xdist を使用して pytest-xdist をインストールします
- py.test -n NUM を使用してテストを実行します。NUM はワーカーの数です。
- メソッドを @pytest.fixture でマークして、各テストの前にコードを実行するフィクスチャ メソッドを作成する
- フィクスチャ メソッドのスコープは、それが定義されているファイル内にあります。
- フィクスチャ メソッドは、conftest.py ファイルで定義することで、複数のテスト ファイルにわたってアクセスできます。
- テスト メソッドは、入力引数として使用して Pytest フィクスチャにアクセスできます。
- 複数の入力セットに対してテストを実行するためのパラメータ化テスト。
@pytest.mark.parametrize(“入力1, 入力2, 出力”,[(5,5,10),(3,5,12)])
def test_add(入力1、入力2、出力):
入力 1+入力 2 == 出力をアサート、「失敗」
入力 (5,5,10) および (3,5,12) を使用してテストを実行します。 - @pytets.mark.skip と @pytest.mark.xfail を使用したスキップ/xfail テスト
- py.test test_sample1.py -v –junitxml=”result.xml” を使用して、実行されたテストの詳細を含む XML 形式のテスト結果を作成します。
- API をテストするためのサンプル pytest フレームワーク


