
での Cookie の処理方法 Selenium webdriver
 Krishna ルンタ
⚡ スマートサマリー
Cookieは、ユーザー設定とセッション識別子をキーと値のペアとして保存し、 Selenium WebDriverはそれらを読み取り、保存、再生できるため、自動テストでは以降の実行時に毎回ログイン画面をスキップできます。

HTTP Cookieは、ユーザーとその設定に関する情報で構成されています。キーと値のペアを使用して情報を保存します。これは、ユーザーがWebサイトを閲覧している間、Webアプリケーションから送信され、Webブラウザに保存される小さなデータです。
この分野に初めて触れる方は、まずこのガイドから始めてください。 クッキーのテスト.
Selenium Cookie のクエリコマンド
In Selenium WebDriverでは、以下の組み込みメソッドを使用してCookieを照会したり操作したりできます。これらのメソッドはすべてdriver.manage()を介してアクセスでき、Optionsインターフェースを返します。
| Selenium クエリコマンド | 出力 |
|---|---|
| driver.manage().getCookies(); | すべてのクッキーのリストを返します |
| driver.manage().getCookieNamed(arg0); | 指定された名前のクッキーを返します |
| driver.manage().addCookie(arg0); | クッキーを作成して追加します |
| driver.manage().deleteCookie(arg0); | 特定のクッキーを削除します |
| driver.manage().deleteCookieNamed(arg0); | 指定された名前のクッキーを削除します |
| driver.manage().deleteAllCookies(); | すべてのクッキーを削除します |
Cookie を処理する (受け入れる) 理由 Selenium?
各 Cookie は、名前、値、ドメイン、パス、有効期限、および安全かどうかのステータスに関連付けられています。 クライアントを検証するために、サーバーは Cookie 内のこれらの値をすべて解析します。
テスト ウェブアプリケーション Selenium WebDriverでは、Cookieを作成、更新、または削除する必要がある場合があります。
例えば、オンラインショップを自動化する場合ping アプリケーションによっては、注文、カートの表示、支払い情報、注文確認などのテストシナリオを自動化する必要があるかもしれません。
Cookieが保存されない場合、上記のテストシナリオを実行する前に毎回ログイン操作を行う必要があります。これにより、コーディング作業量と実行時間が増加します。
解決策は、クッキーをファイルに保存することです。 Laterこのファイルからクッキーの値を取得し、現在のブラウザセッションに追加します。その結果、あらゆるログイン手順をスキップできます。 テストケース ドライバーセッションにはこの情報が含まれているためです。
アプリケーションサーバーは、ブラウザセッションを認証済みとして扱い、リクエストされたページに直接アクセスします。 URL.
での Cookie の処理方法 Selenium
我々は使用するだろう https://demo.guru99.com/test/cookie/selenium_aut.php デモの目的のため。
これは 2 ステップのプロセスになります。
ステップ1)アプリケーションにログインし、生成された認証クッキーを保存します。
デモアプリケーションでは、以下に示すようなシンプルなログインフォームが表示されます。

ステップ2)保存されたCookieを使用して、ユーザーIDとパスワードを使用せずにアプリケーションに再度ログインします。
ステップ1) Cookie情報の保存
package CookieExample;

import java.io.BufferedWriter;
import java.io.File;
import java.io.FileWriter;
import java.util.Set;
import org.openqa.selenium.By;
import org.openqa.selenium.WebDriver;
import org.openqa.selenium.chrome.ChromeDriver;
import org.openqa.selenium.Cookie;

public class cookieRead{
        public static void main(String[] args)
    {
    	WebDriver driver;
        System.setProperty("webdriver.chrome.driver","G:///chromedriver.exe");
		driver=new ChromeDriver();
		driver.get("https://demo.guru99.com/test/cookie/selenium_aut.php");


        // Input Email id and Password If you are already Register
        driver.findElement(By.name("username")).sendKeys("abc123");
        driver.findElement(By.name("password")).sendKeys("123xyz");
        driver.findElement(By.name("submit")).click();

        // create file named Cookies to store Login Information
        File file = new File("Cookies.data");
        try
        {
            // Delete old file if exists
			file.delete();
            file.createNewFile();
            FileWriter fileWrite = new FileWriter(file);
            BufferedWriter Bwrite = new BufferedWriter(fileWrite);
            // loop for getting the cookie information

            // loop for getting the cookie information
            for(Cookie ck : driver.manage().getCookies())
            {
                Bwrite.write((ck.getName()+";"+ck.getValue()+";"+ck.getDomain()+";"+ck.getPath()+";"+ck.getExpiry()+";"+ck.isSecure()));
                Bwrite.newLine();
            }
            Bwrite.close();
            fileWrite.close();

        }
        catch(Exception ex)
        {
            ex.printStackTrace();
        }
    }
}
⚠️ バージョンに関する注記: System.setProperty の行は、元のチュートリアルに書かれているとおりにそのまま残されています。 Selenium 4.6以降、 Selenium Managerは対応するchromedriverを自動的にダウンロードして設定するため、現在の設定ではその行は不要です。以下の元のコードは変更されておらず、コンパイルも正常に完了します。
Code 説明
- WebDriverインスタンスを作成します。
- driver.get(“https://demo.guru99.com/test/cookie/selenium_aut.php”) を使用してウェブサイトにアクセスしてください。
- アプリケーションにログインします。
- を使用して Cookie 情報を読み取ります
driver.manage().getCookies();
- ファイルを使用してクッキー情報を保存しますWriter 文字のストリームを書き込むクラス、 BufferedWriter Cookies.data という名前のファイルにテキストを書き込みます。
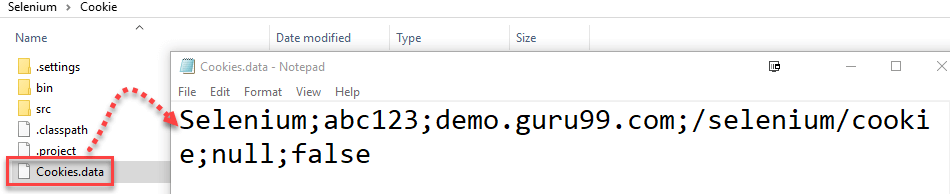
- Cookies.dataファイルには、クッキーの名前、値、ドメイン、パスといったすべてのクッキー情報が保存されています。この情報を取得することで、ログイン認証情報を入力せずにアプリケーションにログインできます。
上記のコードを実行すると、プロジェクトフォルダ構造内に Cookies.data ファイルが作成されます。このファイルを開くと、下のハイライトされた画面に示すように、テスト対象アプリケーション(AUT)のログイン認証情報が Cookie 形式で保存されていることが確認できます。
ステップ 2) 保存された Cookie を使用してアプリケーションにログインする
次に、ステップ1で生成されたクッキーにアクセスし、それを使用してアプリケーション内でのセッションを認証します。
package CookieExample;

import java.io.BufferedReader;
import java.io.File;
import java.io.FileReader;
import java.util.Date;
import java.util.StringTokenizer;
import org.openqa.selenium.Cookie;
import org.openqa.selenium.WebDriver;
import org.openqa.selenium.chrome.ChromeDriver;

public class CookieWrite
{

	public static void main(String[] args){
    	WebDriver driver;
       	System.setProperty("webdriver.chrome.driver","G://chromedriver.exe");
        driver=new ChromeDriver();
    try{

        File file = new File("Cookies.data");
        FileReader fileReader = new FileReader(file);
        BufferedReader Buffreader = new BufferedReader(fileReader);
        String strline;
        while((strline=Buffreader.readLine())!=null){
        StringTokenizer token = new StringTokenizer(strline,";");
        while(token.hasMoreTokens()){
        String name = token.nextToken();
        String value = token.nextToken();
        String domain = token.nextToken();
        String path = token.nextToken();
        Date expiry = null;

        String val;
        if(!(val=token.nextToken()).equals("null"))
		{
        	expiry = new Date(val);
        }
        Boolean isSecure = new Boolean(token.nextToken()).
        booleanValue();
        Cookie ck = new Cookie(name,value,domain,path,expiry,isSecure);
        System.out.println(ck);
        driver.manage().addCookie(ck); // This will add the stored cookie to your current session
        }
        }
        }catch(Exception ex){
        ex.printStackTrace();
        }
        driver.get("https://demo.guru99.com/test/cookie/selenium_aut.php");
}
	}
出力:ユーザーIDとパスワードを入力することなく、ログイン成功画面に直接移動します。
注:上記のスクリプトを実行した後、ログインページが表示された場合は、強制的にページを更新してください。
⚠️ Java 注意事項: リーダースクリプトでは、`new Boolean(String)` と `new Date(String)` を使用していますが、これらはどちらも JDK でずっと前に非推奨になりました。最新の JDK では、これに相当するのは `Boolean.parseBoolean(token.nextToken())` と `java.time` パーサーです。元の行は上記に残されていますので、注釈は編集ではなく、最新の代替コードとして扱ってください。
Cookie属性と Selenium クッキークラス
上記の2つのスクリプトは、6つのフィールドをファイルとの間でやり取りします。これらのフィールドは、org.openqa.selenium.Cookieクラスが公開するフィールドと全く同じであり、これらを把握することで、ステップ2のトークナイザーループがはるかに読みやすくなります。
| 属性 | アクセサー | その意味 |
|---|---|---|
| 名前 | getName() | サーバーが参照するキー。例えば、JSESSIONIDなど。 |
| 値 | getValue() | 保存されるデータ、通常はセッション識別子。 |
| ドメイン | getDomain() | ブラウザがクッキーを送信するホスト。 |
| パス | getPath() | その URL Cookieが適用される対象の接頭辞。 |
| 有効期限 | getExpiry() | クッキーの有効期限。値がnullの場合はセッションクッキーを意味します。 |
| セキュアー | isSecure() | CookieがHTTPS経由でのみ送信される場合に真となります。 |
| HTTPのみ | isHttpOnly() | 真の場合 Javaページ上のスクリプトはクッキーを読み取ることができません。 |
| 同じサイト | getSameSite() | 厳格、緩やか、またはなし。追加 Selenium 4. |
ステップ2で使用した6つの引数を持つコンストラクタではなく、現在のコードでは通常、内部のBuilderクラスを介してクッキーを作成します。これにより、必要なフィールドのみを設定できます。
Cookie sessionCookie = new Cookie.Builder("JSESSIONID", "A1B2C3D4")
        .domain("demo.guru99.com")
        .path("/")
        .isSecure(true)
        .isHttpOnly(true)
        .build();

driver.manage().addCookie(sessionCookie);
多くの人が見落としがちなルールが一つあります。それは、クッキーオブジェクトは作成後に編集できないということです。値を変更するには、古いクッキーを削除して、新しいコピーを追加する必要があります。だからこそ、ビルダーは非常に便利なのです。
Cookie original = driver.manage().getCookieNamed("JSESSIONID");
driver.manage().deleteCookie(original);

Cookie updated = new Cookie.Builder(original.getName(), "NEW-VALUE")
        .domain(original.getDomain())
        .path(original.getPath())
        .isSecure(original.isSecure())
        .build();

driver.manage().addCookie(updated);
一般的なクッキーエラー Selenium WebDriverとその修正方法
Cookieコードは、ごく限られた、予測可能な方法で不具合を起こす傾向があります。以下の表は、最も頻繁に報告される不具合とその原因、および解決策を示しています。
| 症状 | 原因となる | 修正する |
|---|---|---|
| InvalidCookieDomainException | addCookieはサイトにアクセスする前に呼び出されたため、ブラウザはまだabout:blankのままです。 | まず対象ドメインでdriver.getを呼び出し、次にクッキーを追加します。 |
| UnableToSetCookieException | Cookieのドメインが、現在読み込まれているページと一致しません。 | ドメインフィールドを削除するか、開いているページの正確なホスト名を設定してください。 |
| Cookieを追加した後もログインページが表示されます | このページは、クッキーが存在する前にレンダリングされました。 | 上記の注記にある「ハードリフレッシュ」とは、driver.navigate().refresh() を呼び出すことを意味します。 |
| getCookieNamed は null を返します | 名前のスペルが間違っているか、クッキーが別のパスまたはサブドメインに属しています。 | getCookiesを使ってすべてのクッキーをダンプし、名前を比較してください。 |
| 保存されたクッキーは、後続の実行時に拒否されます。 | 有効期限が切れたか、サーバーがセッションを終了しました。 | ステップ1を再度実行して、Cookies.dataを再生成してください。 |
ブラウザが開いて認証も正しく行われるが、その後スクリプトが失敗する場合は、おそらくクッキーが原因ではありません。 例外処理 Selenium そこから先はより速いルートで、専用の Firefox プロフィール セッションデータをファイルに頼らずに保持したい場合、これが一般的な代替手段となります。
