How to Download & Install SQLite on Windows
SQLite offers a lot of different installation packages, depending on your operating systems. It also offers a lot of APIs for a broad range of programming languages.
Download & Install SQLite Package Installer
Installation packages available for Windows 10 users:
From the SQLite official website in the download section. The following screenshot allows you to download different SQLite’s installation packages for Windows:
The command line shell program:
The highlighted download package is called the Command-Line Program (CLP). CLP is a command line application that let you access the SQLite database management system and all the features of the SQLite. Using CLP, you can create and manage the SQLite database. And it is the tool that we will use throughout the tutorial.
- 32-bit DLL(x86): The SQLite Database system core library for x86 platforms.
- 64-bit DLL (x64): The SQLite Database system core library for x64 platforms.
Installing the Command-Line Program (CLP) on your machine
In the following steps, you will find the steps for how to install the Command-Line Program (CLP) on your machine:
Step 1) Download the highlighted download package from the previous image to your PC. It is a “zip” file.
Step 2) Extract the zip file. You will find the “sqlite3.exe” in the extracted file as following:
Step 3) Open My Computer, and double-click the partition “C” to navigate to it:
Step 4) Create a new directory “sqlite“:
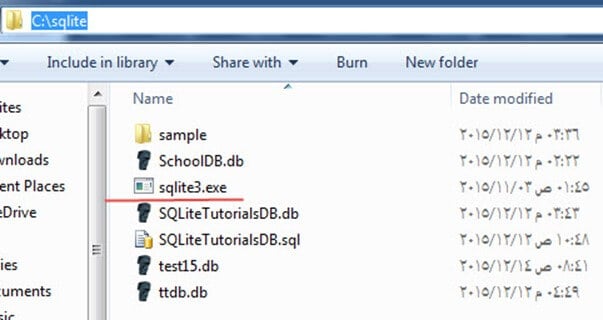
Step 5) Copy the file “sqlite3.exe” into it. This is what we will use through the tutorials to run SQLite queries:
However, there are some other packages for different purposes. They are not required. But you might need it if you are using a different OS than Windows you can get the Linux or Mac OS version of SQLite.
Also, you can get the documentation or source code from there if you wish. You can also get the API for Windows Phone 8 or .Net and other programming languages.
Here are some other different packages for different purposes:
- The Source Code and some alternative Source Code Formats – The complete source code that made up the SQLite.
- The documentation – The documentation of the SQLite as HTML pages. It is the same online documentation, but downloadable as HTML page so that you can open them offline.
- Precompiled Binaries for Linux.
- Precompiled Binaries for Mac OS X (x86).
- Precompiled Binaries for Windows Phone 8 – SDK and components to develop an application for Windows Phone 8 that uses SQLite databases.
- Precompiled Binaries for Windows Runtime – SDK and other components for developing an application to connect to SQLite databases for the Windows Runtime platforms.
- Precompiled Binaries for .NET – these are some set of DLLs and .NET libraries that you can use them from .NET application to connect to SQLite databases.
SQLite Studio – Manager and Administration
There are lots of SQLite management tools that make working with SQLite databases easier. Instead of creating and managing databases using a command line, these tools provide a set of GUI tools that let you create and manage the database.
The official SQLite website has dozens of such tools listed; you can view them from here: SQLite Management Tools. Here is the recommended one
SQLite Studio: It is a portable tool that doesn’t require an installation. It supports both SQLite3 and SQLite2. You can easily import and export data to various formats like CSV, HTML, PDF, JSON. Its open source and supports Unicode.
Introducing Sample database
In the following steps, we will create the sample database that we will use throughout the tutorials:
Step 1) Open a text file and paste the following commands into it:
CREATE TABLE [Departments] (
    [DepartmentId] INTEGER  NOT NULL PRIMARY KEY,
    [DepartmentName] NVARCHAR(50)  NULL
);
INSERT INTO Departments VALUES(1, 'IT');
INSERT INTO Departments VALUES(2, 'Physics');
INSERT INTO Departments VALUES(3, 'Arts');
INSERT INTO Departments VALUES(4, 'Math');

CREATE TABLE [Students] (
    [StudentId] INTEGER  PRIMARY KEY NOT NULL,
    [StudentName] NVARCHAR(50) NOT NULL,
    [DepartmentId] INTEGER  NULL,
    [DateOfBirth] DATE NULL,
    FOREIGN KEY(DepartmentId) REFERENCES Departments(DepartmentId)
);
INSERT INTO Students VALUES(1, 'Michael', 1, '1998-10-12');
INSERT INTO Students VALUES(2, 'John', 1, '1998-10-12');
INSERT INTO Students VALUES(3, 'Jack', 1, '1998-10-12');
INSERT INTO Students VALUES(4, 'Sara', 2, '1998-10-12');
INSERT INTO Students VALUES(5, 'Sally', 2, '1998-10-12');
INSERT INTO Students VALUES(6, 'Jena', NULL, '1998-10-12');
INSERT INTO Students VALUES(7, 'Nancy', 2, '1998-10-12');
INSERT INTO Students VALUES(8, 'Adam', 3, '1998-10-12');
INSERT INTO Students VALUES(9, 'Stevens', 3, '1998-10-12');
INSERT INTO Students VALUES(10, 'George', NULL, '1998-10-12');

CREATE TABLE [Tests] (
    [TestId] INTEGER NOT NULL PRIMARY KEY,
    [TestName] NVARCHAR(50) NOT NULL,
    [TestDate] DATE NULL
);
INSERT INTO [Tests] VALUES(1, 'Mid Term IT Exam', '2015-10-18');
INSERT INTO [Tests] VALUES(2, 'Mid Term Physics Exam', '2015-10-23');
INSERT INTO [Tests] VALUES(3, 'Mid Term Arts Exam', '2015-10-10');
INSERT INTO [Tests] VALUES(4, 'Mid Term Math Exam', '2015-10-15');

CREATE TABLE [Marks] (
    [MarkId] INTEGER NOT NULL PRIMARY KEY,
    [TestId] INTEGER NOT NULL,
    [StudentId] INTEGER  NOT NULL,
    [Mark] INTEGER  NULL,
    FOREIGN KEY(StudentId) REFERENCES Students(StudentId),
    FOREIGN KEY(TestId) REFERENCES Tests(TestId)
);

INSERT INTO Marks VALUES(1, 1, 1, 18);
INSERT INTO Marks VALUES(2, 1, 2, 20);
INSERT INTO Marks VALUES(3, 1, 3, 16);
INSERT INTO Marks VALUES(4, 2, 4, 19);
INSERT INTO Marks VALUES(5, 2, 5, 14);
INSERT INTO Marks VALUES(6, 2, 7, 20);
INSERT INTO Marks VALUES(7, 3, 8, 20);
INSERT INTO Marks VALUES(8, 3, 9, 20);
Step 2) Save the file as “TutorialsSampleDB.sql” in the following directory “C:\sqlite“.
Step 3) Open the Windows Command Line tool (cmd.exe) from the start menu, type “cmd” and open it.
Step 4) It will open in the default path, you need to navigate to the “C:\sqlite” folder we had created earlier in this tutorial by the following command “cd “C:\sqlite”:
Step 5) Write the following command,
sqlite3 TutorialsSampleDB.db < TutorialsSampleDB.sql
The command should be completed successfully, and you should see no output after that command as the following screenshot:
Step 6) You should now be able to see the database file “TutorialsSampleDB.db” created in the directory “C:\sqlite“:


